![]()
How to Install and Use Bluestacks on Ubuntu

Bluestacks is one of the most recommended Android Emulators currently available in the emulator market. This emulator supports almost every major Android-based application or game. Unfortunately, when it comes to platform support, Bluestack is not available for Linux users. Its builts are only available for Mac and Windows users.
However, if you are determined to use Bluestacks on Ubuntu, this post is right for you. It will cover a workaround for accessing Bluestacks on Ubuntu.
Table of Contents
Method 1: Install Bluestacks Inside Windows Virtual Machine
Since there is no support for Linux, you can simply install the Bluestacks by using Windows in a Virtual environment. This workaround will require good hardware because Virtual Box and Windows will need a lot of resources to run. This process of setting up a Virtual box, installing windows, and then setting up Bluestacks might look complex and a bit long for some users.
Before going into the steps, you must update and upgrade the system repositories. Run these two commands in your terminal:
sudo apt-get update
sudo apt-get upgrade
Step 1: Install and Set Up Virtual Box
After updating the system repositories, run the command below to install the Virtualbox:
sudo apt install virtualbox

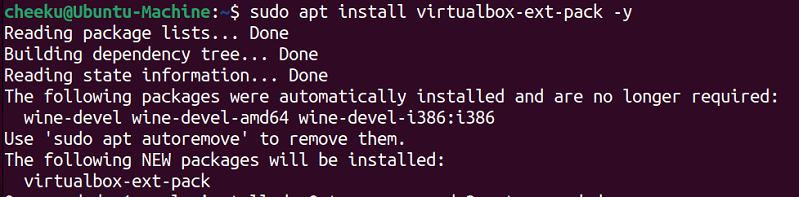
If you are asked with a prompt for permission, write “Y” and enter to continue the process. After you have completed the installation process of the virtual box now, you can install the extension pack for the virtual box to use more of its features like USB installation and remote control. Use this command to install the extension pack:
sudo apt install virtualbox-ext-pack -y
Once the installation is completed, a license window will appear where you have to scroll down to read the license and then use the arrow keys to select “OK” and press “Enter” to accept.
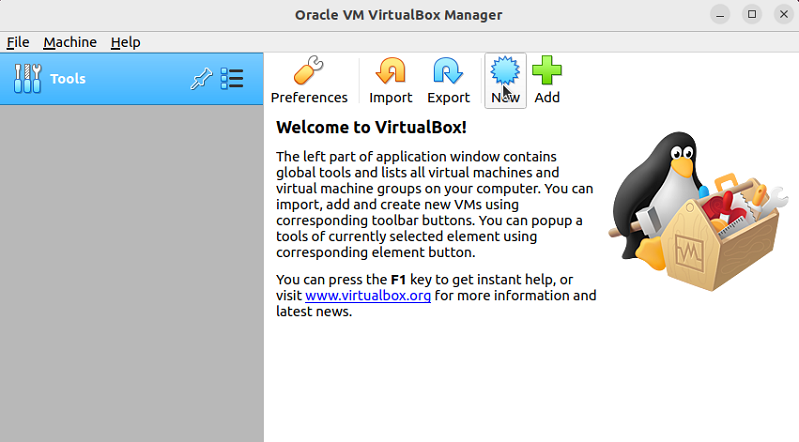
The virtual box is now installed on your Ubuntu system. You can use it by searching for the virtual box in your applications.
Step 2: Create and Configure Windows VM
In this next step, you will set up a Windows Virtual Machine in the Virtual Box you have just installed. Download the “Windows ISO” file from the official Windows site and set up the virtual machine to do this.
Launch the virtual box and click “New” to create a new virtual machine.
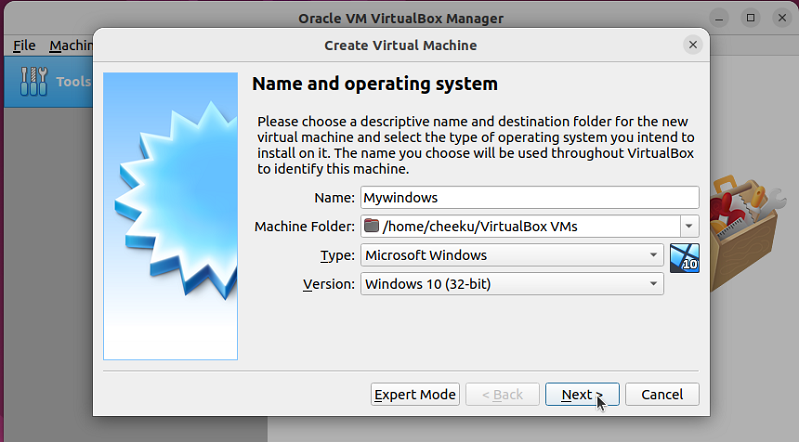
Give your Virtual Machine a name, select type “Microsoft Windows,” and select the version according to the ISO that you have downloaded. Finally, click on the “Next” button to move forward in the configuration wizard.
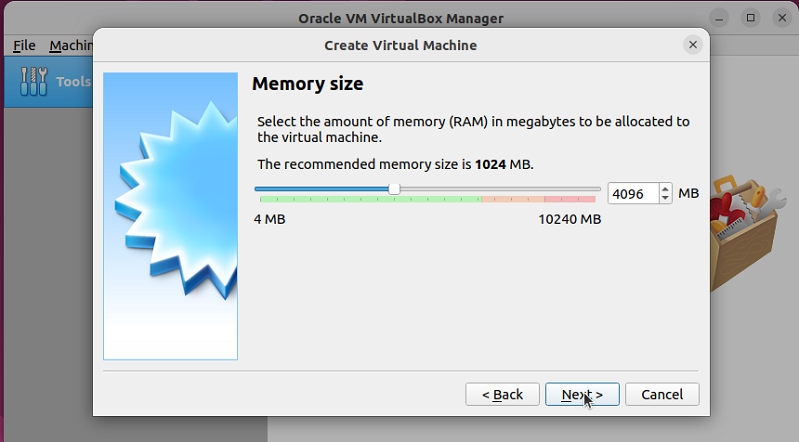
Allocate the Memory size and click “Next”. It is best to allocate at least 4GBs of RAM:
Select “Create a virtual hard drive” and click “Create”:
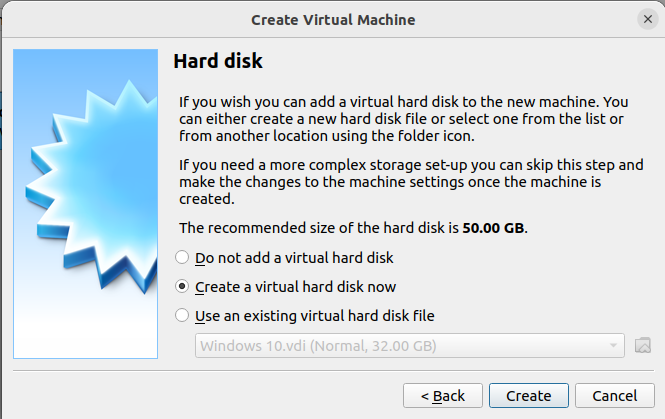
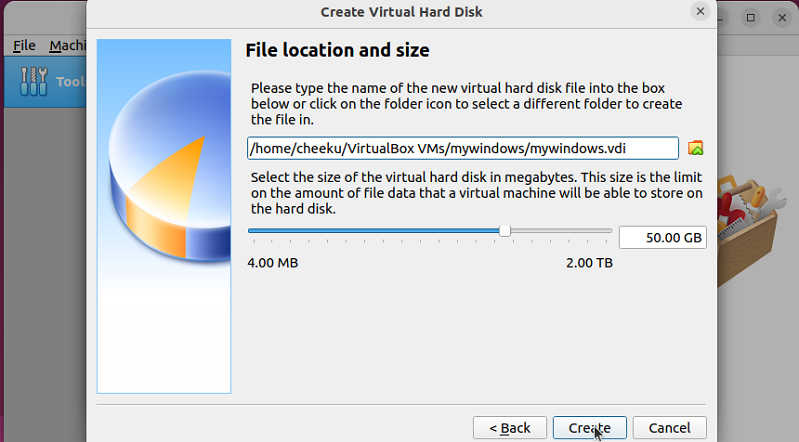
Select “VDI” and click “Next”. Select “Dynamically Allocated” on the next tab and click “Next”. Now allocate the hard drive space and click “Create.” For Windows VMs, it is recommended that at least 50GB of storage space be allocated.
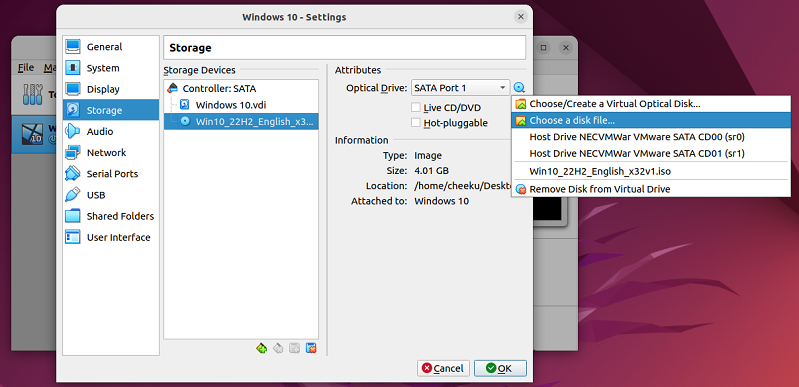
Your VM template is now configured. The next step is to mount the ISO file. To do this, open the settings, go to storage, and click on the CD icon to open settings; at the right-hand side, find “Optical Drive” and click on CD next to ID to add your “ISO” file location. After this, select “OK” to save the settings.
Now, simply Launch your machine and install Windows by following the Windows Installer.
Step 3: Download and Install Bluestacks
Once your virtual machine is loaded with Windows and ready to use, open the browser and download Bluestacks. And once you have successfully downloaded the blue stacks from the official site, run the installer you have downloaded and click “Install”
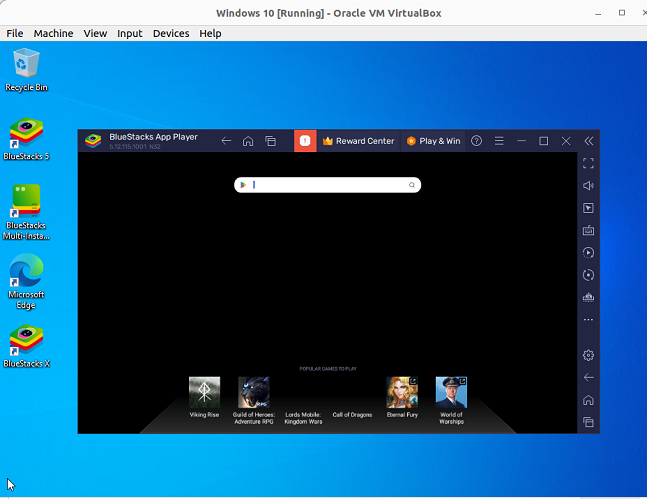
Bluestacks installer will download and install all the necessary files. Once the installation is done, you can use the Bluestacks on your virtual machine inside your Ubuntu.
Affordable VPS Hosting With Dracula Servers
Looking for reliable and budget-friendly Virtual Private Server (VPS) hosting? Look no further than Dracula Servers. Dracula Servers offers a range of VPS hosting plans tailored to meet diverse needs. With competitive pricing, robust performance, and a user-friendly interface, it’s an excellent choice for individuals and businesses alike.
Explore the Dracula Servers website to discover hosting solutions that align with your requirements and take your online presence to new heights with their affordable and efficient VPS hosting services.
Visit Dracula Servers and experience reliable VPS hosting without breaking the bank.
Method 2: Install Bluestack Using Wine
Wine is a tool that enables Windows-based application usage on Linux-based systems. Wine has its own repository of Windows applications capable of working with Wine. These applications are further divided into categories based on perfectly running applications and applications having basic features only.
Step 1: Check and Add System Architecture
To check the system architecture, use this command:
uname -p
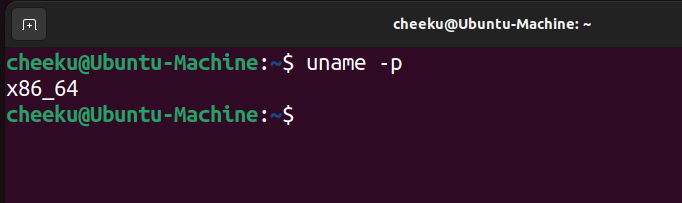
If your system architecture is X84_64 (32bit), then you can continue to the next step. But if your system is X64, then execute this command to enable 32 bit system architecture:
sudo dpkg --add-architecture i386
Step 2: Download the Public key for the Wine repository
The public key will enable your system to have a secure connection to the Wine Library. To download the public key for the wine repository, use the following command:
wget -nc https://dl.winehq.org/wine-builds/winehq.key
Step 3: Add the key to your system
After that, run the following command to add the key to your system-allowed key list.
sudo apt-key add winehq.key
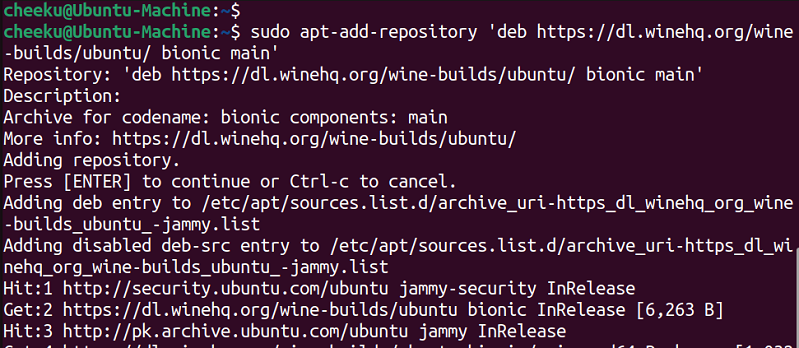
Step 4: Add the Repository to Ubuntu
By running the following command, Wine will be added to your system repository:
sudo apt-add-repository 'deb https://dl.winehq.org/wine-builds/ubuntu/ bionic main'
Step 5: Install Wine
At this point, you are ready to install Wine on your Ubuntu System. To do this, simply type the following command inside a terminal session:
sudo apt install --install-recommends winehq-stable
The above command installs the stable version of Wine. However, if you want to install the latest developer release, you can use this command instead:
sudo apt install --install-recommends winehq-devel
 Once the installation process has completed, you can verify that the wine has been successfully installed onto your Ubuntu system by running the following command inside a terminal:
wine --version

Note: In case you get yellow errors while using the APT command, download the missing dependencies and libraries mentioned in the error.
Step 6: Configure Wine
After the successful installation of Wine, you can now configure it so it can be used. To configure the Wine, you can use this command:
winecfg
As soon as you hit enter, a pop-up window will appear asking for the Mono installer. Click install, and after that, another pop-up will appear asking you to install the Geko installer. Once both of these are installed, your wine is configured for use.
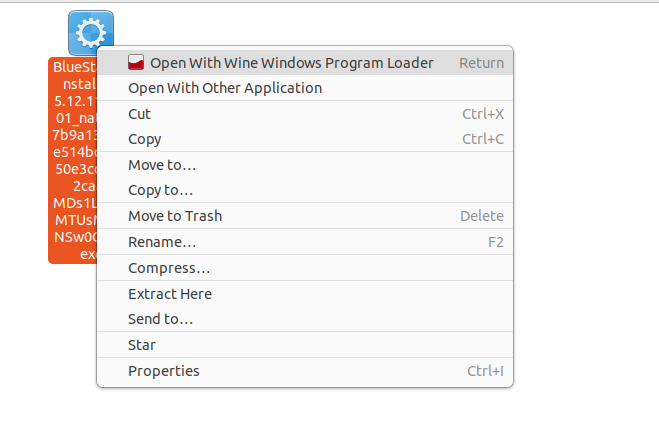
Step 7: Installing the Bluestacks Application
To install Bluestacks using Wine, you will have to download the installation file. For that, head over to the official Bluestacks website and click on the download button. Once you have the installation file, right-click on it and choose “open it with another program”. From the list, select “Wine windows program loader”, and run the file.
Wine will automatically start the installation process, therefore simply wait for the installation to complete. After that, you can locate BlueStacks in applications and run it by simply double-clicking it.

You have successfully installed Bluestacks on Ubuntu using Wine.
Wrap up
As discussed above, Bluestacks is not officially available for Linux systems, but workarounds are available and discussed in this post. However, the workarounds are lengthy and less reliable than the original app. It is better to use Bluestacks alternatives such as Anbox, GenyMotion, AndroVm, Android SDK, and others.
Check out More Linux Tutorials Here!
Subscribe
Login
0 Comments
Oldest