![]()
Install & Configure FreeRADIUS on CentOS 7 with MySQL / MariaDB

What is FreeRADIUS?
FreeRADIUS is the most popular open-source RADIUS server. It supports all common authentication protocols and supplies the AAA protocol ( Authentication, Authorization and Accounting ) for many companies around the world, including many Fortune-500 companies.
It was developed in the dial-up era and used to manage users and keep track of bandwidth usage for billing purposes, however it is still going strong and used by a great deal of companies to this day. It’s commonly used with networking software such as OpenVPN, SoftEther, Squid Proxies and WiFi managing tools.
NOTE: If you’d like to set up FreeRADIUS on an Ubuntu 18.04 machine, visit our other tutorial Install and Configure FreeRADIUS on Ubuntu 18.04 with MySQL
Installing FreeRADIUS on CentOS 8: For an updated and more detailed guide (with Video) for installing FreeRADIUS on CentOS 8, you can check out Install FreeRADIUS & daloRADIUS on CentOS 8 + MySQL/MariaDB on ByteXD.com.
Table of Contents
- What is FreeRADIUS?
- How to set up a RADIUS server?
- Method 1 — The Easy Way – 5 minutes
- Method 2 — The Hard Way
- Step 1 – Install FreeRADIUS & Additional Modules on CentOS 7
- Step 2 – Install & Configure MariaDB 10 on CentOS 7
- Step 3 – Install PHP 7 on CentOS 7
- Step 4 – Configure FreeRADIUS to use MariaDB/MySQL
- Step 5 – GUI WebPanel
- Step 6 – Create a NAS Client & User
- Step 7 – Testing with NTRadPing
- Step 8 – Conclusion
How to set up a RADIUS server?
We present 2 methods of setting up FreeRADIUS:
1. The hard way: Manually setting it up by connecting to your machine via SSH, as well as configuring it and troubleshooting. Depending on your end goal, this can take from 30 if you know what you’re doing, to several hours if you’re just getting started.
2. The easy way: Deploying a server with FreeRADIUS + daloRADIUS + phpMyAdmin installed out of the box in just a few minutes. You can do this by ordering our FreeRADIUS VPS that comes with the software installed and also offers you the possibility to also order priority support, so you’ll have our assistance with any RADIUS related issue you have going forward. To proceed, check out our FreeRADIUS Server Plans.
Method 1 — The Easy Way – 5 minutes
Should you be pressed for time and need to deploy RADIUS servers fast and troubleshoot problems quickly, your best option may be an out of the box solution. As mentioned, you can also upgrade your service to receive Priority Support, should you find yourself tackling complex problems. To order, proceed to our FreeRADIUS VPS Plans.
Pre-Installed FreeRADIUS Servers
Automatic FreeRADIUS 3 + daloRADIUS Set Up
Instantly deploy machines with FreeRADIUS + MySQL + daloRADIUS GUI Panel already set up, receive the credentials and take over from there! You also get our custom WHMCS Module to help you manage it from our dashboard.
Pick one of our FreeRADIUS KVM plans
P.S. We're available for hire, if you need help. Click here to contact us.
Method 2 — The Hard Way
Prefer to do it yourself? Then this is the way to go. Moving forward, we’ll install FreeRADIUS along with daloRADIUS on a machine running a fresh installation of CentOS 7.
Step 1 – Install FreeRADIUS & Additional Modules on CentOS 7
Run the following command to update the system’s package index:
$ sudo yum -y updateWe want to install the following packages:
- freeradius
- freeradius-utils
- freeradius-mysql
- freeradius-perl
We normally can install the above mentioned packages from the CentOS YUM repository.
With the following line we’ll perform a quick search for all the available freeRADIUS packages, to make sure they’re available:
$ sudo yum search all freeradiusThe output should look something like this:
Loaded plugins: fastestmirror
Loading mirror speeds from cached hostfile
 * base: ftpmirror.your.org
 * epel: mirror.layeronline.com
 * extras: ftpmirror.your.org
 * updates: ftpmirror.your.org
============================================================================================================ Matched: freeradius =============================================================================================================
freeradius-devel.i686 : FreeRADIUS development files
freeradius-devel.x86_64 : FreeRADIUS development files
freeradius-doc.x86_64 : FreeRADIUS documentation
freeradius-krb5.x86_64 : Kerberos 5 support for freeradius
freeradius-ldap.x86_64 : LDAP support for freeradius
freeradius-mysql.x86_64 : MySQL support for freeradius
freeradius-perl.x86_64 : Perl support for freeradius
freeradius-postgresql.x86_64 : Postgresql support for freeradius
freeradius-python.x86_64 : Python support for freeradius
freeradius-sqlite.x86_64 : SQLite support for freeradius
freeradius-unixODBC.x86_64 : Unix ODBC support for freeradius
freeradius-utils.x86_64 : FreeRADIUS utilities
freeradius.x86_64 : High-performance and highly configurable free RADIUS server
radcli-compat-devel.x86_64 : Development files for compatibility with radiusclient-ng and freeradius-client
pam_radius.x86_64 : PAM Module for RADIUS Authentication
radcli.x86_64 : RADIUS protocol client library
Looking through the output we can see the packages we want to install are available so we can go through with the installation.
freeradius.x86_64 : High-performance and highly configurable free RADIUS server
freeradius-utils.x86_64 : FreeRADIUS utilities
freeradius-mysql.x86_64 : MySQL support for freeradius
freeradius-perl.x86_64 : Perl support for freeradius
With the following line we’ll install freeradius, freeradius-utils, freeradius-mysql and freeradius-perl:
$ sudo yum -y install freeradius freeradius-utils freeradius-mysql freeradius-perl After the installation’s finished, start and enable freeRADIUS so it’s running and so it also starts up on boot:
$ systemctl start radiusd.service
$ systemctl enable radiusd.service
Output for enable radiusd.service:
Created symlink from /etc/systemd/system/multi-user.target.wants/radiusd.service to /usr/lib/systemd/system/radiusd.service.Check the status of radiusd.service:
$ systemctl status radiusd.serviceOutput:
● radiusd.service - FreeRADIUS high performance RADIUS server.
   Loaded: loaded (/usr/lib/systemd/system/radiusd.service; enabled; vendor preset: disabled)
   Active: active (running) since Sat 2019-05-04 15:28:42 UTC; 1min 8s ago
 Main PID: 1687 (radiusd)
   CGroup: /system.slice/radiusd.service
           └─1687 /usr/sbin/radiusd -d /etc/raddb

May 04 15:28:42 dracula_backup systemd[1]: Starting FreeRADIUS high performance RADIUS.....
May 04 15:28:42 dracula_backup systemd[1]: Started FreeRADIUS high performance RADIUS .....
Hint: Some lines were ellipsized, use -l to show in full.
Configure CentOS 7 Firewall for freeRADIUS
We’ll configure firewalld to allow radius and httpd packets.
RADIUS server uses UDP ports 1812 and 1813. You can check this by issuing the following command:
$ cat /usr/lib/firewalld/services/radius.xmlOutput:
  RADIUS
  The Remote Authentication Dial In User Service (RADIUS) is a protocol for user authentication over networks. It is mostly used for modem, DSL or wireless user authentication. If you plan to provide a RADIUS service (e.g. with freeradius), enable this option.
- Start, enable firewalld and check it’s status
$ systemctl enable firewalld
$ systemctl start firewalld
$ systemctl status firewalld
Output of status check:
● firewalld.service - firewalld - dynamic firewall daemon Loaded: loaded (/usr/lib/systemd/system/firewalld.service; enabled; vendor preset: enabled) Active: active (running) since Sat 2019-05-04 13:39:12 UTC; 8h ago Docs: man:firewalld(1) Main PID: 1775 (firewalld) CGroup: /system.slice/firewalld.service └─1775 /usr/bin/python -Es /usr/sbin/firewalld --nofork --nopid May 04 13:39:10 guest systemd[1]: Starting firewalld - dynamic firewall daemon... May 04 13:39:12 guest systemd[1]: Started firewalld - dynamic firewall daemon. - Check to make sure firewalld is running
$ firewall-cmd --state running - Create permanent rules to default zone to allow
http,httpsandradiusservices$ firewall-cmd --add-service={http,https,radius} --permanent - Reload firewalld for the changes to take effect
$ firewall-cmd --reload - Confirm that the services were successfully added to default zone
$ firewall-cmd --get-default-zone
public

$ firewall-cmd --list-services --zone=public
dhcpv6-client http https radius ssh
The services that we just allowed (
http,https&radius) are all listed in the output, which means we can proceed.
Test RADIUS Server
We’ll test the RADIUS server in debug mode, which means we’ll have to run the service. The problem is that the server’s already running from earlier, and running in debug mode will fail to bind ports, as such we’ll have to kill the radius service first:
$ pkill radiusNow run the RADIUS server in debug mode to check if everything’s working:
$ radiusd -XYou should see a long output ending in:
Listening on auth address 127.0.0.1 port 18120 bound to server inner-tunnel
Listening on auth address * port 1812 bound to server default
Listening on acct address * port 1813 bound to server default
Listening on auth address :: port 1812 bound to server default
Listening on acct address :: port 1813 bound to server default
Listening on proxy address * port 57424
Listening on proxy address :: port 44958
Ready to process requests
The basic installation of FreeRADIUS seems to have been successful.
Now we’ll proceed with configuring our RADIUS server to use MariaDB or MySQL ( depending on which you prefer ).
Step 2 – Install & Configure MariaDB 10 on CentOS 7
NOTE: MariaDB 5.5 is the default database engine in CentOS at the time of writing. Installing MySQL should be somewhat similar. Should you want us to add instructions for MySQL, then just hit us up and we’ll add in the instructions for MySQL.
MariaDB 10 is not the default version on CentOS, as such we’ll add the official MariaDB repositories to our system.
Create a new file, we’ll call it /etc/yum.repos.d/MariaDB.repo using your favorite text editor:
$ nano /etc/yum.repos.d/MariaDB.repoAdd the following content to it, and save and exit the file when you’re done:
[mariadb]
name = MariaDB
baseurl = http://yum.mariadb.org/10.1/centos7-amd64
gpgkey=https://yum.mariadb.org/RPM-GPG-KEY-MariaDB
gpgcheck=1
Update the package index:
$ yum -y updateAnd install MariaDB:
$ yum install -y mariadb-server mariadbAfter the installation is finished, start MariaDB and enable it so it runs on boot:
$ systemctl start mariadb
$ systemctl enable mariadb
Check to make sure it’s running and enabled:
$ systemctl status mariadb
$ systemctl is-enabled mariadb.service
enabled
Securing MariaDB / MySQL
MariaDB/MySQL comes with a script that helps you conveniently secure it and remove some insecure defaults. Some important things it allows you to do:
- set the root password
- remove anonymous users
- disallow remote login
Run it with the following command and you’ll be guided through the process.
$ mysql_secure_installationWe recommend you proceed as follows:
Enter current password for root (enter for none): ENTER
Set root password? [Y/n] y
New password: Enter password
Re-enter new password: Repeat password
You’ll also be prompted to answer some questions to remove/keep some defaults:
Remove anonymous users? [Y/n]: Y
Disallow root login remotely? [Y/n]: Y
Remove test database and access to it? [Y/n]: Y
Reload privilege tables now? [Y/n]: Y
Step 3 – Install PHP 7 on CentOS 7
CentOS 7 ships with PHP 5.4 at the time of writing, which has been officially EOL for some time.
By using PHP 7 applications will load faster and use up less resources.
PHP 7.x is available from various repositories. For our purposes, we’ll use the Remi Repository, which provides newer versions of applications.
The Remi Repository depends on the EPEL repository. With the following line we’ll add both EPEL and Remi:
$ sudo yum install epel-release yum-utils
$ sudo yum install http://rpms.remirepo.net/enterprise/remi-release-7.rpm
We’ll install PHP 7.3, which is the latest stable release at the time of writing.
Enable the PHP 7.3 Remi repository:
$ sudo yum-config-manager --enable remi-php73And run the following command to install PHP 7.3 along with some of the most common PHP modules:
$ sudo yum install php php-common php-opcache php-mcrypt php-cli php-gd php-curl php-mysqlndYou may be asked during the installation if you’re ok with importing a GPG Key. Answer y and hit enter.
With the following command we can check the PHP version, to make sure the installation was successful:
$ php -vStep 4 – Configure FreeRADIUS to use MariaDB/MySQL
To configure FreeRADIUS to use MariaDB / MySQL, we’ll have to create a database with tables to be used by the FreeRADIUS server for finding RADIUS users and to store accounting data.
The FreeRADIUS MySQL package ships with the necessary query to create these tables, making our job a lot easier.
To begin, we’ll log into MariaDB or MySQL and create and configure a database that we’ll call radius:
$ mysql -u root -pEnter your password at the prompt.
Once you’re logged in, run the following commands to create and configure the database:
MariaDB [(none)]> CREATE DATABASE radius;
MariaDB [(none)]> GRANT ALL ON radius.* TO radius@localhost IDENTIFIED BY "radiuspassword";
MariaDB [(none)]> FLUSH PRIVILEGES;
MariaDB [(none)]> quit;
Next import the RADIUS database scheme to populate the radius database:
$ mysql -uroot -pYOUR_PASSWORD radius < /etc/raddb/mods-config/sql/main/mysql/schema.sqlAnd create a soft link for SQL under /etc/raddb/mods-enabled:
$ ln -s /etc/raddb/mods-available/sql /etc/raddb/mods-enabled/Now we’ll configure the freeRADIUS server to use the database server. Do this by opening the configuration file /raddb/mods-available/sql using your favorite text editor:
$ nano /etc/raddb/mods-available/sqlThe sql section should look something like the following, although yours will be a longer document due to explanations and other lines that are commented out.
sql {

driver = "rlm_sql_mysql"
dialect = "mysql"

# Connection info:

server = "localhost"
port = 3306
login = "radius"
password = "radiuspassword"

# Database table configuration for everything except Oracle

radius_db = "radius"
}

# Set to ‘yes’ to read radius clients from the database (‘nas’ table)
# Clients will ONLY be read on server startup.
read_clients = yes

# Table to keep radius client info
client_table = “nas”
The steps to follow here are:
- Change
driver = "rlm_sql_null"todriver = "rlm_sql_mysql" - Change
dialect = "sqlite"todialect = "mysql" - Uncomment
server,port,loginandpasswordby removing#from the beginning of the line, as well as changingpassword = "radpass"topassword = "radiuspassword".To exemplify, here is how the lines look initially:# server = "localhost" # port = 3306 # login = "radius" # password = "radpass"And here is how they look after:
server = "localhost" port = 3306 login = "radius" password = "radiuspassword" - Uncomment the
read_clients = yesline, by removing the#at the beginning of the line. - The other lines should be already set up according to our needs, so you can save and close the file when you’re done. ( You can check to make sure that everything’s in order, however )
Finally, change the group rights of /etc/raddb/mods-enabled/sql to radiusd:
$ chgrp -h radiusd /etc/raddb/mods-enabled/sqlNow let’s run FreeRADIUS in debug mode again, since we’ve made some changes.
If the RADIUS server is running, first kill the deamon:
pkill radiusdAnd run the server in debug mode:
radiusd -XOutput:
Listening on auth address 127.0.0.1 port 18120 bound to server inner-tunnel
Listening on auth address * port 1812 bound to server default
Listening on acct address * port 1813 bound to server default
Listening on auth address :: port 1812 bound to server default
Listening on acct address :: port 1813 bound to server default
Listening on proxy address * port 59387
Listening on proxy address :: port 51874
Ready to process requests
Step 5 – GUI WebPanel
There are a few freeRADIUS web panels available for easier user creation and management. We’re currently using daloRADIUS. You can follow our tutorial to installing daloRADIUS WebPanel on a RADIUS server on CentOS 7, and then return to this page.
NOTE: Should you be looking for a ready-made solution complete with FreeRADIUS + daloRADIUS installed, we offer FreeRADIUS Servers that you can deploy in a few minutes. Additionally you can opt, any time after you’ve ordered, for priority support which ensures you get help when you encounter issues.
Step 6 – Create a NAS Client & User
For other computers to connect to the RADIUS server, they need to be added to the NAS client table in the RADIUS database.
First we need to add the NAS. Do this in daloRADIUS by navigating to Management > Nas > New Nas.

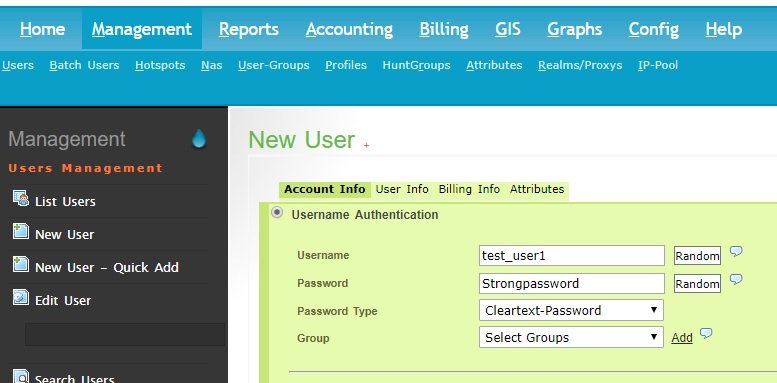
After adding the NAS, you can add new Users in daloRADIUS by going to Management > Users > New Users.
There are more attributes that you can set to users and user groups, however that is beyond the scope of this tutorial.
Now that we’ve added a new NAS and new User, we should test them. Every time a new NAS is added, you’ll need to reload FreeRADIUS so it fetches the refreshed table. To test that everything is OK, stop the freeradius server and start it in debug mode and move on to the next step.
First we’ll kill the daemon:
$ pkill radiusdAnd start it in debug mode:
$ radiusd -XStep 7 – Testing with NTRadPing
A great tool we can use to test our radius servers is NTRadPing. You can download it here: ntradping.
Unzip and run the executable, and in fill out the fields with the credentials you created earlier when adding the new NAS and new User. Here’s how we fill it, according to the credentials we created in this tutorial. Also keep in mind that RADIUS users port 1812, so that’s the port you want to fill in.
RADIUS Server/port: your_server_ip / 1812
RADIUS Secret Key: strongsecret!
Password: Strongpassword
And check the CHAP checkbox.
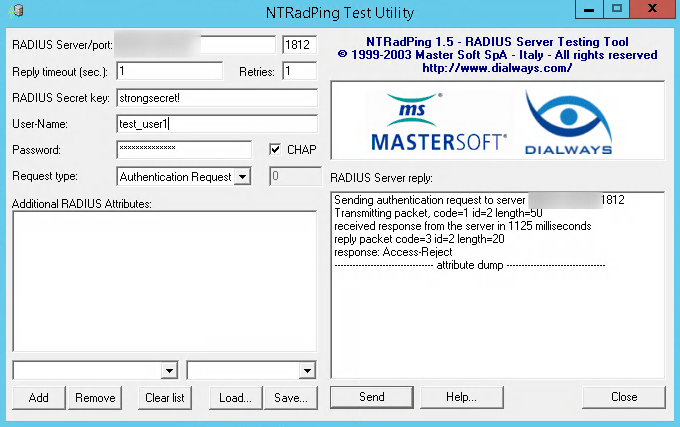
Now click Send and you should receive a reply that looks something like this:
Sending authentication request to server xx.xx.xx.xx.:1812
transmiting Packet, code=1 id=2 length=50
recieved response from the server in 145 milliseconds
replay packet code=3 id=2 length=20
response: Access-Accept
-------------------attribute dump------------------
The output for FreeRADIUS debug mode when a user is successfully authenticated should look something like this:
(0) sql: SQL-User-Name set to 'test_user1'
(0) sql: EXPAND INSERT INTO radpostauth (username, pass, reply, authdate) VALUES ( '%{SQL-User-Name}', '%{%{User-Password}:-%{Chap-Password}}', '%{reply:Packet-Type}', '%S')
(0) sql:    --> INSERT INTO radpostauth (username, pass, reply, authdate) VALUES ( 'test_user1', '0x61a8a6390c46259cf64b56697fd5d78ad5', 'Access-Accept', '2019-05-06 19:00:56.660290')
(0) sql: Executing query: INSERT INTO radpostauth (username, pass, reply, authdate) VALUES ( 'test_user1', '0x61a8a6390c46259cf64b56697fd5d78ad5', 'Access-Accept', '2019-05-06 19:00:56.660290')
(0) sql: SQL query returned: success
(0) sql: 1 record(s) updated
rlm_sql (sql): Released connection (6)
(0)     [sql] = ok
(0)     [exec] = noop
(0)     policy remove_reply_message_if_eap {
(0)       if (&reply:EAP-Message && &reply:Reply-Message) {
(0)       if (&reply:EAP-Message && &reply:Reply-Message)  -> FALSE
(0)       else {
(0)         [noop] = noop
(0)       } # else = noop
(0)     } # policy remove_reply_message_if_eap = noop
(0)   } # post-auth = ok
(0) Sent Access-Accept Id 3 from 108.61.203.68:1812 to 213.136.66.127:56372 length 0
(0) Finished request
Waking up in 4.9 seconds.
(0) Cleaning up request packet ID 3 with timestamp +6110
Ready to process requests
Step 8 – Conclusion
If you’ve made it this far then you should have your FreeRADIUS server up and running with daloRADIUS WebPanel on a CentOS 7 machine. Well done.
Should you have issues with setting up RADIUS servers, then do keep in mind that we offer a solution for deploying instant FreeRADIUS Servers.
Our servers come with FreeRADIUS + daloRADIUS + phpMyAdmin readily installed, and you can have them up in minutes! Additionally, you can opt for our Professional Support addon at a later time, should you find yourself needing priority support when things get more complex. To find out more info, please check our FreeRADIUS Servers Offer.
Additional tutorials you may be interested in:
- Creating Radius Profiles with Bandwidth Limits
- If you prefer to use FreeRADIUS on Ubuntu 18.04, then check out our tutorial on installing FreeRADIUS with MySQL on Ubuntu 18.04
Pre-Installed FreeRADIUS Servers
Automatic FreeRADIUS 3 + daloRADIUS Set Up
Instantly deploy machines with FreeRADIUS + MySQL + daloRADIUS GUI Panel already set up, receive the credentials and take over from there! You also get our custom WHMCS Module to help you manage it from our dashboard.
Pick one of our FreeRADIUS KVM plans
P.S. We're available for hire, if you need help. Click here to contact us.
Hello,
Thanks for your tutorial. Radius Authentication seems to be fine, but Accounting is failed with the following error:
(12) sql: ERROR: rlm_sql_mysql: ERROR 1054 (Unknown column ‘acctupdatetime’ in ‘field list’): 42S22
How can I update this table to mysql?
Thank you.
Hi @disqus_o69XlopMSJ:disqus
I suspect this may be because the radacct table doesn’t have the acctupdatetime column.
Could you try adding the fields acctupdatetime and acctinterval to the radacct table and see if that fixes the issue?
Hello,
Thanks a lot for your prompt response. Do you mean the radacct in which file? If i check the schema.sql file, I see it is there:
sudo vi /etc/raddb/mods-config/sql/main/mysql/schema.sql
CREATE TABLE radacct (
radacctid bigint(21) NOT NULL auto_increment,
acctsessionid varchar(64) NOT NULL default ”,
acctuniqueid varchar(32) NOT NULL default ”,
username varchar(64) NOT NULL default ”,
groupname varchar(64) NOT NULL default ”,
realm varchar(64) default ”,
nasipaddress varchar(15) NOT NULL default ”,
nasportid varchar(15) default NULL,
nasporttype varchar(32) default NULL,
acctstarttime datetime NULL default NULL,
acctupdatetime datetime NULL default NULL,
acctinterval int(12) default NULL,
…
any update @draculaservers:disqus ?
Apologies for the delay.
I was thinking that maybe even though those fields appear in the schema.sql file, maybe they aren’t added into your radacct MySQL table so you could try adding it manually.
Can you try logging into MySQL:
mysql -u root -p[enter password at the prompt]
Once logged in select the radius database:
use radius;And add the columns to the radacct table:
ALTER TABLE radacct ADD COLUMN acctinterval int(12) default NULL;ALTER TABLE radacct ADD COLUMN acctupdatetime datetime NULL default NULL;
And exit the MySQL console.
I checked out the fields in the radacct table and I can confirm acctupdatetime and acctinterval don’t show up.
MariaDB [radius]> describe radacct;+----------------------+-------------+------+-----+---------+----------------+
| Field | Type | Null | Key | Default | Extra |
+----------------------+-------------+------+-----+---------+----------------+
| radacctid | bigint(21) | NO | PRI | NULL | auto_increment |
| acctsessionid | varchar(64) | NO | MUL | | |
| acctuniqueid | varchar(32) | NO | MUL | | |
| username | varchar(64) | NO | MUL | | |
| groupname | varchar(64) | NO | | | |
| realm | varchar(64) | YES | | | |
| nasipaddress | varchar(15) | NO | MUL | | |
| nasportid | varchar(15) | YES | | NULL | |
| nasporttype | varchar(32) | YES | | NULL | |
| acctstarttime | datetime | YES | MUL | NULL | |
| acctstoptime | datetime | YES | MUL | NULL | |
| acctsessiontime | int(12) | YES | MUL | NULL | |
| acctauthentic | varchar(32) | YES | | NULL | |
| connectinfo_start | varchar(50) | YES | | NULL | |
| connectinfo_stop | varchar(50) | YES | | NULL | |
| acctinputoctets | bigint(20) | YES | | NULL | |
| acctoutputoctets | bigint(20) | YES | | NULL | |
| calledstationid | varchar(50) | NO | | | |
| callingstationid | varchar(50) | NO | | | |
| acctterminatecause | varchar(32) | NO | | | |
| servicetype | varchar(32) | YES | | NULL | |
| framedprotocol | varchar(32) | YES | | NULL | |
| framedipaddress | varchar(15) | NO | MUL | | |
| acctstartdelay | int(12) | YES | | NULL | |
| acctstopdelay | int(12) | YES | | NULL | |
| xascendsessionsvrkey | varchar(10) | YES | | NULL | |
+----------------------+-------------+------+-----+---------+----------------+
26 rows in set (0.002 sec)
Thanks a lot for your prompt reply.
Indeed I confirm that Accounting is now working fine after adding manually it to MySQL 🙂
Thanks a lot!
Our pleasure! We’re very happy we could be of service!
Hi i need some help here if anyone can help me i dont knoow why i have this error
including dictionary file /usr/share/freeradius/dictionary
including dictionary file /usr/share/freeradius/dictionary.dhcp
including dictionary file /usr/share/freeradius/dictionary.vqp
including dictionary file /etc/raddb/dictionary
including configuration file /etc/raddb/radiusd.conf
Unable to open file “/etc/raddb/radiusd.conf”: Permission denied
Errors reading or parsing /etc/raddb/radiusd.conf
and i dont know the url to enter radius plz help me i need smoe hlelp haha
Hi i need some help here if anyone can help me i dont knoow why i have this error
including dictionary file /usr/share/freeradius/dictionary
including dictionary file /usr/share/freeradius/dictionary.dhcp
including dictionary file /usr/share/freeradius/dictionary.vqp
including dictionary file /etc/raddb/dictionary
including configuration file /etc/raddb/radiusd.conf
Unable to open file “/etc/raddb/radiusd.conf”: Permission denied
Errors reading or parsing /etc/raddb/radiusd.conf
and i dont know the url to enter radius plz help me i need smoe hlelp hahaa
I get this error “permission denied” when run $ mysql -uroot -pYOUR_PASSWORD radius < /etc/raddb/mods-config/sql/main/mysql/schema.sql How to fix it?
Hi i need some help here if anyone can help me i dont knoow why i have this error
including dictionary file /usr/share/freeradius/dictionary
including dictionary file /usr/share/freeradius/dictionary.dhcp
including dictionary file /usr/share/freeradius/dictionary.vqp
including dictionary file /etc/raddb/dictionary
including configuration file /etc/raddb/radiusd.conf
Unable to open file “/etc/raddb/radiusd.conf”: Permission denied
Errors reading or parsing /etc/raddb/radiusd.conf
and i dont know the url to enter radius plz help me i need smoe hlelp hahaa
rlm_sql (sql): Opening additional connection (0), 1 of 32 pending slots used
rlm_sql_mysql: Starting connect to MySQL server
rlm_sql_mysql: Couldn’t connect to MySQL server @:radius
rlm_sql_mysql: MySQL error: Access denied for user ‘root’@’localhost’ (using password: NO)
rlm_sql_mysql: Socket destructor called, closing socket
rlm_sql (sql): Opening connection failed (0)
rlm_sql (sql): Removing connection pool
/etc/raddb/mods-enabled/sql[20]: Instantiation failed for module “sql”
help me bro
i get this error when running radius in debug mode
rlm_sql (sql): rlm_sql_mysql: ERROR 1146 (Table ‘radius.nas’ doesn’t exist): 42S02
Failed to load clients from SQL
/etc/raddb/mods-enabled/sql[20]: Instantiation failed for module “sql”
Guys, has anyone of you experience with the following error message. As also with the solution to solve this error message?
Failed binding to auth address * port 1812 bound to server default: Address already in use
/etc/raddb/sites-enabled/default[59]: Error binding to port for 0.0.0.0 port 1812
Best regards,
Kenan Ozdemir