![]()
How to Install & Configure CyberPanel and Create a WordPress Website
Introduction
In this tutorial we’ll cover installing CyberPanel on an Ubuntu 20.04 remote server, we will configure some of CyberPanel’s options, and we’ll finally use it to set up a WordPress website.
What is CyberPanel?
CyberPanel is a free and open-source web hosting panel that uses OpenLiteSpeed as a web server. It’s in active development and has been steadily rising in popularity, along with OpenLiteSpeed.
CyberPanel makes it easy for you to set up websites powered by OpenLiteSpeed web server or LiteSpeed Enterprise, along with other useful features to manage your websites.
Some notable features are managing users, databases, email, FTP, backups, DNS, automatically issuing SSL certificates with Let’s Encrypt, integration with CloudFlare, Docker management, and more.
From those features, you can probably tell that even if CyberPanel is not extremely mature and not yet an industry standard, it is a modern web hosting panel, and the developers are aware of the userbase’s needs.
The CyberPanel developers and community are also focused on website speed and Core Web Vitals. That alone is probably a reason enough for some webmasters to try it out.
What is OpenLiteSpeed?
OpenLiteSpeed is a free, open source, high-performance web server. It is based on the popular Apache HTTP Server, but with a different architecture and a few key features. It is the free version of LiteSpeed. You can check the differences between the two on their official website OpenLiteSpeed vs. LiteSpeed Enterprise.
What is a Web Server?
Web server is a term used to describe both hardware and software. In our case it’s software, and it is used to serve web pages to the users. For a deeper understanding of what web servers are and how they work, we recommend this excellent very beginner friendly guide on MDN Web Docs at mozilla.org.
Table of Contents
- Introduction
- Prerequisites
- Install CyberPanel on Ubuntu/CentOS
- Demo Install
- Selecting Between OpenLiteSpeed or LiteSpeed Enterprise
- PowerDNS, Postfix and Pure-FTPd
- Do you want to setup Remote MySQL?
- CyberPanel Version
- Choosing Default Password
- Install Memcached and/or Redis, and their PHP Extensions.
- Install WatchDog for Web service and Database service
- Finish Installation – Restart Server
- Post Installation Steps
- Setup a WordPress Website
- Other CyberPanel FAQ
- Conclusion
Prerequisites
- Acting as the root user
- A server running one of the supported operating systems Centos 7.x, Centos 8.x, Ubuntu 18.04, Ubuntu 20.04. In this article I’ll be using Ubuntu 20.04.
- A server with a recommended minimum of 1GB RAM
- 10 GB Disk Space
- Python 3.x installed on your server
Install CyberPanel on Ubuntu/CentOS
Whether you’re running an Ubuntu or CentOS server, the installation procedure is the same.
Demo Install
This is a quick demo of the installation process. So you can quickly check it out from start to finish. Going further we’ll go in detail through the installation process:
To install CyberPanel just run the following command, which will download and run the CyberPanel install script:
$ sh <(curl https://cyberpanel.net/install.sh || wget -O - https://cyberpanel.net/install.sh)During the installation process you’ll be prompted to decide on a few configurations.
First, whether you want to install CyberPanel or Exit. Enter 1 if you wish to proceed and press enter.
                CyberPanel Installer v2.1.1

1. Install CyberPanel.

2. Exit.


  Please enter the number[1-2]:
Selecting Between OpenLiteSpeed or LiteSpeed Enterprise
Next, if you want to install CyberPanel with OpenLiteSpeed (1) or LiteSpeed Enterprise (2).
OpenLiteSpeed is the free and open source web server, while LiteSpeed Enterprise is the paid version and comes with additional features that we won’t cover in this tutorial.
In our case, we’ll go with OpenLiteSpeed. To do that we enter 1 and press Enter.
                CyberPanel Installer v2.1.1

RAM check : 186/981MB (18.96%)

Disk check : 3/24GB (15%) (Minimal 10GB free space)

1. Install CyberPanel with OpenLiteSpeed.

2. Install Cyberpanel with LiteSpeed Enterprise.

3. Exit.


  Please enter the number[1-3]:
PowerDNS, Postfix and Pure-FTPd
Next we’re prompted if we also want to install a few other services used by CyberPanel. Depending on your needs you may or may not want to install them.
For our purposes we’ll install them and briefly explain what each of these services does so you can decide for yourself if you want to install them or not.
To install them we enter Y and press Enter.
Install Full service for CyberPanel? This will include PowerDNS, Postfix and Pure-FTPd.

Full installation [Y/n]: Y
Before going further with the installation, let’s see what each of this service does.
What is PowerDNS
PowerDNS is a high-performance, authoritative DNS server. It is an alternative to the popular BIND DNS, and is used by many large-scale websites and Internet infrastructure providers.
What is Postfix
Postfix is a mail transfer agent (MTA) that is used to send email. It is one of the most common MTAs used on the Internet. It handles the sending of emails to remote systems.
What is Pure-FTPD
Pure-FTPd is a free, secure, production-quality and standard-conformant FTP server.
Do you want to setup Remote MySQL?
Next we’re being asked if we want to use MySQL remotely.
A remote database is basically an external database that is hosted on a different server than your application (in this case, the application WordPress). There are pros and cons to this, depending on your specific case.
The most common way to set up WordPress is using a local MySQL database.
We also want MySQL installed on the current machine, so we’ll enter N and press Enter.
Do you want to setup Remote MySQL? (This will skip installation of local MySQL)

(Default = No) Remote MySQL [y/N]: N
CyberPanel Version
You’ll also be prompted to select which CyberPanel version you’d prefer, should you need a specific version.
You can just press Enter (⏎) to proceed with the latest version, which is what we’ll do.
Press Enter key to continue with latest version or Enter specific version such as: 1.9.4 , 2.0.1 , 2.0.2 ...etc ⏎Choosing Default Password
You can select whether the CyberPanel admin password should be.
- the default password, which is 1234567 (enter d)
- a randomly generated password that you’ll be presented with after the install is completed (enter r).
- a password that you’d prefer to specify yourself (enter s)
I’ll go with the randomly generated one and enter r.
Please choose to use default admin password 1234567, randomly generate one (recommended) or specify the admin password?
Choose [d]fault, [r]andom or [s]et password: [d/r/s] r ⏎

Admin password will be provided once installation is completed...
Install Memcached and/or Redis, and their PHP Extensions.
Next you can select whether to install Memcached and/or Redis and their PHP Extensions.
What are Memcached or Redis?
In very simple terms, Memcached and Redis are caching systems that allow you to store data in RAM, rather than on the disk. This can greatly improve performance, depending on your use case.
Since data is stored in RAM, this means that looking up data stored there is much faster. However it’s much more volatile, so if your system crashes, you’re going to lose that data, unless you’re backing it up consistently.
As such, Memcached or Redis can come in really handy when you know you have some queries that might take a long time to process, or you have data that you access often and doesn’t change. You can store that data inside Memcached or Redis, and when you need that data, you can access it much faster than you would when querying it from the database.
For a great walkthrough where you can see how Redis actually works, we recommend this excellent 27 minute YouTube video – Redis Crash Course by Web Dev Simplified.
Memcached vs Redis
The predominant sentiment when you search online, is to just go with Redis, as it can do about everything that Memcached can do, but better. I couldn’t say, however, so you will have to decide for yourself. I believe this Redis vs. Memcached Comparison on AWS is a good starting point.
For demo purposes I’ll install both, so I’ll input Y for both and press Enter.
Do you wish to install Memcached process and its PHP extension?
Please select [Y/n]: Y ⏎

Install Memcached process and its PHP extension set to Yes...


Do you wish to install Redis process and its PHP extension?
Please select [Y/n]: Y ⏎

Install Redis process and its PHP extension set to Yes...
Install WatchDog for Web service and Database service
This is the last prompt before the installation begins.
In Linux, the system can reset if serious problems are detected. Watchdog is a background process that helps with this, and tells the Linux kernel if the system is working fine.
In our case CyberPanel comes with a script that uses Watchdog to check the status of LiteSpeed Web Server and MariaDB every 60 seconds, and tries to restart if one of them is not running. Additionally it will send an email to a designated email address.
Here is a link to the script if you’d like to read through it – https://cyberpanel.sh/misc/watchdog.sh
I’ll enter Y to install WatchDog.
Would you like to set up a WatchDog (beta) for Web service and Database service ?
The watchdog script will be automatically started up after installation and server reboot
If you want to kill the watchdog , run watchdog kill
Please type Yes or no (with capital Y, default Yes): Y ⏎
Finish Installation – Restart Server
Finally you’ll be shown the login details for your:
- CyberPanel login (panel username/password)
- Webadmin login – which is a graphical interface from where you can configure OpenLiteSpeed. More info in the OpenLiteSpeed Docs.
- Ranloop Admin login – the webmail login which uses Rainloop as the mail client
You’ll also be asked to restart the server. Copy the credentials and store them somewhere safe, and enter y and Enter to restart the server.
Admin password successfully changed!

Finalizing...

Cleaning up...

###################################################################
                CyberPanel Successfully Installed

                Current Disk usage : 7/24GB (33%)

                Current RAM  usage : 301/981MB (30.68%)

                Installation time  : 0 hrs 14 min 0 sec

                Visit: https://212.152.103.165:8090
                Panel username: admin
                Panel password: tt7S7qhroRsNZhvS
                Visit: https://212.152.103.165:7080
                WebAdmin console username: admin
                WebAdmin console password: IX4PuMZ2sUBKwlPa

                Visit: https://212.152.103.165:8090/rainloop/?admin
                Rainloop Admin username: admin
                Rainloop Admin password: qp9vVEptcMjy4B

             Run cyberpanel help to get FAQ info
             Run cyberpanel upgrade to upgrade it to latest version.
             Run cyberpanel utility to access some handy tools .

              Website : https://www.cyberpanel.net
              Forums  : https://forums.cyberpanel.net
              Wikipage: https://docs.cyberpanel.net
              Docs    : https://cyberpanel.net/docs/

            Enjoy your accelerated Internet by
                CyberPanel & OpenLiteSpeed
###################################################################
If your provider has a network-level firewall
Please make sure you have opened following port for both in/out:
TCP: 8090 for CyberPanel
TCP: 80, TCP: 443 and UDP: 443 for webserver
TCP: 21 and TCP: 40110-40210 for FTP
TCP: 25, TCP: 587, TCP: 465, TCP: 110, TCP: 143 and TCP: 993 for mail service
TCP: 53 and UDP: 53 for DNS service
Would you like to restart your server now? [y/N]: y
As you can see above, we’ve been given some credentials.
Further in this tutorial we’ll mostly cover some operations in the CyperPanel Dashboard.
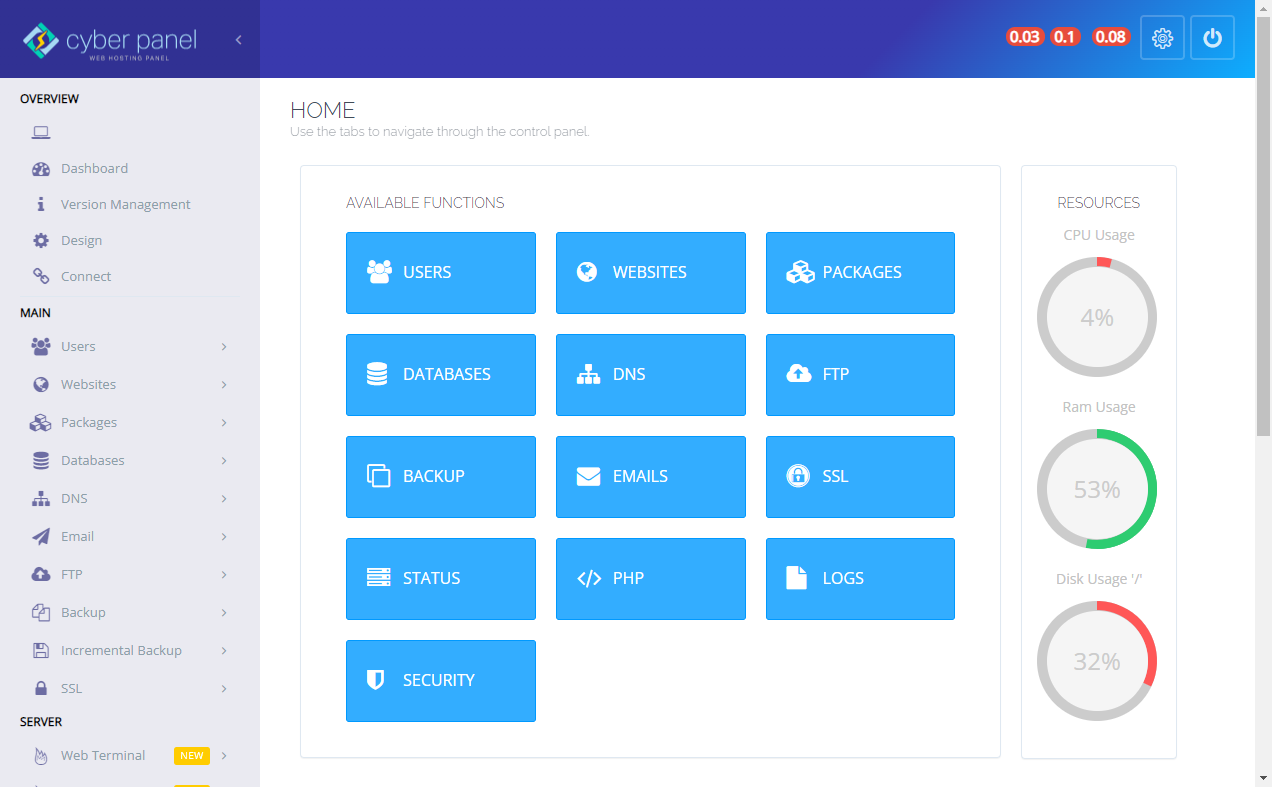
CyberPanel Dashboard
This is the dashboard from where you can operate CyberPanel and access all its functionalities.
Visit: https://212.152.103.165:8090
Panel username: admin
Panel password: tt7S7qhroRsNZhvS
When you access it you’ll get an SSL warning. Click Advanced and click to accept the risk and continue, since it’s our website and we know it’s safe.
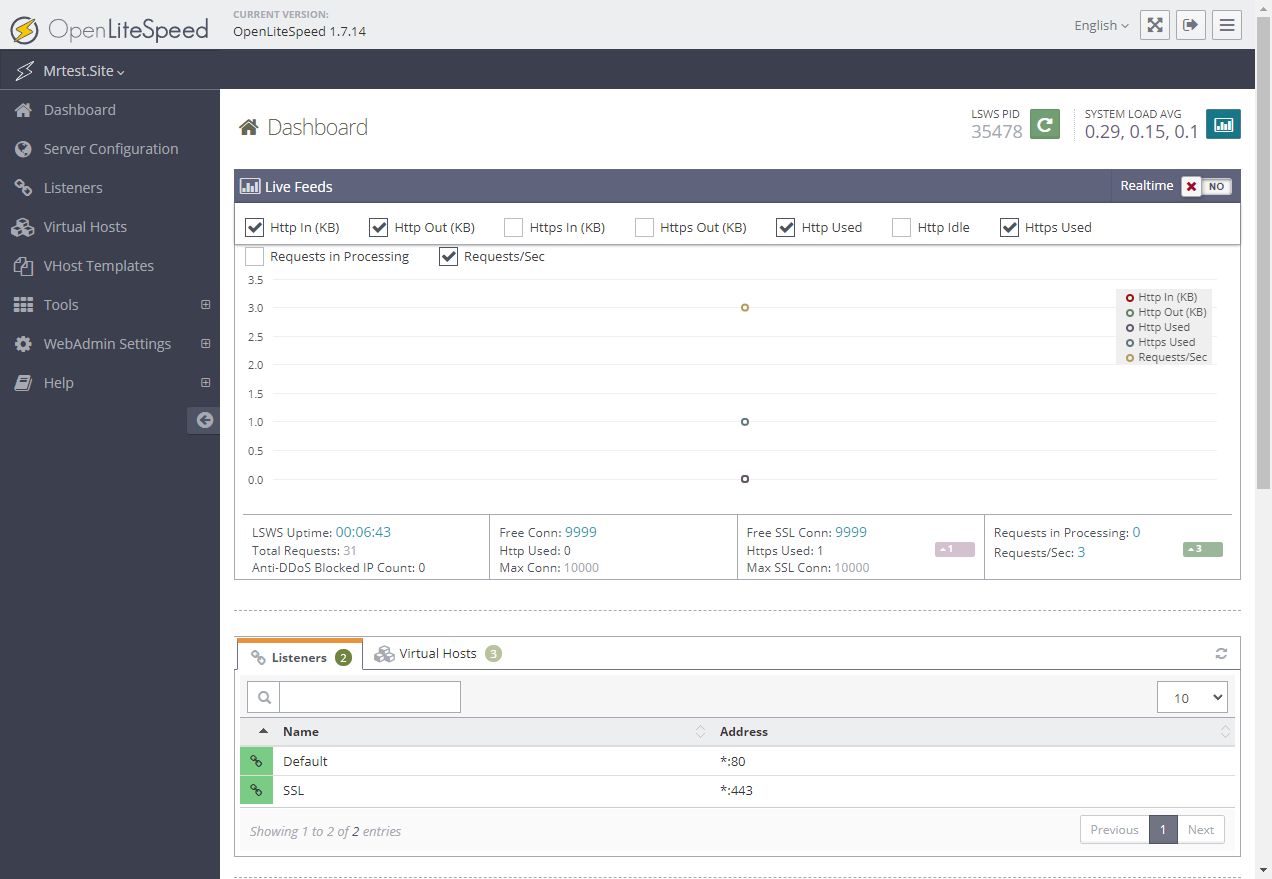
WebAdmin Console (OpenLiteSpeed GUI)
OpenLiteSpeed comes with a graphical interface that allows you to configure it.
Visit: https://212.152.103.165:7080
WebAdmin console username: admin
WebAdmin console password: IX4PuMZ2sUBKwlPa
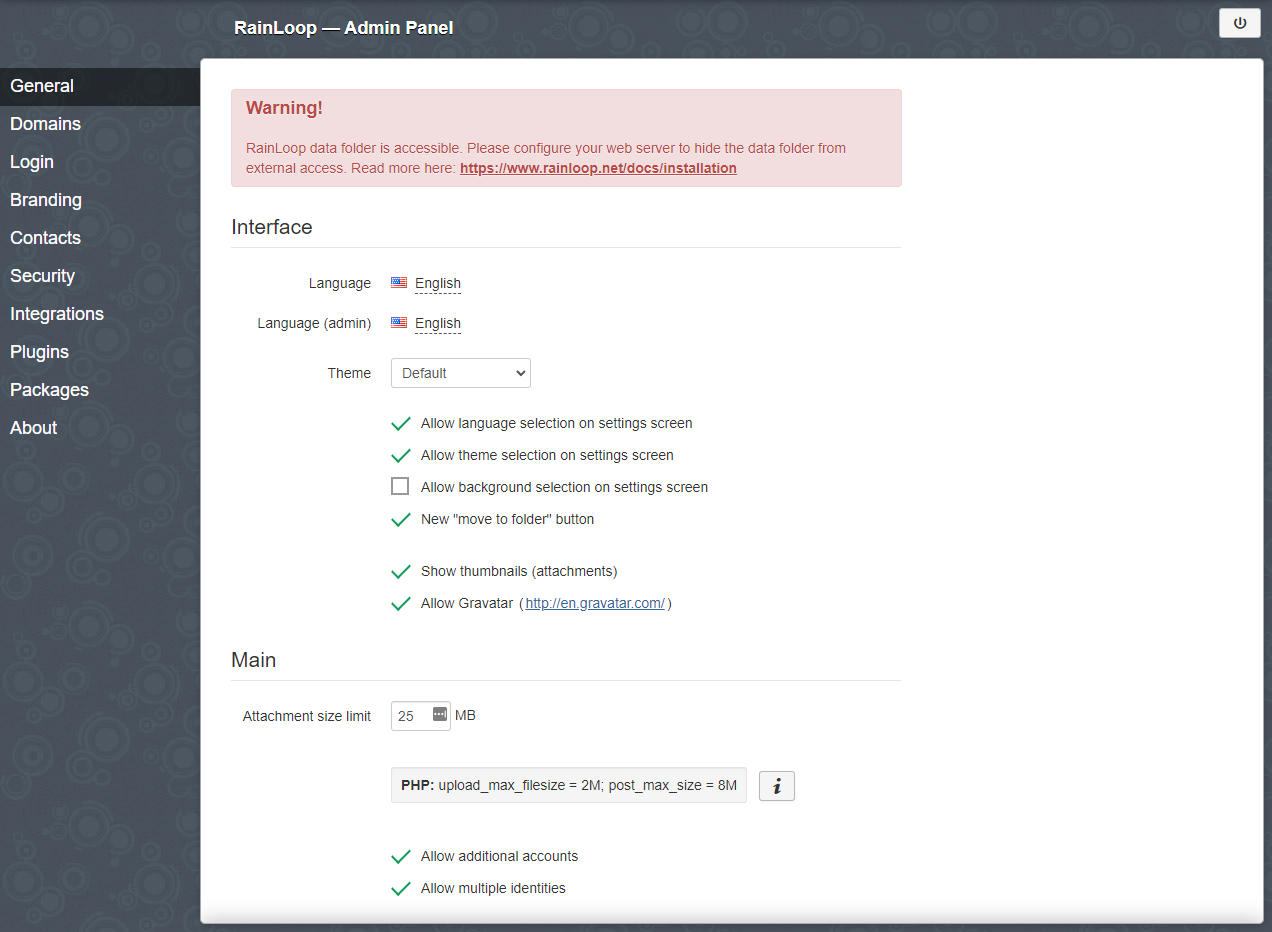
Rainloop (Webmail) Admin Panel
Visit: https://212.152.103.165:8090/rainloop/?admin
Rainloop Admin username: admin
Rainloop Admin password: qp9vVEptcMjy4B
Post Installation Steps
Changing CyberPanel URL (Optional)
If we want, we can change the access URL for CyberPanel; that is, instead of http://your_server_ip:8090 we can change it to a domain (http://mrtest.site) or subdomain (http://panel.mrtestsite), and optionally add SSL (https://panel.mrtest.site).
For our example, I’ll change it to a subdomain and add SSL to it, and the new URL will be https://panel.mrtest.site
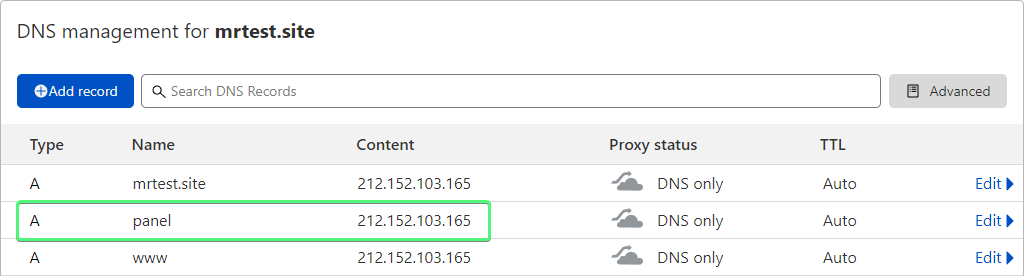
Create A Record
To start off, we’ll need to create an A record with our subdomain and point it to the IP of our server.
I’m using CloudFlare to manage DNS records, and here’s how my A record for my subdomain looks like (the other records don’t need to match mine):
Create a Website
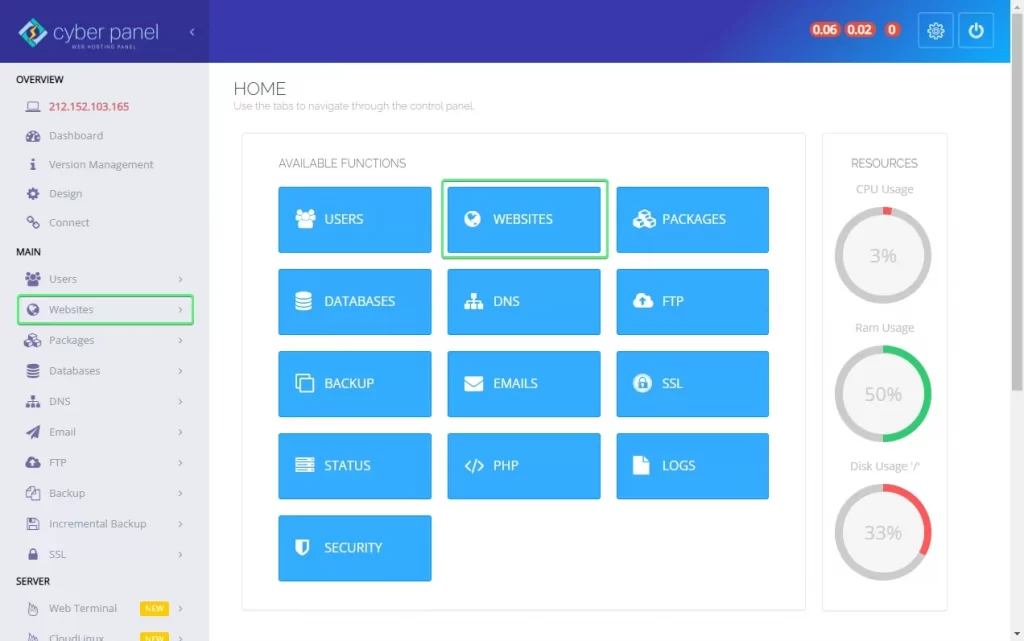
Next we’ll have to create a website from CyberPanel.
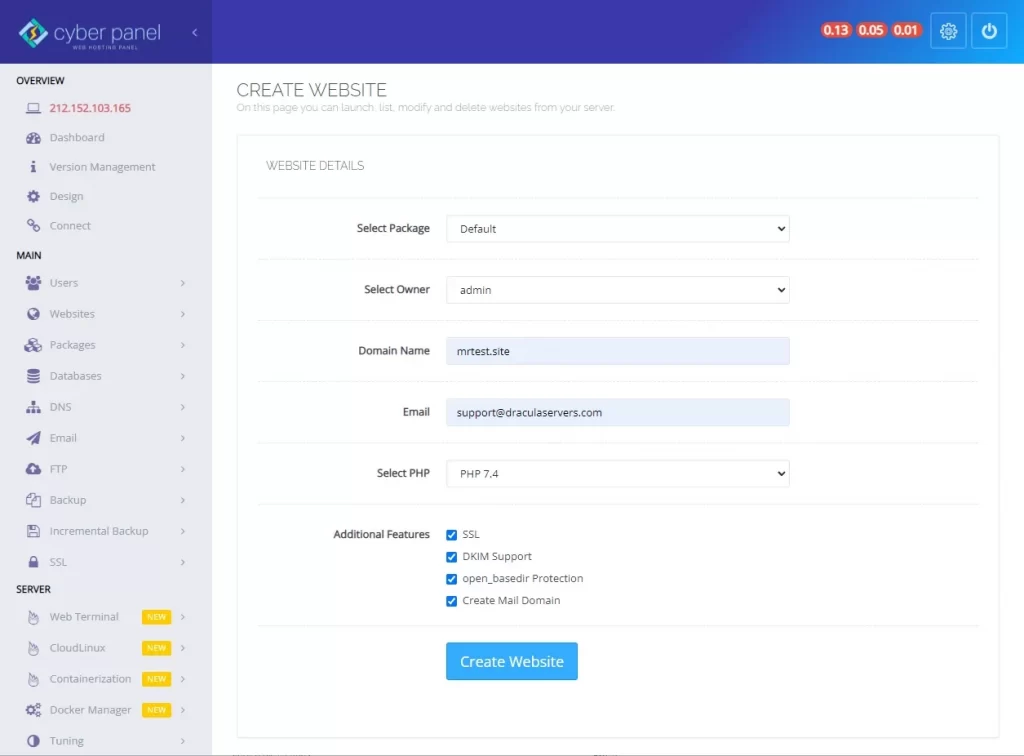
To do this, in our dashboard, go to Websites > Create Website, whether in the Dashboard section or from the left panel.
Next we’ll need to configure a few options. We don’t have to set many of them, since we won’t actually install a fully functional website, and we just need the domain so we can change our panel’s URL:
- Select Package: <package_name>. Packages are like another term for “plans”, where you allocate resources to a website. I’ve left this on Default.
You can configure the resources allocated for each package type in the Packages section. - Select Owner: <owner>. The website’s admin user. I’ll leave admin.
- Domain Name: The domain or subdomain you want to associate with the panel. Make sure you have created the A record pointing to the server’s IP. In my case I’ll leave panel.mrtest.site.
Important Note: If your server’s hostname is the same as the domain you’re trying to add, then please check this short section of ths article. (“Error message: Blacklisted domain” when Creating Website) - Email: An email where you can receive emails.
- Select PHP: This won’t matter in this case, since we’re not setting up a functional website. You can just leave PHP 7.4.
- Additional Features: You can leave these unchecked in this case. We’ll set up SSL in a step later.
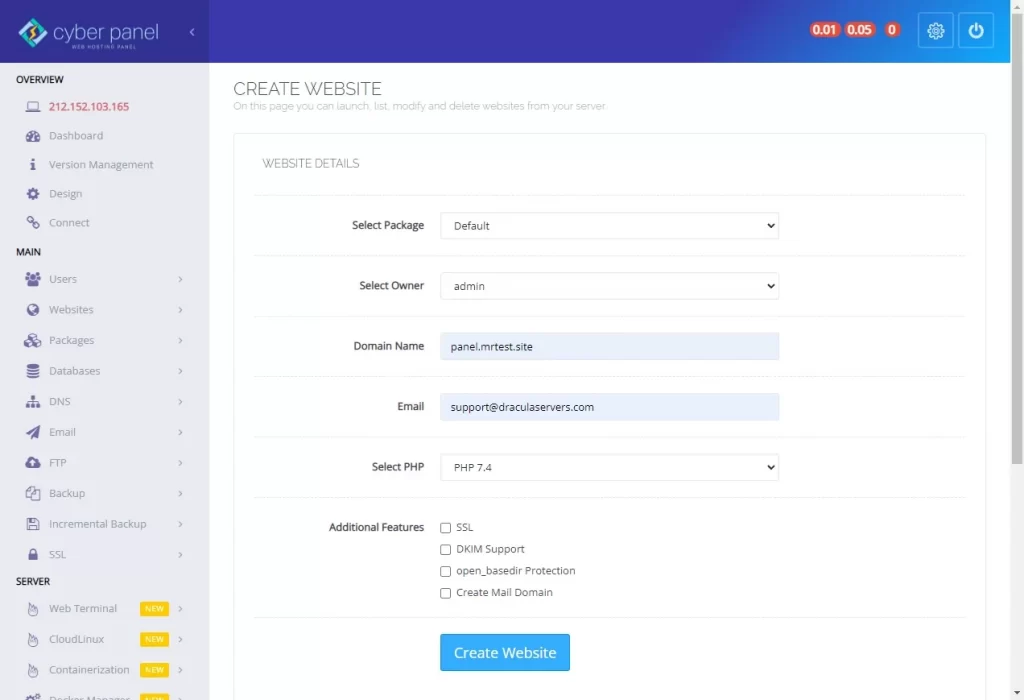
After filling in the options, click Create Website.
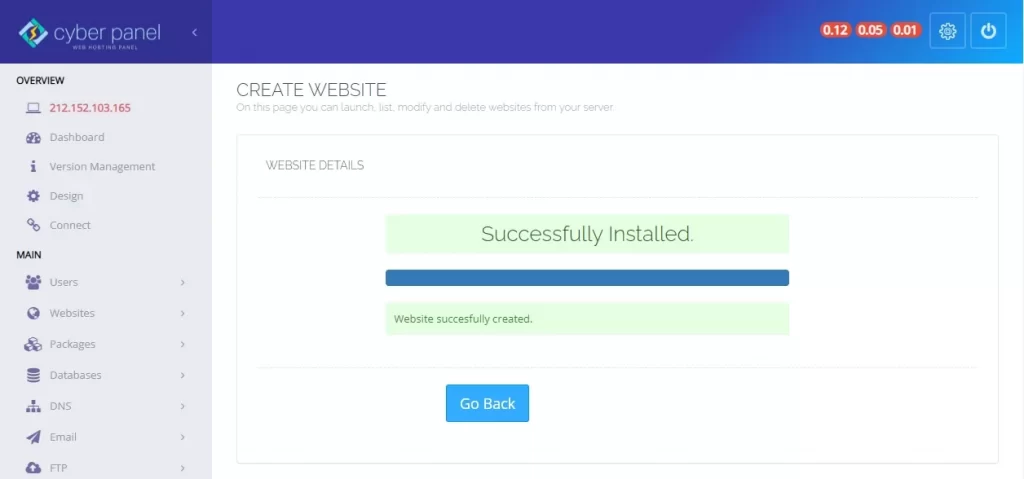
If everything worked, you should see a message that the site installation was a success.
Next, in the left panel of the dashboard, go to SSL > Hostname SSL and from the dropdown select our newly created website and click on Issue SSL.
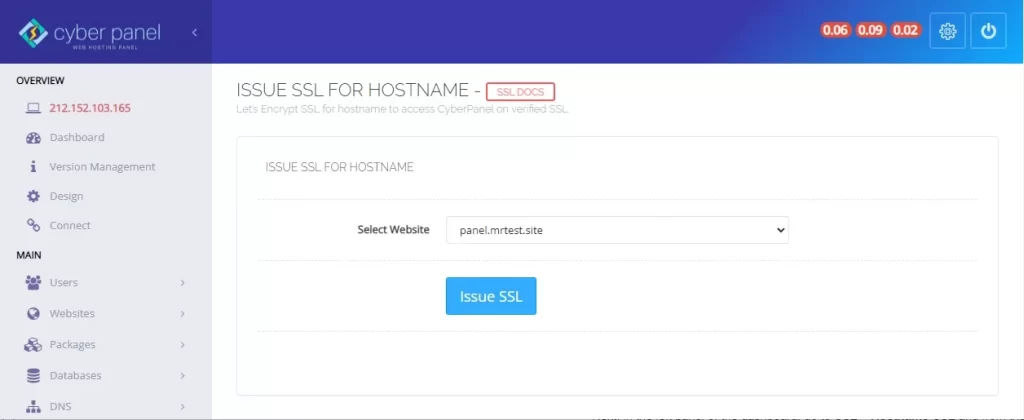
That’s it. Now you should be able to access CyberPanel from the domain you just added, instead of the IP, followed by port 8090.
In my case, I can access it from https://panel.mrtest.site:8090.
Setup a WordPress Website
Creating a WordPress website with CyberPanel is extremely easy, only takes a few mintues,, and you get the added benefit of using the full functionality LSCache (LiteSpeed Cache) plugin.
What is LSCache?
LSCache is an extremely popular WordPress caching plugin that comes with lots of useful features. I believe that some users may even use it without its caching capabilities, if they’re running Nginx/Apache – they use it because the additional functions are just so useful and well organized.
Sidenote: After setting up your website we recommend you check out our section on LSCache Recommended Settings.
Create New Website
Before proceeding, please make sure you have A records for your root domain and for www pointing to your server.

As we’ve done earlier, first we’ll need to create a website from the CyberPanel dashboard. To do this, go to Websites > Create Website.
Fill in the configurable options, in my case I’ll fill them as:
- Select Package: Default package because it’s just fine for me and package configuration is beyond the scope of our tutorial.
- Select Owner: admin
- Domain Name: mrtest.site
- Email: an email I can receive emails to
- Select PHP: PHP 7.4. At the time of writing (Nov 14th 2021) and with the current WordPress version (5.8.2), the recommended PHP version is 7.4. You can check recommended specs for WordPress here https://wordpress.org/about/requirements/
- I’ll check SSL, because I want SSL
- I’ll check DKIM Support (Domain Keys Identified Mail), because I may want to set up sending emails. You can find more info here.
- I’ll check open_basedir Procection. You can find more info here.
- I’ll check Create Mail Domain which will create a domain mail.mrtest.site, which I may use for emails, instead of the root domain. Here is an excellent article from Mailgun.com, which also talks about why you should use your subdomain for emails, rather than your root domain.
Install WordPress from CyberPanel
Next, we can install WordPress on our website.
To do this first let’s go to our list of websites. You can find them in the Websites > List Websites section.
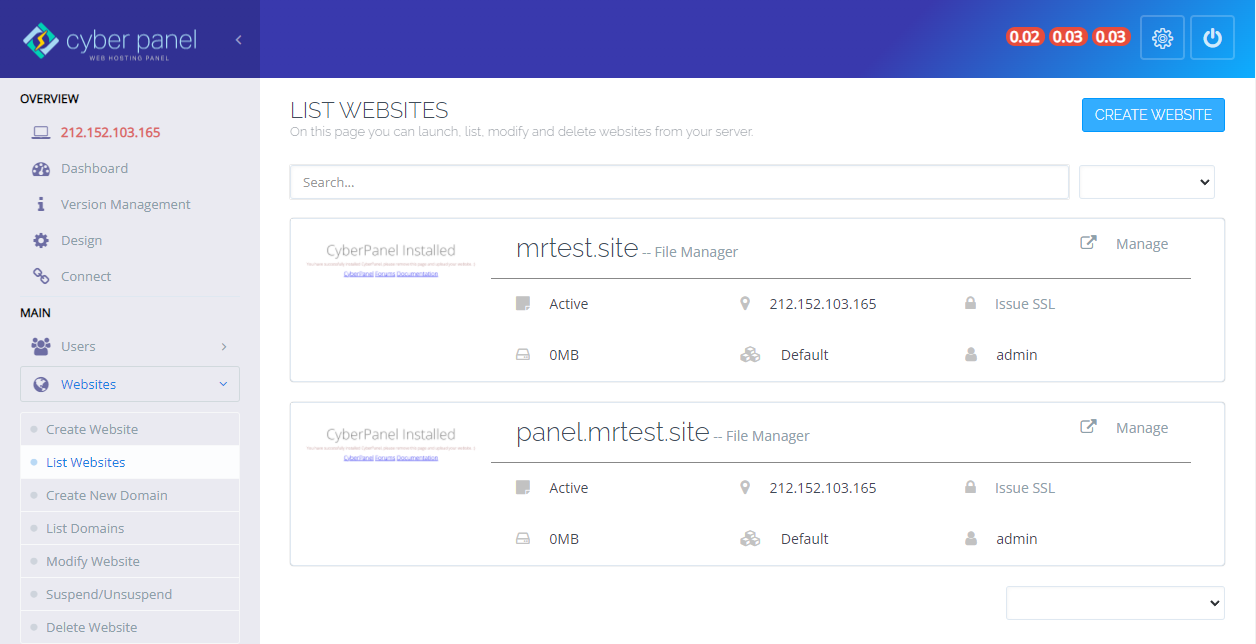
Next click on Manage that corresponds to the website you’d like to install WordPress on. In my case, it’s mrtest.site.
This will take us to a section from where we can manage and configure various aspects of our website. If you have ever used other web hosting panels, this may be familiar to you.
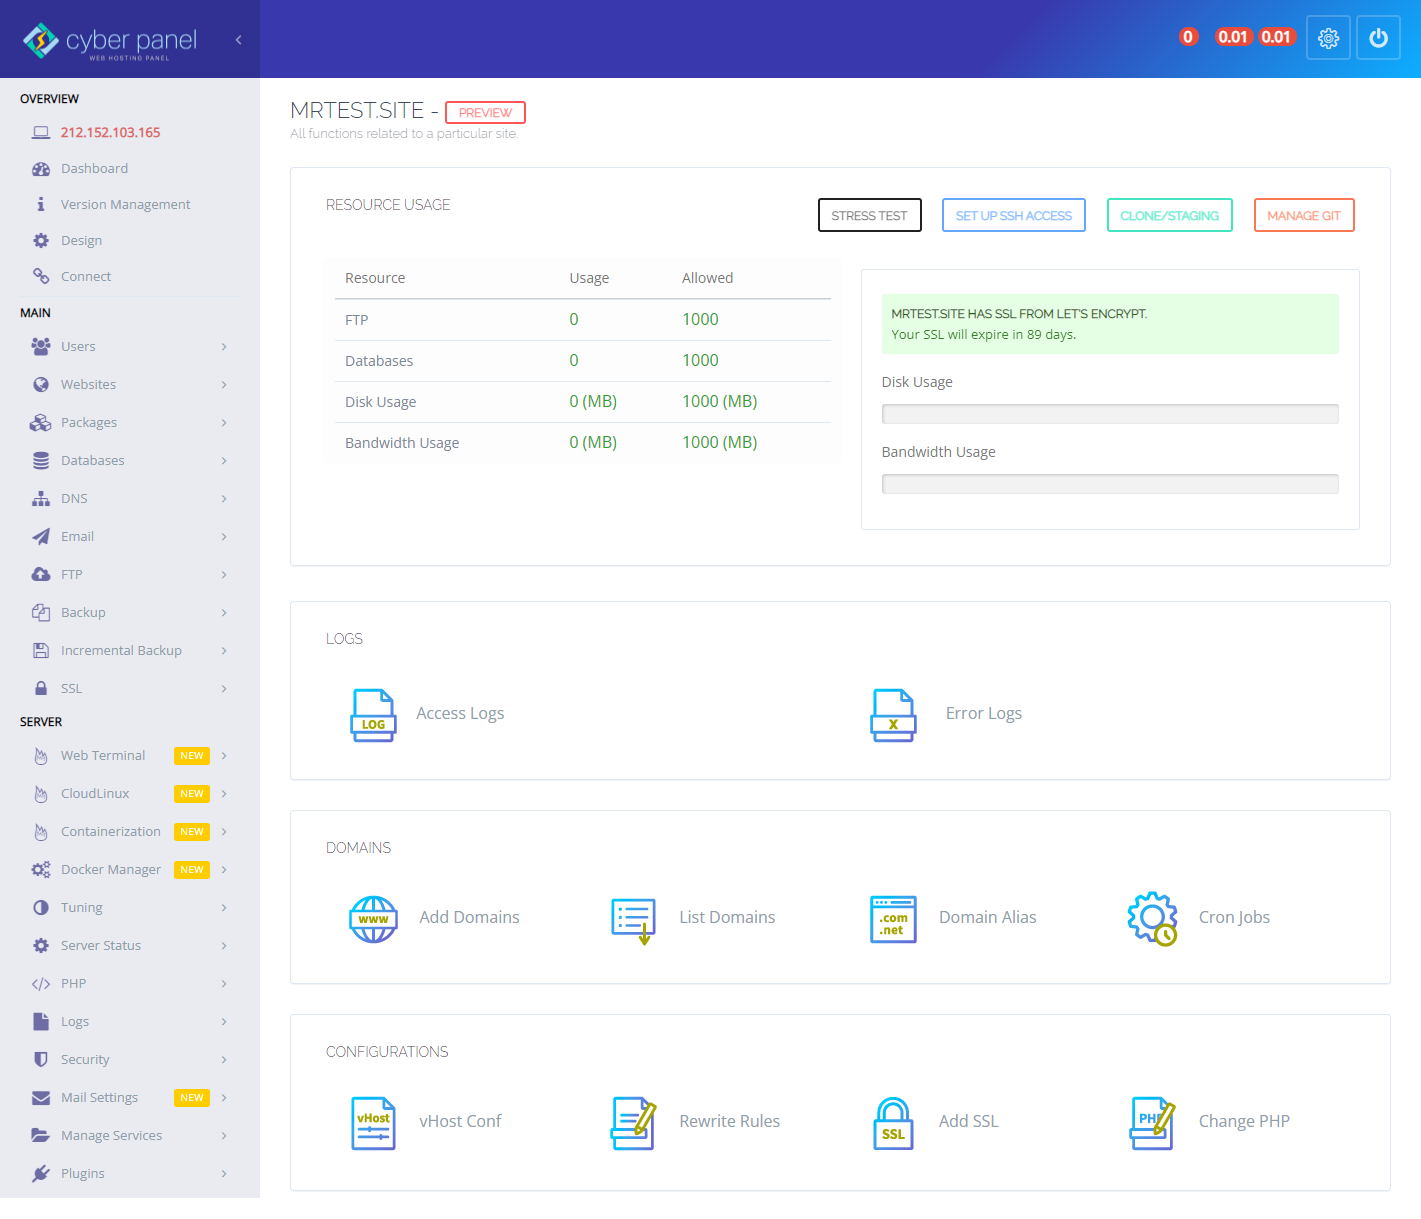
We won’t cover all the options you can configure, and we’ll go straight to installing WordPress.
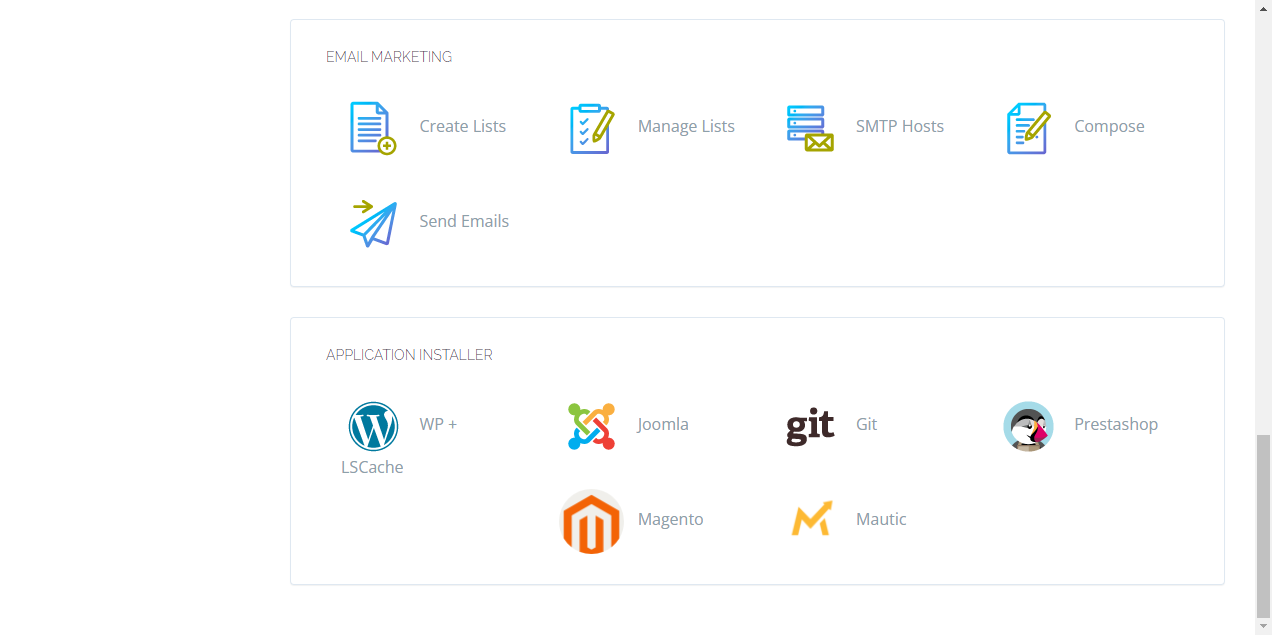
To do this, just scroll to the bottom of the page and you should see the available applications available for easy installation. At the time of writing, the options are:
- WordPress + LSCache (LiteSpeed Cache)
- Joomla (another popular CMS)
- Git (self-hosted git repository)
- Prestashop (ecommerce CMS)
- Magento (ecommerce CMS)
- Mautic (marketing automation platform)
Go ahead and click on WP + LSCache, and you’ll be taken to configure a few options for installing WordPress:
- Blog Title
- Login User
- Login Password
- Path (if you’d like a different directory other than the default one)
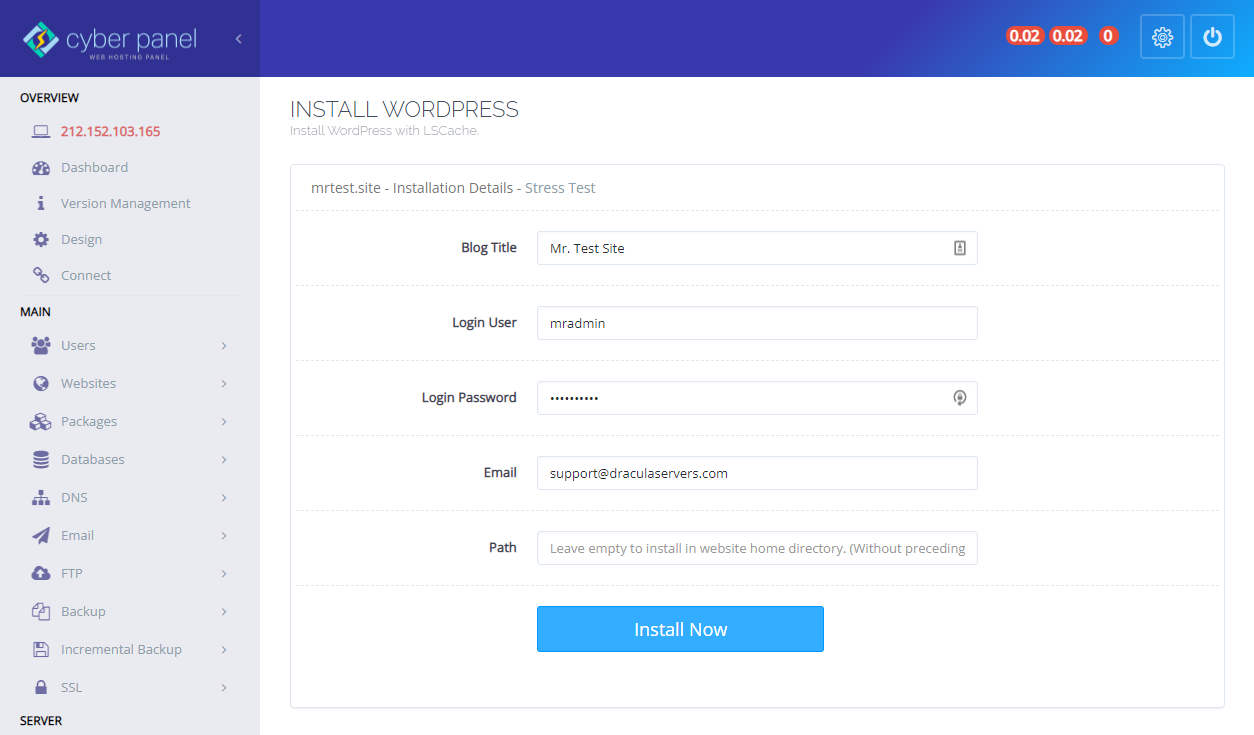
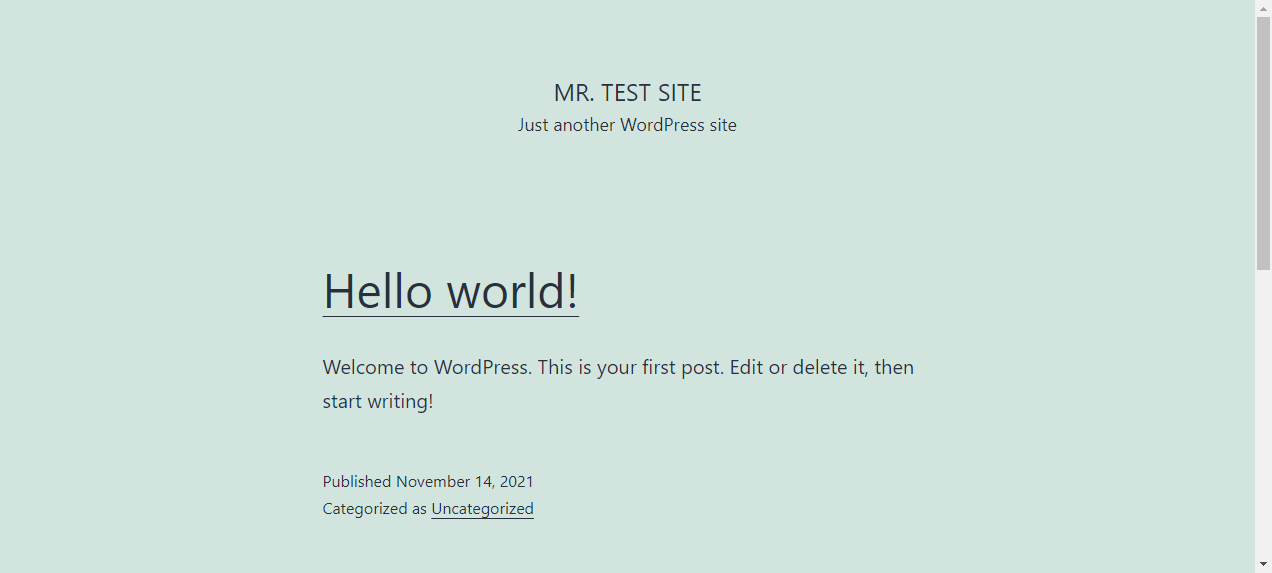
After you can click Install Now, and you’ll see a loading bar letting you know of the steps it’s going through. When it’s finished then WordPress should be installed.
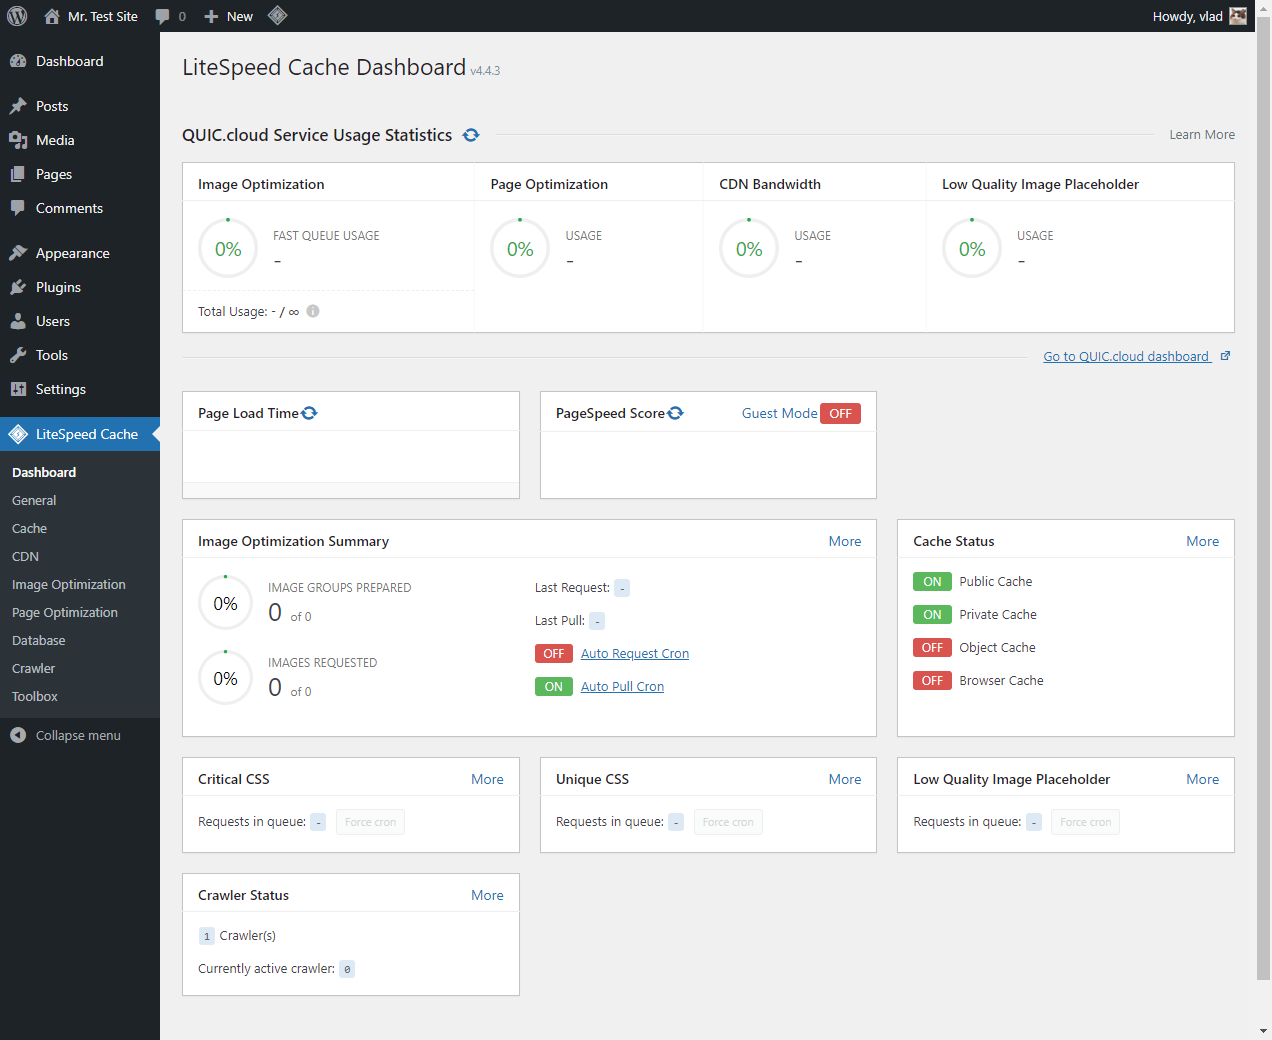
When you log into https://yourwebsite.com/wp-admin you’ll also notice LSCache is installed and you can explore the options it offers:
LSCache Recommended Settings
After your website is set up, we recommend this excellent article on LSCache and performance from PagePipe.com.
They address common misconceptions about website speed and performance, and we guarantee you’ll love most of their articles. If you scroll to the bottom of their article you’ll also reach a free ebook on Setting up LSCache (pdf) with detailed recommendations on how to configure LSCache for ideal performance.
We’re not affiliated with PagePipe.com in any way, they just offer tremendous value through their articles, free of charge, and without wasting your time with fluff.
If you’re confused by various conflicting information on pagespeed that you keep coming across online, then we recommend reading through their free articles.
Other CyberPanel FAQ
Is CyberPanel Free?
Yes, CyberPanel is free and open-source.
What is CyberPanel used for?
In simple terms, CyberPanel is used to manage your websites.
How do I access CyberPanel?
To access CyberPanel after first installing it, just visit https://<your_server_ip>:8090 in your web browser. Since you probably don’t have SSL set up, click Advanced and to proceed without an SSL, since it’s a website that we have just set up.
Errors
“Error message: Blacklisted domain” when Creating Website
This error happens when you’re trying to create a website with a blacklisted domain or when the domain is the same as the server hostname.

Possible Issue – Domain is Same as Server Hostname
A common scenario when you get this error is when the domain you’re using when creating a website is the same as your server’s hostname. For example if my server’s hostname is mrtest.site and I’m trying to create https://mrtest.site.
The great thing is that we can easily bypass this without touching config files. On your server just temporarily change the hostname and then restart the lspcd service.
For exampe, say my server hostname is mrtest.site. Then I’d change it by running:
hostname notmrtestsite
systemctl restart lspcd
$ hostname notmrtestsite
$ systemctl restart lspcd
Next you can try to create the mrtest.site website again, and it should work. After it has been created, you can go back into your server and change the hostname back, if you want:
$ hostname mrtest.site
$ systemctl restart lspcd
Further Explanation
For a detailed explanation on why this is and how to fix/bypass it, you can check out this very useful short video from the developer of CyberPanel:
Conclusion
Well done. Hopefully this tutorial has given you a basic understanding on how to set up and configure CyberPanel and how to install a WordPress website on it.
There are many more notable features worth discussing with regards to CyberPanel that we couldn’t cover in this tutorial. Fortunately, CyberPanel is being actively developed and the community is quite active and growing. For further information you can also check their docs https://cyberpanel.net/docs/ as well as the CyberPanel Forum.
Should you have any issues or questions then feel free to leave a comment, and we’ll get back to you as soon as possible.
Subscribe
Login
0 Comments
Oldest