![]()
How to Install Proxmox in Ubuntu
Proxmox is a Debian-based solution for creating a virtualization server. Proxmox recommends the creation of a new server by using Proxmox instead of installing it over an old server. It also doesn’t support other distributions other than Debian. The documentation for Proxmox explains the procedure of installing it on Debian, but there is no documentation available for Ubuntu.
As Proxmox is unavailable for Ubuntu, the only solution left is running it over a virtual machine. It might feel like an absurd idea to host a virtual machine that will host more virtual machines. However, if you are determined to keep your current Ubuntu server and still want to use Proxmox, this is the perfect solution.
Table of Contents
Proxmox Installation on Ubuntu
This solution is for the Ubuntu server and desktop. Before starting the installation process you will have to set up your system so it can host the Proxmox in a virtual machine.
Setting up the server will require executing the following steps:
Step 1: Update Your System
It is recommended that you update and upgrade your system repositories before moving on to other steps. In case there are missing libraries on your system update them so everything works perfectly.
Open the terminal using the “Alt+Ctrl+T” shortcut and execute these two commands:
sudo apt update
sudo apt full-upgrade
Step 2: Virtual Manager Installation
Virtual manager or in short, Virt-manager is the easiest and most simple way to create virtual machines on Ubuntu. You can install the Virt-manager by executing this command in your terminal window
sudo apt install virt-manager
Once installation is complete, the Virt-manager will be available in your system application. However, Reboot your system before continuing to the next step. If you are running a Ubuntu server and you are unable to reboot, you can run this command to launch Virt-manager in root:
sudo virt-manager

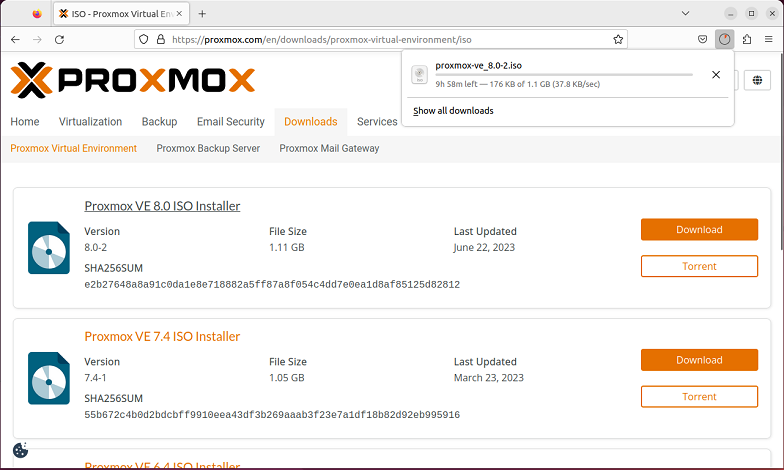
Step 3: Download Proxmox
After setting up the system and virtual machine, you can now download the latest Proxmax ISO file from the official website. Here is a link to Proxmox’s download page. Download the most recent version of Proxmox, which will be the first file on the list, by clicking the “Download” button.
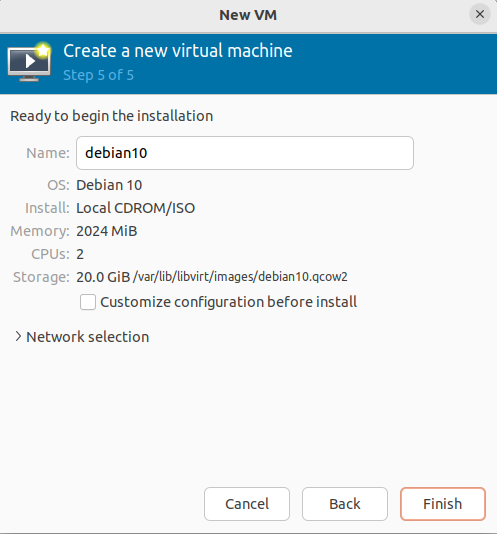
Step 4: Set up a Virtual Machine for Proxmox
Open the system application and launch the “Virtual Machine Manager” we have downloaded in Step 2.
- After launching the VM manager, click the Monitor button to create a new virtual machine.
- Local installation media will be selected by default; keep it as it is and click “Forward”
- In the next tab, click on the “Browse” button, and a pop-up will appear
- Click “Browse local” to locate the file within your system and select the “Proxmox ISO” file you downloaded earlier.
- After that, you can uncheck the automatic detection of the file select the latest Debian version as your operating system, and click “Forward”
- In the next step, you need to select the RAM size (recommended 4GB), and you can keep processors to 1 as this is not going to affect the performance, and then click “Forward.”
- By default, the Disk size will be 20GB. This is more than enough for just Proxmox installation. You can add new disks for your virtual machines.
- On the next screen, name your Virtual machine and click “Finish.” Now your VM is ready for Proxmox installation.
Step 5: Initiate Installation
After preparing your virtual machine, you can run the VM to start the installation process of Proxmox.
- Once your VM has finished booting the Proxmox installation GUI, you will end up on this screen. By default, “Install Proxmox VE (Graphical)” will be selected. Press “Enter” on your keyboard to start the installation process.
- Scroll down the agreement and click “I Agree” on the next page. You don’t have to change anything. Just press “Next” to continue.
- On this page, select your country to set up the time zone and also select your preferred keyboard layout, and click “Next”
- This is the most important step: create a password and give an email with “Next” to continue.
Note: (remember the password, as you will need it to access the Proxmox control panel) - Here, enter your Hostname (FQDN) in “Fully Qualified Domain Name” format and click on “Next” to continue.
- The next page will show the summary of the configuration that you have selected. Recheck everything and click “Install” to begin the installation process.
- After the installation process is finished, the VM will automatically reboot and initiate the Proxmax. Here you can see the IP address which you can open in your host machine browser to access the “Proxmox Virtual Environment”
- Open the browser in your host machine and write the IP address. Proxmax virtual environment will launch and ask for a username and password. Here, enter the username you want and enter the password you set up during the installation process. Check “Save Username” and “Login”
- With this, you can access the Proxmox dashboard and use Proxmox.

Affordable VPS Hosting With Dracula Servers
Looking for reliable and budget-friendly Virtual Private Server (VPS) hosting? Look no further than Dracula Servers. Dracula Servers offers a range of VPS hosting plans tailored to meet diverse needs. With competitive pricing, robust performance, and a user-friendly interface, it’s an excellent choice for individuals and businesses alike.
Explore the Dracula Servers website to discover hosting solutions that align with your requirements and take your online presence to new heights with their affordable and efficient VPS hosting services.
Visit Dracula Servers and experience reliable VPS hosting without breaking the bank.
Backup and Restore Procedures for Proxmox
When managing virtual machines (VMs) and containers on Proxmox VE, having a reliable backup and restore strategy is crucial. This ensures that you can quickly recover from data loss, hardware failures, or other unexpected issues. Below, we’ll discuss methods for backing up VMs and containers, including full backups, incremental backups, and snapshot creation. Additionally, we’ll provide instructions on restoring from backups.
Full Backups
Full backups involve creating a complete copy of a VM or container at a specific point in time. This method is the most straightforward and ensures that you have a comprehensive backup of your entire VM or container.
Steps to create a full backup:
- Access the Proxmox Web Interface: Open your web browser and navigate to the Proxmox VE web interface.
- Select the VM or Container: Choose the VM or container you want to back up from the left-hand side menu.
- Initiate Backup:
- Click on the
Backuptab. - Click
Backup now. - In the popup window, select
ModeasStoporSnapshotdepending on whether you want to stop the VM/container during backup or take a live snapshot. - Choose the storage location where the backup will be saved.
- Click
OKto start the backup process.
- Click on the
- Monitor Backup Process: You can monitor the backup progress in the
Task Viewersection.
Incremental Backups
Incremental backups only save the changes made since the last backup, reducing the amount of data that needs to be transferred and stored. This method is efficient for maintaining frequent backups without using excessive storage space.
Steps to create incremental backups:
- Set Up Storage for Incremental Backups: Ensure that your storage configuration supports incremental backups. Typically, this involves configuring a storage location that supports snapshot-based backups.
- Schedule Incremental Backups:
- Navigate to the
Datacenterview. - Click on
Backup. - Click
Addto create a new backup job. - Choose the
ModeasSnapshotto enable incremental backups. - Set the
Schedulefor how often the backups should occur. - Select the VMs or containers to include in the backup job.
- Choose the storage location for the backups.
- Click
OKto save the backup job.
- Navigate to the
- Monitor Backup Jobs: You can monitor the scheduled backup jobs in the
Task Viewersection.
Snapshot Creation
Snapshots are point-in-time copies of a VM or container’s state. They are useful for quickly reverting to a previous state without restoring a full backup. Snapshots are ideal for testing changes or updates.
Steps to create a snapshot:
- Access the Proxmox Web Interface: Open your web browser and navigate to the Proxmox VE web interface.
- Select the VM or Container: Choose the VM or container you want to create a snapshot for from the left-hand side menu.
- Initiate Snapshot:
- Click on the
Snapshotstab. - Click
Take Snapshot. - Provide a name and description for the snapshot.
- Click
Take Snapshotto start the process.
- Click on the
- Revert to Snapshot:
- In the
Snapshotstab, select the snapshot you want to revert to. - Click
Rollback. - Confirm the rollback to revert the VM or container to the snapshot state.
- In the
Restoring from Backups
Restoring from backups is essential for recovering VMs or containers in case of data loss, corruption, or migration to a different host.
Steps to restore from a backup:
- Access the Proxmox Web Interface: Open your web browser and navigate to the Proxmox VE web interface.
- Navigate to Storage: Select the storage location where your backups are stored from the left-hand side menu.
- Find the Backup:
- Click on the
Backupstab. - Locate the backup file you want to restore.
- Click on the
- Initiate Restore:
- Click
Restore. - Select the target VM ID for the restoration or create a new VM ID.
- Choose the desired options for restoration (e.g., full or partial restore).
- Click
Restoreto start the process.
- Click
- Monitor Restore Process: You can monitor the restore progress in the
Task Viewersection.
By implementing a robust backup and restore strategy, you can ensure the availability and integrity of your virtual machines and containers on Proxmox VE. Regular backups and understanding how to restore from them are key components of effective data management and disaster recovery planning.
Wrap Up
The recommended method for installation of Proxmox is on a fresh server. It should not be a package over an existing server or desktop system. Proxmox only provides a solution as a package for Debian distribution. As Virtual machines linked to Proxmox will perform important tasks, it’s better to load it on a Server than a virtual machine inside a server or desktop.
Check out More Linux Tutorials Here!
Subscribe
Login
0 Comments
Oldest