![]()
How to Install XAMPP on Ubuntu
XAMPP is a product of Apache friends to enable the developers to test their product’s functionalities and behaviors in a local host environment before deploying them on the actual system. It combines multiple integrated technologies to provide a perfect all-in-one solution for web development.
The acronym XAMPP itself stands for the technologies it includes in its package. (A) stands for Apache web server; (M) MYSQL, a database; (P) PHP for adding dynamic looks to the website; and (P) is for the Pearl language. Apart from these, the X, in the beginning, stands for the cross-platform functionality support of the XAMPP. It also comes in a lite version for developing smaller projects, including MariaDB and PHP.
Install XAMPP Using the Installation Package on Ubuntu
The following installation steps will remain the same for current and older versions of Ubuntu. Before installing XAMPP, choose the version that satisfies your needs, as there are many versions of XAMPP with different app compositions.
Step 1: Download XAMPP
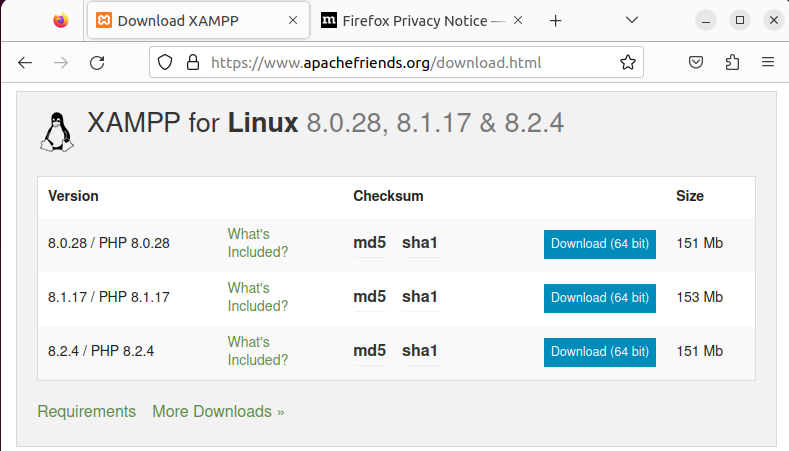
First, you must Download the installation media package, which will be an executable binary file of XAMPP. You can easily find this file on Apachefriends, which is Apache’s official site for the XAMPP application.
Go to the site download menu and scroll until you find the Linux section. There will be three different packages listed up front, and you can access more by clicking more downloads. In these packages, the main difference is the version of PHP. Apart from that, all other tools will remain the same in all three packages. If you want to check what’s in the package, click on “What’s Included?” and you can find the information there.
Step 2: Run the Installation Package
Open your command line terminal by pressing “Ctrl+Alt+T” so you can execute the commands to install the XAMPP. After launching your command prompt, let’s switch to the downloads folder to access the file as it is downloaded in the “Downloads” folder by default.
To switch to “Downloads,” run this command:
cd Downloads
Next, you are supposed to make the file executable by altering the permissions for the installer. To do that, you will be running the command below. This command will give the user read, write, and execution access.
chmod 755 xampp-linux-*-installer.run
After running this command, your package is not executable. Run the following command to initiate the installation process:
sudo ./xampp-linux-*-installer.run
Step 3: Installation Wizard
After running the above command, a graphical installation wizard will pop up:
- Click on the “Forward” button to continue the installation process.
- On the next screen, you can choose the components you want to install. The “XAMPP Core Files” are selected by default. Click and select the “XAMPP Developer Files” and click “Forward” to move onto the next screen.
- On this screen and the next screen, click “Forward” to move on, as no input is needed in these two screens. This one shows the default directory where the files will be installed, and the next one will begin the installation.
- After the installation, click “Finish,” and the system will automatically launch the XAMPP application.
For further use of XAMPP, you can run the command in the terminal to launch the XAMPP application:
sudo /opt/lampp/./manager-linux-x64.run
Step 4: Start the Servers
Open the “Manage Server” tab from the application dashboard to access the servers. After switching the tab now, you can start the servers. If you are using custom ports for the server, select the server and click “Configure” to access the configuration and change the port number.

Step 5: Create a Desktop Shortcut
You must create a file that will let you access XAMPP through the desktop. Run this command to create the shortcut file:
sudo nano Desktop/XAMPP.desktop
After running this command, copy the following text and paste it into the file terminal. After that, press CTRL+O to write the file and Enter to save. Press CTRL+X and click Enter to save the changes you have just made and exit the file.
[Desktop Entry]
Version=1.0
Type=Application
Name=XAMPP
Exec=sudo /opt/lampp/manager-linux-x64.run
Icon=/opt/lampp/htdocs/favicon.ico
Terminal=false
StartupNotify=false
After saving the file, now provide sudo permissions for this shortcut. Write this command to open permissions:
sudo visudo
In permissions files, scroll down to the end of the file and then copy this line of code. Enter your user name, and then paste this command inside. In this example, lu is the user name. After pasting this line, press CTRL+X and hit Enter to exit the file.
lu ALL = NOPASSWD: /opt/lampp/manager-linux-x64.run
Therefore, fill in your username in the following template command:
{Enter your user name} ALL = NOPASSWD: /opt/lampp/manager-linux-x64.runAfter completing this process, go to the desktop shortcut right, click on it, and select “Allow Launching.” This will allow you to use your shortcut to launch the application.
How do you start/stop the XAMPP server?
You can start and stop the XAMPP server directly from the terminal window by using these two commands. The start command for the XAMPP server is as follows:
sudo /opt/lampp/lampp start
To stop the XAMPP server, the command is as follows:
sudo /opt/lampp/lampp stop
Pros and Cons of Using XAMPP
XAMPP is a popular option when choosing a web application development environment for its simplicity and comprehensive features. However, like any tool, it comes with its own set of advantages and disadvantages. Let’s delve into the pros and cons of using XAMPP for your development needs.
Pros of Using XAMPP
- Ease of Installation:
- User-Friendly Setup: XAMPP offers an easy installation process, making it accessible even for beginners. The package includes Apache, MySQL, PHP, and Perl, all configured to work seamlessly together.
- Cross-Platform Compatibility: XAMPP is available for multiple operating systems, including Windows, Linux, and macOS, ensuring that developers can use it regardless of their preferred platform.
- Comprehensive Package:
- All-in-One Solution: XAMPP provides all necessary components for web development in one package. This eliminates the need to install and configure each component individually, saving time and reducing potential configuration errors.
- Additional Tools: It includes useful tools like phpMyAdmin for database management, FileZilla FTP Server, and Mercury Mail Server, enhancing its utility for development and testing.
- Development and Testing:
- Local Development Environment: XAMPP is perfect for setting up a local development environment where developers can test their web applications before deploying them to a live server. This ensures that any bugs or issues can be resolved in a controlled setting.
- Open Source: Being open-source, XAMPP is free to use, and developers can modify and customize it according to their specific needs.
- Community Support:
- Active Community: XAMPP has a large and active community. This means that developers can easily find tutorials, forums, and other resources to help them troubleshoot issues and learn new tips and tricks.
Cons of Using XAMPP
- Security Concerns:
- Not for Production: XAMPP is primarily designed for development and testing purposes. By default, it is not optimized for security, making it unsuitable for use in a production environment without significant modifications.
- Default Settings: The default settings in XAMPP prioritize ease of use over security. For instance, the default MySQL root account has no password, and certain ports are open, which can be risky if not properly secured.
- Resource Consumption:
- Resource Intensive: Running XAMPP with all its services can consume significant system resources. On lower-end machines, this might slow down the system and affect performance.
- Overhead: Including multiple components that might not be necessary for every project can lead to unnecessary overhead, especially for lightweight or simple web applications.
- Configuration Complexity:
- Learning Curve: While the initial setup is straightforward, the advanced configuration can be complex. Customizing settings to match production environments might require a deeper understanding of server management.
- Limited Scalability: For large-scale applications, XAMPP might not offer the scalability and performance tuning required. Dedicated server environments with more granular control over each component might be preferable.
- Inconsistent Environments:
- Mismatch with Production: The configuration and environment of XAMPP might differ from the live server environment. This can lead to issues when deploying applications that were tested on XAMPP but behave differently on production servers.
XAMPP provides a convenient and comprehensive solution for local web development and testing, offering an easy setup and a range of useful tools. However, it is essential to recognize its limitations, particularly regarding security and performance, and to use it appropriately within its intended scope. For production environments, additional configuration and security measures are necessary to ensure a robust and secure setup.
How to Completely Uninstall XAMPP From Ubuntu?
If you are looking to uninstall the XAMPP from your Ubuntu machine completely, then use this command:
sudo /opt/lampp/./uninstall
After uninstalling the XAMPP, you will also need to delete the shortcut file. To delete the shortcut file, run the following commands:
sudo rm ~/Desktop/XAMPP.desktop
sudo rm /usr/share/applications/XAMPP.desktop
With these, you have removed XAMPP from your Ubuntu Installation.
Wrap Up
XAMPP is an ideal solution for creating a local web server for the testing environment. Developers can set up the local host and test their applications before deploying them over the server. The alternative applications for XAMPP are the LAMP and Mean Stack.
Subscribe
Login
0 Comments
Oldest