![]()
How to Install Nagios 4 on Ubuntu 18.04 for Server Monitoring
Prerequisites
To follow this tutorial we assume the following:
- You’re using a machine running Ubuntu or Debian. This tutorial is for Ubuntu 18.04, but it should work on Ubuntu 16.4, 14.04 and Debian systems.
- You’re acting as a
non-root sudo user. If you don’t have one set up, you can follow our tutorial on creating a sudo user on Ubuntu 18.04
Get a High RAM VPS at Entry-level Pricing
Starting with 2GB RAM at $6.99/month
Take your pick from our KVM VPS that offer a generous amount of RAM at an affordable price. We've got 5 plans for you to choose from, our cheapest featuring 2GB RAM at $6.99/mo.
[Main Features] - SSD Drives
- KVM Virtualization
- 1Gbps Shared Uplink
- Location: Chicago, IL
Pick one of our KVM plans
Table of Contents
Step 1 – Install PHP & Apache
We’ll first update our package index and install PHP and Apache.
$ sudo apt-get update
$ sudo apt-get install wget build-essential unzip openssl libssl-dev
$ sudo apt-get install apache2 php libapache2-mod-php php-gd libgd-dev
Step 2 – Create a User and Group for Nagios
Next, create a new user for Nagios, and assign them a password:
$ sudo adduser nagios_userNow we’ll create a group for Nagios, which we’ll call nagcmd and we’ll add the user we just created to this group.
$ sudo groupadd nagcmd
$ sudo usermod -a -G nagcmd nagios_user
We’ll also add the user to the Apache group.
$ sudo usermod -a -G nagcmd www-dataStep 3 – Install Nagios Binaries
To install Nagios, we’ll first have to download the latest Nagios release. To do this, retrieve the tar.gz download link from the Github Releases page. The latest one at the time of writing is nagios-4.4.3.tar.gz.
We’ll first change our directory into /opt, download the release, and extract the archive.
$ cd /opt
$ sudo wget https://github.com/NagiosEnterprises/nagioscore/releases/download/nagios-4.4.3/nagios-4.4.3.tar.gz
$ tar xzf nagios-4.4.3.tar.gz
After extracting the archive, navigate into the source directory and install Nagios along with some additional requirements using the make command:
cd nagios-4.4.3
sudo ./configure --with-command-group=nagcmd
sudo make all
sudo make install
sudo make install-init
sudo make install-daemoninit
sudo make install-config
sudo make install-commandmode
sudo make install-exfoliation
Now we’ll need to copy event handlers scripts to the libexec directory. These provide multiple event triggers for the Nagios Web Interface.
$ sudo cp -R contrib/eventhandlers/ /usr/local/nagios/libexec/
$ sudo chown -R nagios:nagios /usr/local/nagios/libexec/eventhandlers
Step 4 – Set Up Apache with an Authentication Gateway
We’ll now set up Apache Virtual Hosts for Nagios, and to secure our web interface, we’ll set up an authentication gateway to prevent unauthorized access.
To do this, we’ll create an Apache configuration file for Nagios:
$ sudo nano /etc/apache2/conf-available/nagios.confAnd paste the following content into the file.
ScriptAlias /nagios/cgi-bin "/usr/local/nagios/sbin"

<directory "="" usr="" local="" nagios="" sbin"="">
   Options ExecCGI
   AllowOverride None
   Order allow,deny
   Allow from all
   AuthName "Restricted Area"
   AuthType Basic
   AuthUserFile /usr/local/nagios/etc/htpasswd.users
   Require valid-user


Alias /nagios "/usr/local/nagios/share"

<directory "="" usr="" local="" nagios="" share"="">
   Options None
   AllowOverride None
   Order allow,deny
   Allow from all
   AuthName "Restricted Area"
   AuthType Basic
   AuthUserFile /usr/local/nagios/etc/htpasswd.users
   Require valid-user
Save and close the file when you’re done.
Now we can set up the authentication gateway. We’ll use the user nagiosadmin. This is the default user that we can use to authenticate, and to use a different one would require further configuration.
$ sudo htpasswd -c /usr/local/nagios/etc/htpasswd.users nagiosadminNow enable the Apache configuration and restart it so the changes take effect:
$ sudo a2enconf nagios
$ sudo a2enmod cgi rewrite
$ sudo service apache2 restart
Step 5 – Install Nagios Plugins
Once Nagios is installed and configured, we can download and install the latest nagios-plugins. To do this, retrieve the latest nagios-plugins release link from here. The latest version at the time of writing is nagios-plugins-2.2.1.tar.gz. After which, change the directory into /opt, download it, extract it, and navigate into it’s folder.
$ cd /opt
$ wget http://www.nagios-plugins.org/download/nagios-plugins-2.2.1.tar.gz
$ tar xzf nagios-plugins-2.2.1.tar.gz
$ cd nagios-plugins-2.2.1
Now we compile and install nagios-plugins:
$ sudo ./configure --with-nagios-user=nagios --with-nagios-group=nagios --with-openssl
$ sudo make
$ sudo make install
Step 6 – Verify & Start Nagios
After installing and configuring Nagios, we can verify if Nagios has been successfully installed, start it, and configure it to start on system boot.
Verify the installation:
$ /usr/local/nagios/bin/nagios -v /usr/local/nagios/etc/nagios.cfgExample Output
Nagios Core 4.4.3
Copyright (c) 2009-present Nagios Core Development Team and Community Contributors
Copyright (c) 1999-2009 Ethan Galstad
Last Modified: 2019-01-15
License: GPL

Website: https://www.nagios.org
Reading configuration data...
   Read main config file okay...
   Read object config files okay...

Running pre-flight check on configuration data...

Checking objects...
	Checked 8 services.
	Checked 1 hosts.
	Checked 1 host groups.
	Checked 0 service groups.
	Checked 1 contacts.
	Checked 1 contact groups.
	Checked 24 commands.
	Checked 5 time periods.
	Checked 0 host escalations.
	Checked 0 service escalations.
Checking for circular paths...
	Checked 1 hosts
	Checked 0 service dependencies
	Checked 0 host dependencies
	Checked 5 timeperiods
Checking global event handlers...
Checking obsessive compulsive processor commands...
Checking misc settings...

Total Warnings: 0
Total Errors:   0

Things look okay - No serious problems were detected during the pre-flight check
Start Nagios:
$ service nagios startConfigure to start on system boot:
$ sudo systemctl enable nagiosStep 7 – Access the Nagios Web Interface
Now you can access the Nagios Web Interface by visiting your hostname or IP address in your browser followed by /nagios:
https://your_server_IP_or_domain/nagiosAnd login using nagiosadmin and the assigned password.
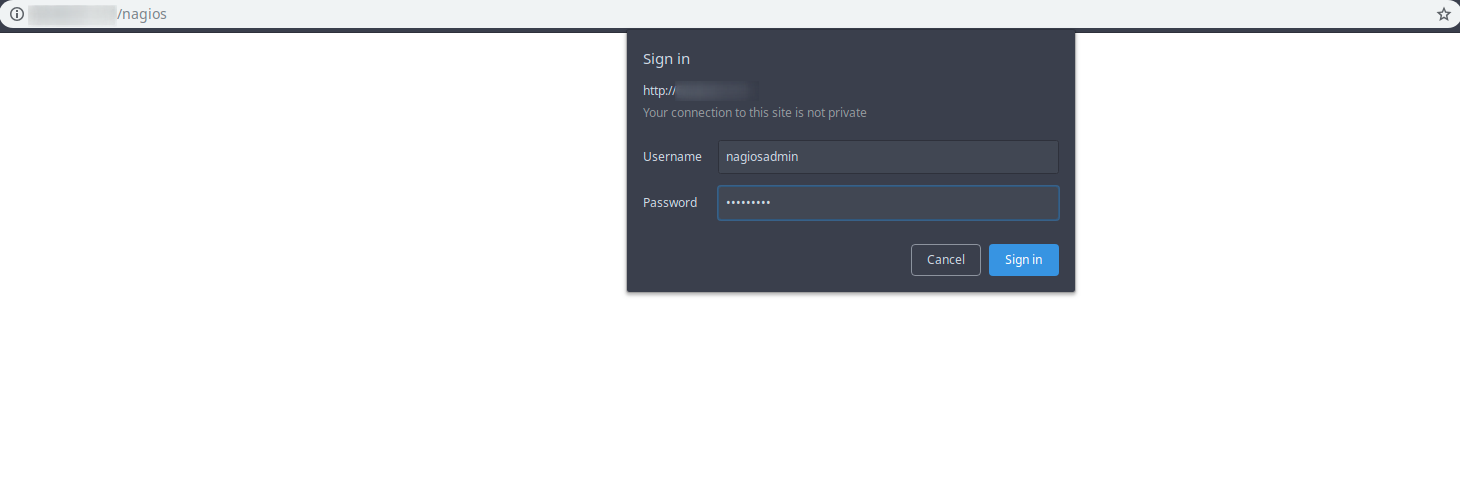
And you should be greeted by the Nagios dashboard.

Conclusion
Well done. You now should have installed and configured Nagios for server monitoring.
If you have any questions or find any issues with this guide, then please feel free to contact us via the comments or our social media channels and we’ll get back to you as soon as possible.
Get a High RAM VPS at Entry-level Pricing
Starting with 2GB RAM at $6.99/month
Take your pick from our KVM VPS that offer a generous amount of RAM at an affordable price. We've got 5 plans for you to choose from, our cheapest featuring 2GB RAM at $6.99/mo.
[Main Features] - SSD Drives
- KVM Virtualization
- 1Gbps Shared Uplink
- Location: Chicago, IL
Pick one of our KVM plans
Subscribe
Login
0 Comments
Oldest