![]()
How to Install NextCloud with Nginx, PHP7.3 & Let’s Encrypt Free SSL/TLS Certificates on Ubuntu 18.04 Server
In this tutorial we’ll be installing the latest version of NextCloud (15 at the time of writing) on an Ubuntu 18.04 server, with Nginx and PHP7.3. We’ll also secure our NextCloud installation with free SSL/TLS certificates provided by Let’s Encrypt.
NextCloud is a free and open-source self-hosted cloud storage solution, that’s a fork of ownCloud. Not only is NextCloud a free and great alternative to many of the paid cloud storage services. It not only features file storage, but also calendar and contacts, secure video and audio calls, website creation and hosting and collaborative document viewing and editing.
Having said that, let’s get to installing it.
Table of Contents
Prerequisites
Before installing NextCloud, do consider that we assume the following:
- You’re have a local machine remote server running Ubuntu 18.04
- You are acting as a
non-root sudo user. While this is not absolutely necessary, we do recommend it. If you don’t have one set up, you can follow our tutorial on setting up sudo users on Ubuntu 18.04 - You have LEMP Stack installed on your Ubuntu 18.04 machine. It you do not have it set up, you can follow our tutorial Install Linux, Nginx, MariaDB & PHP7.3 (LEMP Stack) on an Ubuntu 18.04 VPS
Get a High RAM VPS at Entry-level Pricing
Starting with 2GB RAM at $6.99/month
Take your pick from our KVM VPS that offer a generous amount of RAM at an affordable price. We've got 5 plans for you to choose from, our cheapest featuring 2GB RAM at $6.99/mo.
[Main Features] - SSD Drives
- KVM Virtualization
- 1Gbps Shared Uplink
- Location: Chicago, IL
Pick one of our KVM plans
Having those requirements fulfilled, we can proceed to going through the steps of installing the latest version of NextCloud. At the time of writing, the latest version is NextCloud 15.
Step 1 – Download NextCloud 15 on Ubuntu 18.04
To download NextCloud 15 on your Ubuntu 18.04 server, change into the /tmp folder, to keep things clean, and use wget to download the archive:
$ cd /tmp
$ wget https://download.nextcloud.com/server/releases/nextcloud-15.0.0.zip
NOTE: At the time of writing, the latest version is NextCloud 15. To download the latest version go to https://nextcloud.com/install/#instructions-server and retrieve the download link for NextCloud.
With the archive downloaded, now unzip it. We’ll also attempt to install unzip, in case you don’t have it installed already. The -d switch specifies the target directory, so the archive will be extracted in /var/www/html/nextcloud:
$ sudo apt install unzip
$ sudo unzip nextcloud-15.0.0.zip -d /var/www/html
Now we’ll have to change the owner of /var/www/html/nextcloud so that Nginx can write to it:
$ sudo chown www-data:www-data /var/www/html/nextcloud -RStep 2 – Install PHP Require Modules
NextCloud requires additional PHP modules. To install them, run the following command:
$ sudo apt install php-imagick php7.3-common php7.3-gd php7.3-json php7.3-curl php7.3-zip php7.3-xml php7.3-mbstring php7.3-bz2 php7.3-intlStep 3 – Create User & Database for NextCloud
NextCloud will need a database and a user to access it. To create them, first log into MariaDB. Since MariaDB now uses the unix_socket authentication plugin for login, you don’t need to enter the root password:
$ sudo mariadbNOTE: If you’re using
MySQLthen just usesudo mysql
Now you should be logged in.
Next, create a database for NextCloud. You can name it whatever you want, but in this tutorial we’ll name it nextcloud_db. To create the database, run the following command:
create database nextcloud_db;Create the database user and give it a password. Name it whatever you’d like and give it what password you prefer, but in this tutorial we’ll call it nextcloud_user and assign it the password _C@stl3br@n:
create user nextcloud_user@localhost identified by '_C@stl3br@n';Grant all privileges to nextcloud_user to nextcloud_db:
grant all privileges on nextcloud_db.* to nextcloud_user@localhost identified by '_C@stl3br@n';Finally flush privileges and exit:
flush privileges;exit;Step 4 – Configure Nginx for NextCloud
Next, we’ll create the configuration file to serve NextCloud.
First, use your favorite text editor to open a file in /etc/nginx/sites-available/. I prefer to name it nextcloud , but you can name it whatever you want:
$ sudo nano /etc/nginx/sites-availableNow add the following contents, replacing nextcloud.dracula.host with your own domain/subdomain. Additionally, please don’t forget to set an A record for your chosen domain to point at your server.
server {
    listen 80;
    server_name nextcloud.dracula.host;

    # Add headers to serve security related headers
    add_header X-Content-Type-Options nosniff;
    add_header X-XSS-Protection "1; mode=block";
    add_header X-Robots-Tag none;
    add_header X-Download-Options noopen;
    add_header X-Permitted-Cross-Domain-Policies none;

    #This header is already set in PHP, so it is commented out here.
    #add_header X-Frame-Options "SAMEORIGIN";

    # Path to the root of your installation
    root /var/www/html/nextcloud/;

    location = /robots.txt {
        allow all;
        log_not_found off;
        access_log off;
    }

    # The following 2 rules are only needed for the user_webfinger app.
    # Uncomment it if you're planning to use this app.
    #rewrite ^/.well-known/host-meta /public.php?service=host-meta last;
    #rewrite ^/.well-known/host-meta.json /public.php?service=host-meta-json
    # last;

    location = /.well-known/carddav {
        return 301 $scheme://$host/remote.php/dav;
    }
    location = /.well-known/caldav {
       return 301 $scheme://$host/remote.php/dav;
    }

    location ~ /.well-known/acme-challenge {
      allow all;
    }

    # set max upload size
    client_max_body_size 512M;
    fastcgi_buffers 64 4K;

    # Disable gzip to avoid the removal of the ETag header
    gzip off;

    # Uncomment if your server is build with the ngx_pagespeed module
    # This module is currently not supported.
    #pagespeed off;

    error_page 403 /core/templates/403.php;
    error_page 404 /core/templates/404.php;

    location / {
       rewrite ^ /index.php$uri;
    }

    location ~ ^/(?:build|tests|config|lib|3rdparty|templates|data)/ {
       deny all;
    }
    location ~ ^/(?:\.|autotest|occ|issue|indie|db_|console) {
       deny all;
     }

    location ~ ^/(?:index|remote|public|cron|core/ajax/update|status|ocs/v[12]|updater/.+|ocs-provider/.+|core/templates/40[34])\.php(?:$|/) {
       include fastcgi_params;
       fastcgi_split_path_info ^(.+\.php)(/.*)$;
       fastcgi_param SCRIPT_FILENAME $document_root$fastcgi_script_name;
       fastcgi_param PATH_INFO $fastcgi_path_info;
       #Avoid sending the security headers twice
       fastcgi_param modHeadersAvailable true;
       fastcgi_param front_controller_active true;
       fastcgi_pass unix:/run/php/php7.3-fpm.sock;
       fastcgi_intercept_errors on;
       fastcgi_request_buffering off;
    }

    location ~ ^/(?:updater|ocs-provider)(?:$|/) {
       try_files $uri/ =404;
       index index.php;
    }

    # Adding the cache control header for js and css files
    # Make sure it is BELOW the PHP block
    location ~* \.(?:css|js)$ {
        try_files $uri /index.php$uri$is_args$args;
        add_header Cache-Control "public, max-age=7200";
        # Add headers to serve security related headers (It is intended to
        # have those duplicated to the ones above)
        add_header X-Content-Type-Options nosniff;
        add_header X-XSS-Protection "1; mode=block";
        add_header X-Robots-Tag none;
        add_header X-Download-Options noopen;
        add_header X-Permitted-Cross-Domain-Policies none;
        # Optional: Don't log access to assets
        access_log off;
   }

   location ~* \.(?:svg|gif|png|html|ttf|woff|ico|jpg|jpeg)$ {
        try_files $uri /index.php$uri$is_args$args;
        # Optional: Don't log access to other assets
        access_log off;
   }
}
NOTE: If you had chosen a different location for NextCloud, then you should also adjust the path to the root of your installation in this file. Basically replace
/var/www/html/nextcloud/with where you installed NextCloud.
Save and close the file when you’re done.
After configuring the server block above, enable it by creating a symbolic link of it into /etc/nginx/sites-enabled/ using the following command:
$ sudo ln -s /etc/nginx/sites-available/nextcloud /etc/nginx/sites-enabled/Test the Nginx configuration to be sure everything is in order and reload Nginx for the changes to take effect:
$ sudo nginx -t
$ sudo systemctl reload nginx
Step 5 – Enable SSL for NextCloud
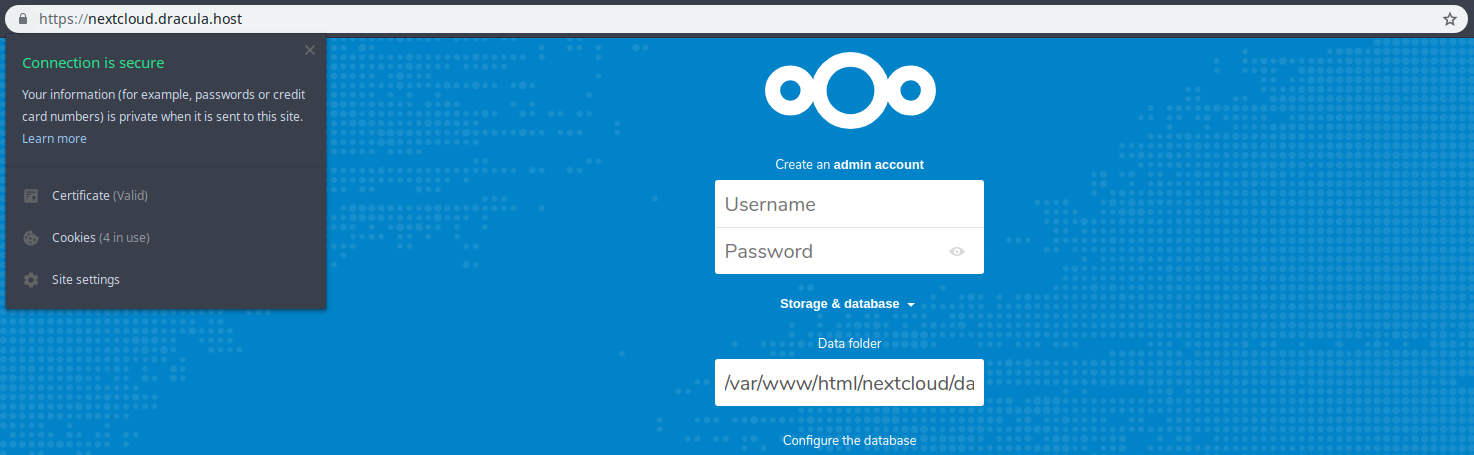
At this point you’ve installed NextCloud on your Ubuntu 18.04 server, but the connection is not secure.
If you visit the domain for your NextCloud installation and you’ll be greeted by the install wizard, but you’ll notice the your browser saying your connection isn’t secure:

For this reason, let’s go through one last step before finalizing the installation.
We can obtain free SSL/TLS certificates using Let’s Encrypt. We can easily do this by using the client provided by Let’s Encrypt, called certbot. You can install certbot on Ubuntu 18.04 by running the following command:
$ sudo apt install certbot python3-certbot-nginxThat command installed certbot along with the Nginx plugin python3-certbot-nginx.
To obtain a free SSL/TLS certificate from Let’s Encrypt for our domain, run the following command, replacing the EMAIL and DOMAIN with your own:
$ sudo certbot --nginx --agree-tos --redirect --hsts --staple-ocsp --email hello@dracula.host -d nextcloud.your-domain.comOption explanation:
--nginx – Use the Nginx authenticator and installer
--agree-tos – Agree to the Terms of Service
--redirect – Enable 301 redirection from http:// to https://
--hsts – HTTP Strict Transport Security tells the browser to never request content from your site using HTTP
--staple-ocsp – Enable Online Certificate Status Protocol (OCSP) stapling, which is a safe and quick way of determining if an SSL certificate is valid or not.
--email – Your email where you’ll receive emails regarding the status of your certificate, and if you want you can also receive updates from the Electronic Frontier Foundation
-d – The domain for which you’re requesting the certificate. You can add up to 100 domains after it.
After running the command you’ll be asked if you’d like to received emails from the Electronic Frontier Foundation.
-------------------------------------------------------------------------------
Would you be willing to share your email address with the Electronic Frontier
Foundation, a founding partner of the Let's Encrypt project and the non-profit
organization that develops Certbot? We'd like to send you email about EFF and
our work to encrypt the web, protect its users and defend digital rights.
-------------------------------------------------------------------------------
Whether you say Y or N your certificate will be obtained and configured for you.
Obtaining a new certificate
Performing the following challenges:
http-01 challenge for nextcloud.dracula.host
Waiting for verification...
Cleaning up challenges
Deploying Certificate to VirtualHost /etc/nginx/sites-enabled/nextcloud

Failed ensure-http-header for nextcloud.dracula.host
Unable to set enhancement ensure-http-header for nextcloud.dracula.host

Problem in /etc/nginx/sites-enabled/nextcloud: tried to insert directive "['add_header', 'Strict-Transport-Security', '"max-age=31536000"', 'always']" but found conflicting "['add_header', 'X-Content-Type-Options', 'nosniff']".

IMPORTANT NOTES:
 - We were unable to set up enhancement ensure-http-header for your
   server, however, we successfully installed your certificate.
 - Congratulations! Your certificate and chain have been saved at:
   /etc/letsencrypt/live/nextcloud.dracula.host/fullchain.pem
   Your key file has been saved at:
   /etc/letsencrypt/live/nextcloud.dracula.host/privkey.pem
   Your cert will expire on 2019-04-10. To obtain a new or tweaked
   version of this certificate in the future, simply run certbot again
   with the "certonly" option. To non-interactively renew *all* of
   your certificates, run "certbot renew"
 - Your account credentials have been saved in your Certbot
   configuration directory at /etc/letsencrypt. You should make a
   secure backup of this folder now. This configuration directory will
   also contain certificates and private keys obtained by Certbot so
   making regular backups of this folder is ideal.
Since are Nginx configuration file is a little too customized from the standard one, certbot didn’t know how to configure redirection (--redirect) and add the HTTP Strict Transport Security headers (--hsts), but we can easily do that ourselves.
Enable HTTPS and HSTS
To do this, we’ll have to edit our Nginx configuration file for NextCloud, that we created earlier, /etc/nginx/sites-available/nextcloud.
Open it up using your favorite text editor:
$ sudo nano /etc/nginx/sites-available/nextcloudNext, make the following edits:
- First of all, we’ll have to configure redirecting from http to https. To do this, we’ll simply add the following block at the top of the file. Be sure to replace my domain with yours:
server {
    listen 80;
    server_name nextcloud.dracula.host;
    return 301 https://nextcloud.dracula.host$request_uri;
}
What we’re telling Nginx to do, is whenever someone visites
http://nextcloud.dracula.host, to redirect it permanently tohttps://nextcloud.dracula.host. - Now, in the existing server block, if you scroll all the way to the bottom of the server block, you’ll see a few lines added by
certbot, that look something like this:listen 443 ssl; ssl_certificate /etc/letsencrypt/live/nextcloud.dracula.host/fullchain.pem; # managed by Certbot ssl_certificate_key /etc/letsencrypt/live/nextcloud.dracula.host/privkey.pem; # managed by Certbot include /etc/letsencrypt/options-ssl-nginx.conf; # managed by Certbot ssl_dhparam /etc/letsencrypt/ssl-dhparams.pem; # managed by CertbotTo keep things tidy, cut them from there, and move them to the top of the server block, right after
server {. - Additionally, under
# Add headers to serve security related headers, you can add the--hstsheader thatcertbotfailed to add:add_header Strict-Transport-Security "max-age=31536000" always; - Lastly, change
listen 443 ssl;tolisten 443 ssl http2to enable HTTP/2.
In case the last few instructions are confusing, here’s how you’ll want the file to look, replacing dracula.host with your own domain, and replacing /var/www/html/nextcloud/ in case you changed the path to your NextCloud installation.
server {
    listen 80;
    server_name nextcloud.dracula.host;
    return 301 https://nextcloud.dracula.host$request_uri;
}

server {
    listen 443 ssl http2; # managed by Certbot
    ssl_certificate /etc/letsencrypt/live/nextcloud.dracula.host/fullchain.pem; # managed by Certbot
    ssl_certificate_key /etc/letsencrypt/live/nextcloud.dracula.host/privkey.pem; # managed by Certbot
    include /etc/letsencrypt/options-ssl-nginx.conf; # managed by Certbot
    ssl_dhparam /etc/letsencrypt/ssl-dhparams.pem; # managed by Certbot

    server_name nextcloud.dracula.host;

    # Add headers to serve security related headers
    add_header Strict-Transport-Security "max-age=31536000" always;
    add_header X-Content-Type-Options nosniff;
    add_header X-XSS-Protection "1; mode=block";
    add_header X-Robots-Tag none;
    add_header X-Download-Options noopen;
    add_header X-Permitted-Cross-Domain-Policies none;

    #This header is already set in PHP, so it is commented out here.
    #add_header X-Frame-Options "SAMEORIGIN";

    # Path to the root of your installation
    root /var/www/html/nextcloud/;

    location = /robots.txt {
        allow all;
        log_not_found off;
        access_log off;
    }

    # The following 2 rules are only needed for the user_webfinger app.
    # Uncomment it if you're planning to use this app.
    #rewrite ^/.well-known/host-meta /public.php?service=host-meta last;
    #rewrite ^/.well-known/host-meta.json /public.php?service=host-meta-json
    # last;

    location = /.well-known/carddav {
        return 301 $scheme://$host/remote.php/dav;
    }
    location = /.well-known/caldav {
       return 301 $scheme://$host/remote.php/dav;
    }

    location ~ /.well-known/acme-challenge {
      allow all;
    }

    # set max upload size
    client_max_body_size 512M;
    fastcgi_buffers 64 4K;

    # Disable gzip to avoid the removal of the ETag header
    gzip off;

    # Uncomment if your server is build with the ngx_pagespeed module
    # This module is currently not supported.
    #pagespeed off;

    error_page 403 /core/templates/403.php;
    error_page 404 /core/templates/404.php;

    location / {
       rewrite ^ /index.php$uri;
    }

    location ~ ^/(?:build|tests|config|lib|3rdparty|templates|data)/ {
       deny all;
    }
    location ~ ^/(?:\.|autotest|occ|issue|indie|db_|console) {
       deny all;
     }

    location ~ ^/(?:index|remote|public|cron|core/ajax/update|status|ocs/v[12]|updater/.+|ocs-provider/.+|core/templates/40[34])\.php(?:$|/) {
       include fastcgi_params;
       fastcgi_split_path_info ^(.+\.php)(/.*)$;
       fastcgi_param SCRIPT_FILENAME $document_root$fastcgi_script_name;
       fastcgi_param PATH_INFO $fastcgi_path_info;
       #Avoid sending the security headers twice
       fastcgi_param modHeadersAvailable true;
       fastcgi_param front_controller_active true;
       fastcgi_pass unix:/run/php/php7.3-fpm.sock;
       fastcgi_intercept_errors on;
       fastcgi_request_buffering off;
    }

    location ~ ^/(?:updater|ocs-provider)(?:$|/) {
       try_files $uri/ =404;
       index index.php;
    }

    # Adding the cache control header for js and css files
    # Make sure it is BELOW the PHP block
    location ~* \.(?:css|js)$ {
        try_files $uri /index.php$uri$is_args$args;
        add_header Cache-Control "public, max-age=7200";
        # Add headers to serve security related headers (It is intended to
        # have those duplicated to the ones above)
        add_header X-Content-Type-Options nosniff;
        add_header X-XSS-Protection "1; mode=block";
        add_header X-Robots-Tag none;
        add_header X-Download-Options noopen;
        add_header X-Permitted-Cross-Domain-Policies none;
        # Optional: Don't log access to assets
        access_log off;
   }

   location ~* \.(?:svg|gif|png|html|ttf|woff|ico|jpg|jpeg)$ {
        try_files $uri /index.php$uri$is_args$args;
        # Optional: Don't log access to other assets
        access_log off;
   }

}
When you’re done save and close the file.
Now test Nginx to be sure everything is OK and there are no conflicts and then reload Nginx for the changes to take effect:
$ sudo nginx -t
$ sudo systemctl reload nginx
Now visit your NextCloud domain and you should see that it’s a secured:
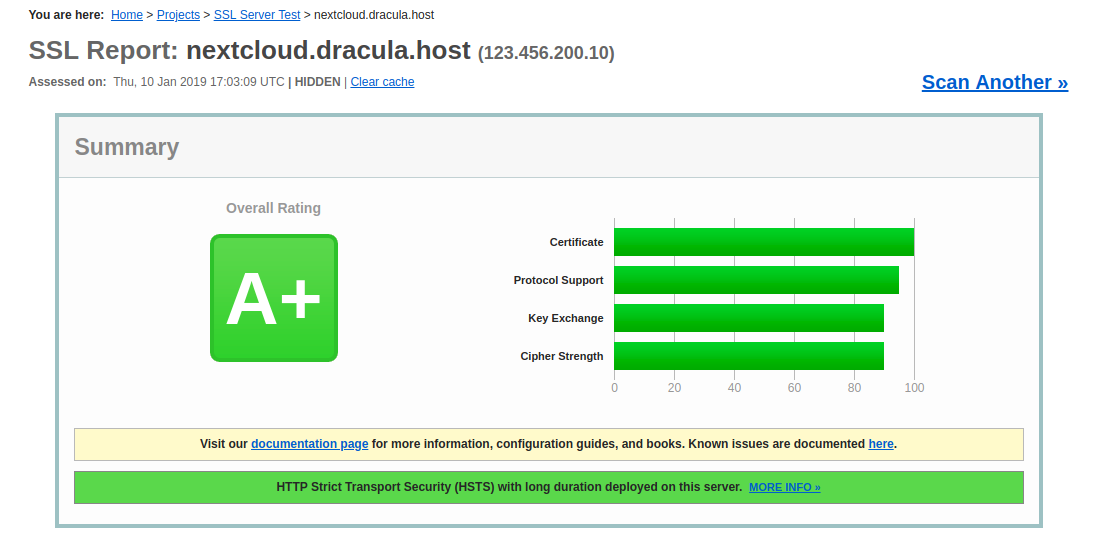
Additionally, you can check how well we configured SSL, by testing your domain at SSLabs.
You should get an A+:
Step 6 – Complete NextCloud Installation
Now we’ve got everything set up to finish installing NextCloud.
Visit your NextCloud domain in your browser and you should be presented with a for to fill:
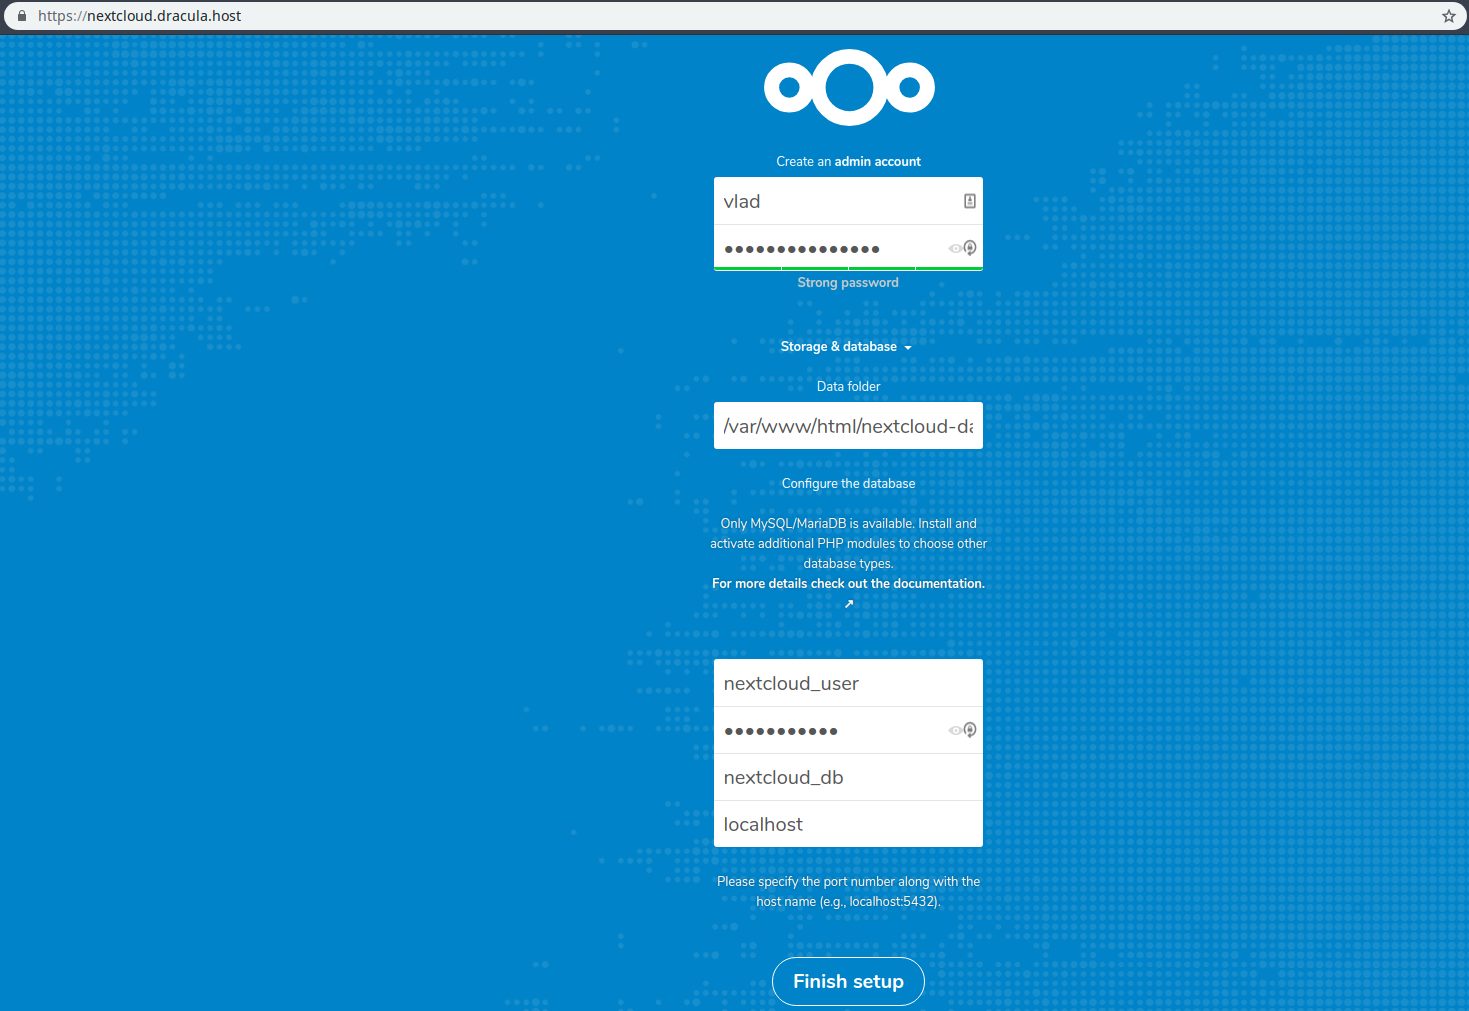
Here’s what to do next:
Create an admin account
Here you enter your desired user and password. Be sure to use a strong password, for security reasons.
Data folder
This is where data will be stored. It is considered good practice to set the data directory outside of the NextCloud root directory.
As such, we can create a different directory such as /var/www/html/nextcloud-data:
$ sudo mkdir /var/www/html/nextcloud-dataWe then have to make sure that we change the owner so Nginx can write to the folder:
$ sudo chown www-data:www-data /var/www/html/nextcloud-data -RNow you can fill in /var/www/html/nextcloud-data in the Data folder field in the installation form.
Configure the database
Here’s where you’ll fill in your database user, password, and database name, that you created earlier.
If you created the database on the server on which you installed NextCloud, then leave localhost, otherwise, if you’re keeping the database on a different server, replace localhost with the remote database.
Finally, you can click on Finish setup and you’re done!
Conclusion
Well done. Hopefully, you’ve succeeded in installing NextCloud on your Ubuntu 18.04 server with Nginx, PHP7.3 and Let’s Encrypt SSL/TLS free certificates, and you now have your own elegant Dropbox solution.
If you’ve encountered any issues, feel free to let us know in the comment section or by contacting us via email or social media.
Get a High RAM VPS at Entry-level Pricing
Starting with 2GB RAM at $6.99/month
Take your pick from our KVM VPS that offer a generous amount of RAM at an affordable price. We've got 5 plans for you to choose from, our cheapest featuring 2GB RAM at $6.99/mo.
[Main Features] - SSD Drives
- KVM Virtualization
- 1Gbps Shared Uplink
- Location: Chicago, IL
Pick one of our KVM plans
Subscribe
Login
0 Comments