![]()
How to Install and Secure phpMyAdmin with Nginx on Ubuntu 18.04

phpMyAdmin is a free and open-source MySQL and MariaDB management tool. It allows you to manage databases, execute SQL queries, manage user accounts, export and import data, and much more – all over a web interface. It is, and has been for a long time, one of the most popular web based MySQL management tools.
In this tutorial we’ll install phpMyAdmin with Nginx (LEMP Stack to be precise), on a server running Ubuntu 18.04.
Table of Contents
Prerequisites
- While not required, it’s recommended that you use a
non-root sudo user. If you don’t have one set up, you can check out our tutorial on how to create a sudo user on Ubuntu and why it’s recommended. - LEMP Stack installed on your Ubuntu 18.04. If you don’t have it set up, you can follow our tutorial on how to install LEMP stack on Ubuntu 18.04 here.
Step 1 – Install phpMyAdmin on Ubuntu
To install phpMyAdmin on Ubuntu, just update the package index and then install the package from the default Ubuntu repositories:
$ sudo apt update
$ sudo apt install phpmyadmin
Please make sure that you have LEMP Stack installed on your system before installing phpMyAdmin.
During the phpMyAdmin installation you’ll be prompted with a few Package Configuration screens. They may vary in order, depending on your setup.
If you’re prompted to choose a web server, Nginx will most likely not be one of them, and you’ll have to choose between apache2 and lighttpd. Just press TAB, so the cursor goes on OK, and press enter ENTER, without selecting a server.

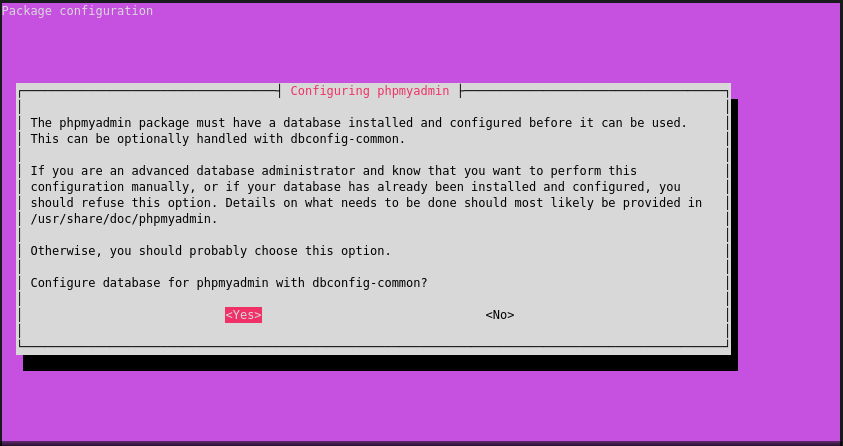
In this next screen, in which you’re asked to install and configure the database for phpMyAdmin, select YES and press ENTER.
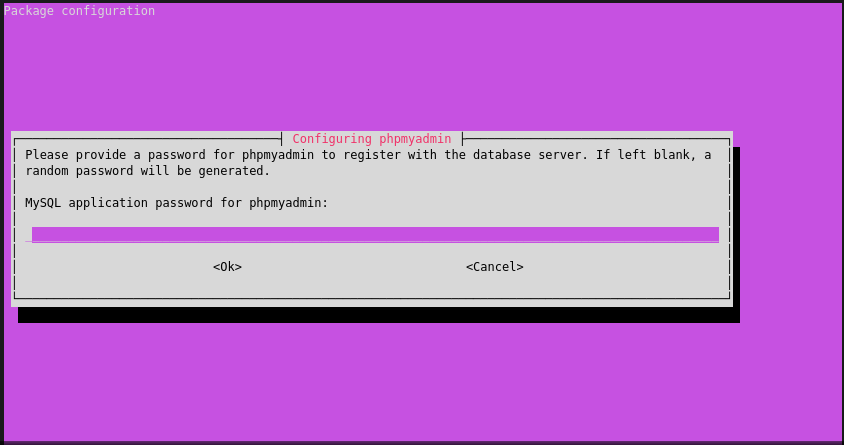
This screen is asking you for a password that will be used only internally by phpMyAdmin to communicate with MySQL. You can just leave it empty and press ENTER and a random password will be generated. If you insist on it, you can set your own password, however.
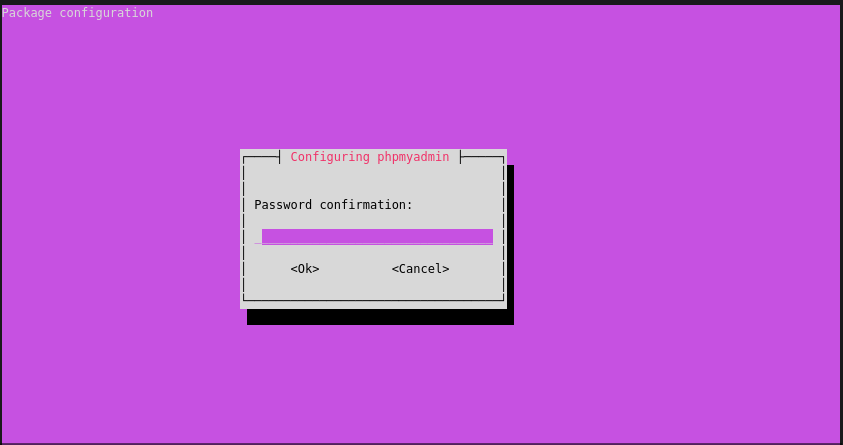
The last thing you have to do is to confirm your password:
And that’s it. Now phpMyAdmin is installed on your system.
Step 2 – Create Symbolic Link
We’ll have to configure Nginx ourselves to serve phpMyAdmin files. There are a few ways to do this, but since our domain’s server block is already set up to serve PHP files, we’ll just create a symbolic link from the phpMyAdmin installation files, to our domain’s document root.
The phpMyAdmin directory is /usr/share/phpmyadmin and the default document root for Nginx on Ubuntu 18.04 is /var/www/html, but your directory may be different depending on your set up. If it is, then just replace /var/www/html in the following command, with your own.
Once you’ve established your Nginx document root, we’ll create a symbolic link from the phpMyAdmin directory to it. To do this, run the following command.
sudo ln -s /usr/share/phpmyadmin /var/www/html/phpmyadmin
You should now be able to access phpMyAdmin at http://your_domain_or_IP/phpmyadmin. Before doing that, however, we’ll create a superuser account just for accessing phpMyAdmin.
Step 3 – Create Administrative MySQL User
There may be a possibility that you’re not able to log into phpMyAdmin as root. For this reason we’ll create a superuser account just for accessing it.
To do this, log into MySQL as root, using the password you created upon installing and securing MySQL (or MariaDB). To log in, run the following command and enter your MySQL password at the prompt:
$ sudo mysql -u root -pNow we’ll create a user to access phpMyAdmin with. I’m creating one called pma_vlad (phpMyAdmin Vlad) and the password bloodiwantblood. Be sure to replace them with your own, when creating the user.
CREATE USER 'pma_vlad'@'%' IDENTIFIED BY 'bloodiwantblood';The % symbol tells MySQL to allow the user to connect from anywhere. If you want additional security, you can replace % with an IP address.
With the following command, we’ll grant superuser privileges to pma_vlad:
GRANT ALL PRIVILEGES ON *.* TO 'pma_vlad'@'%' WITH GRANT OPTION;You should now be able to log into phpMyAdmin with the new user you created.
Step 4 – Access phpMyAdmin
To access phpMyAdmin, just go to http://your_domain_or_IP/phpmyadmin and you should be able to log in with the user/password you created in step 3.
Step 5 – Secure phpMyadmin
Since phpMyAdmin is a popular open-source software, it’s a target for hackers and bots. As such, we’ll take a few simple measures to prevent them from reaching & accessing our phpMyAdmin, by adding 2 simple layers of security.
01. Obscure the Default phpMyAdmin URL
Since hackers and bots will typically scan example.com/phpmyadmin or ip_address/phpmyadmin for the phpMyAdmin login page, what we’ll do is simply move the login page to some other URL.
In Step 2 we created a symbolic link from the phpMyAdmin (/usr/share/phpmyadmin)directory to the our domain’s document root (/var/www/html).
To change our phpMyAdmin URL, all we need to do is rename that symbolic link, which is /var/www/html/phpmyadmin. You can rename it do anything you’d like. In our example we’ll rename it to nopenopenope. To rename the symbolic link, run the following command:
$ sudo mv /var/www/html/phpmyadmin /var/www/html/nopenopenopeNow you should be able to access phpMyAdmin by visiting http://your_domain_or_IP/nopenopenope, or whatever you used instead of nopenopenope.
02. Set Up an Nginx Authentication Gateway for phpMyAdmin
An additional layer of security is to set up an authentication gateway in Nginx, for when someone visits your phpMyAdmin URL.
This will prompt any visitor with a Javascript popup to first authenticate with another set of credentials, before attempting to actually log into phpMyAdmin.
This should be especially efficient against most bots.
To do this, we’ll install apache2-utils that’ll generate our .htpasswd file. This works with both Nginx and Apache.
$ sudo apt install apache2-utilsNow we’ll generate our .htpasswd file. Run the following command, replacing username with whatever username you’d like:
$ sudo htpasswd -c /etc/nginx/.htpasswd usernameYou’ll be prompted to set up a new password. It’s recommended you decide on a strong password.
If you check the contents of the newly generated file, you’ll see that it contains your username and your encrypted password:
$ cat /etc/nginx/.htpasswdOutput:
vlad:$apr1$WzMVMcJi$cvSu3QXzPRiOTQDd2qZ3O0We’ll now need to add 2 directives to our Nginx configuration file. If you followed the naming convention from our LEMP installation tutorial, then you should’ve named your config file the same as your domain name. In our case it’s /etc/nginx/sites-available/dracula.host.
We’ll open it up with our favorite text editor, and add the following block, under thelocation block:
location /nopenopenope {
        auth_basic "Restricted Access";
        auth_basic_user_file /etc/nginx/.htpasswd;
}
Save and exit the file when you’re done.
Check if the Nginx syntax is correct by running:
$ sudo nginx -tIf everything’s OK then reload Nginx:
$ sudo service nginx reloadNow, when you visit http://your_domain_or_IP/nopenopenope you should be prompted with the authentication popup.
[Example] Edit Server Block – Nginx Auth Gateway
Conclusion
That’s it. You should now have phpMyAdmin installed on Ubuntu 18.04, using Nginx, and secured with 2 layers of protection.
If you’ve had issues with this tutorial, please do let us know in the comments or get in touch via email.
Subscribe
Login
0 Comments