![]()
How to Install VestaCP and Add a New Domain on Ubuntu 18.04
VestaCP is a free and open-source web hosting control panel, with a set of features that includes integration with Softaculous, managing domains, databases, mail, DNS, cron jobs, backups, and more. It’s one of the free control panels that has stuck around and is still going strong – and for good reason! Compared to other control panels, it’s lightweight and resource friendly, easy to install, and it’s a great cPanel alternative.
In this tutorial we’ll install VestaCP on an Ubuntu 18.04 machine, after which we’ll configure it and add a new domain to it.
Table of Contents
Prerequisites
This guide assumes that you have the following.
- A server running Ubuntu 18.04, with at a minimum of 1GB RAM
- A valid domain with it’s A records pointing to your server’s IP address.
To clarify, before we start, here’s how I’ll have things set up on starting:
dracula.host – A Record points to server_IP (our testing domain)
panel – A Record points to server_IP (we’ll access VestaCP by visiting panel.dracula.host)
draculawebsite.ml – The domain that we’ll add to our hosting, after VestaCP is installed.
If you don’t have domains, you can get free ones from FREENOM. If you need a recommendation to buy domains from a registrar, then we recommend Namecheap.
NOTE: You may have different requirements, and not want to do what we write in this guide. If that’s the case, and you need assistance, then feel free to leave us a comment and we’ll get back to you ASAP.
Get a High RAM VPS at Entry-level Pricing
Starting with 2GB RAM at $6.99/month
Take your pick from our KVM VPS that offer a generous amount of RAM at an affordable price. We've got 5 plans for you to choose from, our cheapest featuring 2GB RAM at $6.99/mo.
[Main Features] - SSD Drives
- KVM Virtualization
- 1Gbps Shared Uplink
- Location: Chicago, IL
Pick one of our KVM plans
Step 1 – Configure Your Server’s FQDN
FQDN (Fully Qualified Domain Name) is your server’s complete domain name. It consists of the hostname and the domain name.
First, we’ll change the domain name using the hostnamectl command. This command will update the kernel about the hostname being changed, and you won’t have to reboot your machine.
We’ll update our hostname based on the subdomain we’ve want to access VestaCP on. In our case it’s going to be panel.
$ sudo hostnamectl set-hostname panelNext, we’ll edit our /etc/hosts file:
$ sudo nano /etc/hostsIt probably looks something like this:
127.0.0.1	localhost
127.0.1.1	ubuntu

# The following lines are desirable for IPv6 capable hosts
::1     localhost ip6-localhost ip6-loopback
ff02::1 ip6-allnodes
ff02::2 ip6-allrouters
And now we’ll add the following line at the end of the file:
IP_address subdomain.domain.tld subdomainIn my case, I’ll add something like the following:
123.231.111.23 panel.dracula.host panelSave and close the file when you’re done.
Now run the following command to restart the network manager for the changes to be applied:
$ sudo systemctl restart NetworkManager.serviceLet’s check our hostname and FQDN, for good measure:
$ hostname
panel
$ hostname -f
panel.dracula.host
If everything’s ok up until now, then we can proceed.
Step 2 – Install VestaCP on Ubuntu
Update Your System
First of all, let’s make sure that all of our packages are up-to-date by running the following commands:
$ sudo apt update
$ sudo apt upgrade
Download and Install VestaCP
Install cURL:
$ sudo apt install curlNow download the VestaCP install script and make it an executable:
$ curl -O http://vestacp.com/pub/vst-install.sh
$ sudo chmod u+x vst-install.sh
Generate the Install Command
The VestCP website provides an awesome way to customize and generate the VestaCP install command, so you can configure your installation right a way. To do this, visit https://vestacp.com/install and scroll down just a little. You’ll find the form, where you can configure the command, under Advanced Install Settings.
Now you can select your settings in accordance with your requirements.
We’ll explain a few of them, that we’re selecting in this demo:
WEB – Select your preferred web server. Most users choose nginx + apache, which means Nginx will be used as the frontend webserver and Apache as the backend.
DNS – If you want a a DNS server, choose named.
Additional Repository – You can select an additional repository, Remi, which is a third party repository that includes up-to-date versions of Apache, MySQL, MariaDB, PHP and related software.
FTP – VestaCP does not include a file browser, so you can choose between to vsftpd or proftpd as your FPT server, for uploading/downloading files.
Firewall – You can choose between fail2ban + iptables, iptables or no firewall. fail2ban alters iptables rules dynamically, to mitigate brute force attacks. We recommend you chose either of the 2 options, as choosing no will leave your server vulnerable.
File System Quota – If you intend to use VestaCP for a Shared Web Hosting server, where you’ll have multiple users, you’ll probably want to choose yes, to limit users. Otherwise you can choose no.
MAIL – Here, it’s recommended that you choose Exim + dovecot + SpamAssassin + ClamAV. Exim is responsible for receiving and sending emails to remote servers, dovecot is responsible for storing the emails, SpamAssassin will protect your server against SPAM, and ClamAV will handle virus activity. A downside of ClamAV is that it will increase load on your CPU.
SOFTACULOUS – If you either want the option to auto-install the packages available in the free version or plan on buying Softaculous for auto installing a ton of software, then choose yes. If you don’t plan on doing that, then choose no
DB – Here, we chose MySQL since it’s what we primarily use.
Hostname – Where we want to access VestaCP. We’re using panel.dracula.host
Email – Your email.
Password – Your desired VestaCP login password.
After selecting your preferred options, you can click the Generate Install Command at the bottom, and the command will be made available under # Run it.
Here’s ours:
bash vst-install.sh --nginx yes --apache yes --phpfpm no --named yes --remi yes --vsftpd yes --proftpd no --iptables yes --fail2ban yes --quota yes --exim yes --dovecot yes --spamassassin yes --clamav yes --softaculous yes --mysql yes --postgresql no --hostname panel.dracula.host --email hello@dracula.host --password YOUR_PASSWORD_HERE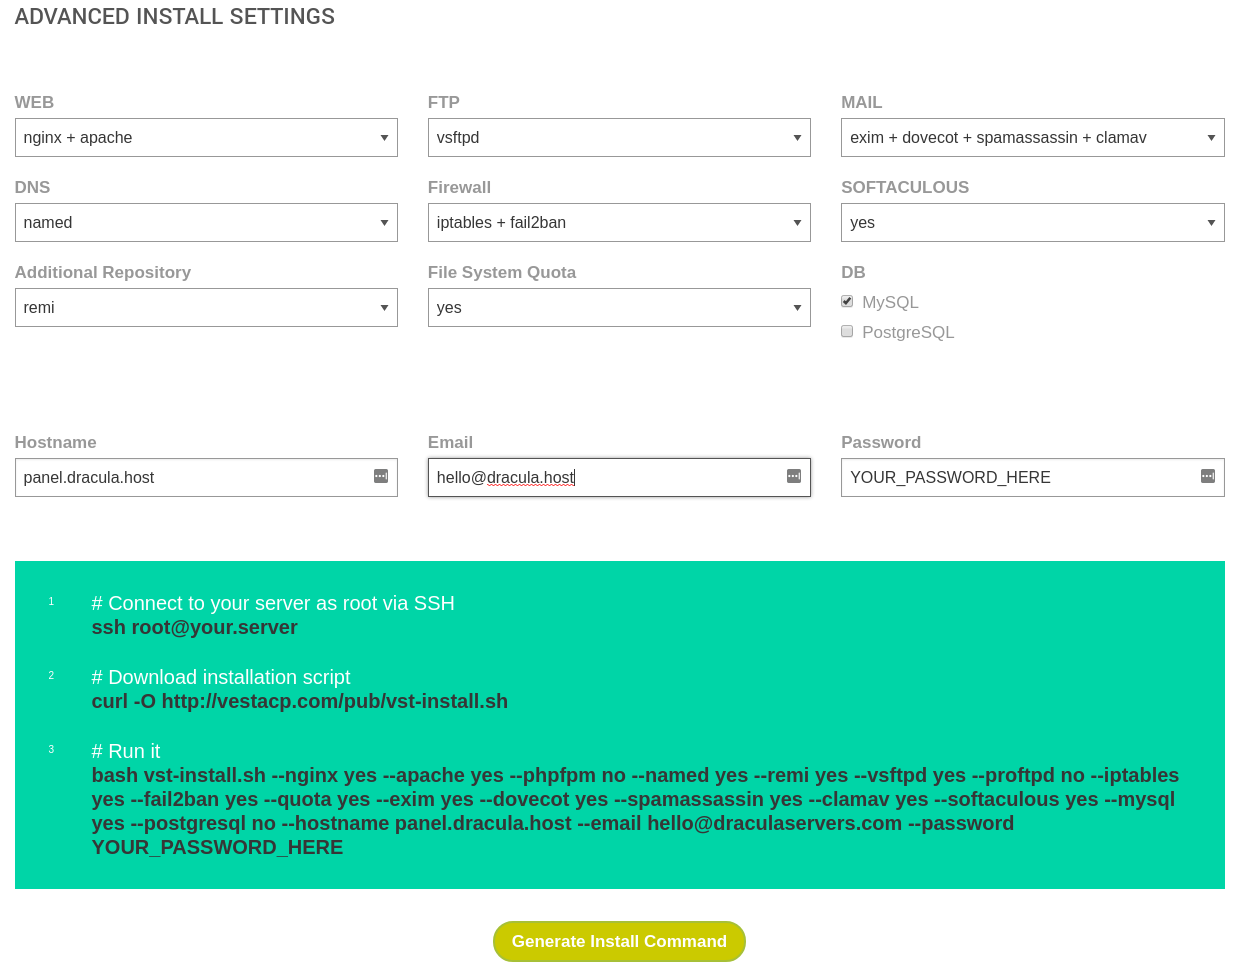
Run the VestaCP Install Command
When you run the install command, you’ll end up with the following output, displaying your chosen configuration:
 _|      _|  _|_|_|_|    _|_|_|  _|_|_|_|_|    _|_|
 _|      _|  _|        _|            _|      _|    _|
 _|      _|  _|_|_|      _|_|        _|      _|_|_|_|
   _|  _|    _|              _|      _|      _|    _|
     _|      _|_|_|_|  _|_|_|        _|      _|    _|

                                  Vesta Control Panel


The following software will be installed on your system:
   - Nginx Web Server
   - Apache Web Server (as backend)
   - Bind DNS Server
   - Exim Mail Server + ClamAVSpamAssassin
   - Dovecot POP3/IMAP Server
   - MySQL Database Server
   - Vsftpd FTP Server
   - Softaculous Plugin
   - Iptables Firewall + Fail2Ban

Would you like to continue [y/n]: y
Installation backup directory: /root/vst_install_backups/1546684280


Installation will take about 15 minutes ...
If you’re sure you want to continue, type y and ENTER.
The installation takes about 10-15 minutes.
When it’s finished installing VestaCP, you’ll be displayed something like the following screen, and you’ll also be sent the login details to your email.
_| _| _|_|_|_| _|_|_| _|_|_|_|_| _|_|
_| _| _| _| _| _| _|
_| _| _|_|_| _|_| _| _|_|_|_|
_| _| _| _| _| _| _|
_| _|_|_|_| _|_|_| _| _| _|
Congratulations, you have just successfully installed Vesta Control Panel
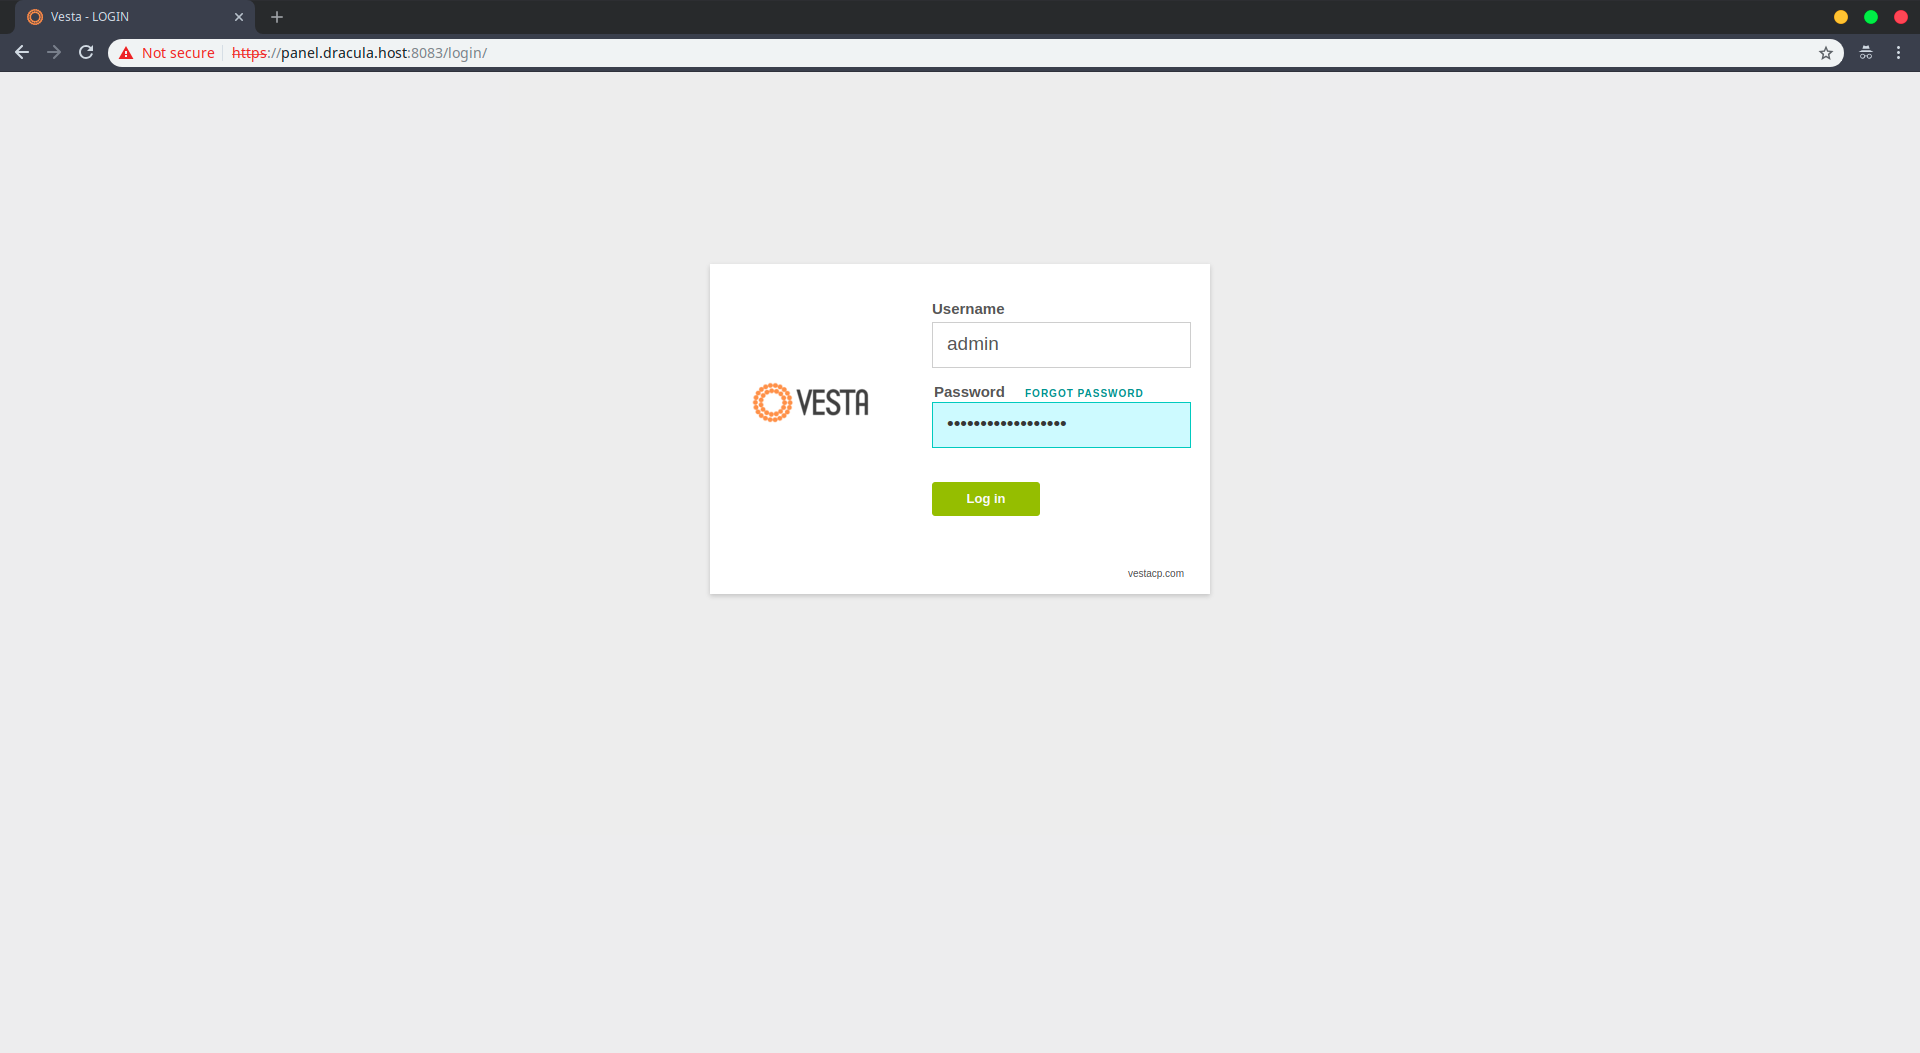
https://panel.dracula.host:8083
username: admin
password: YOUR_PASSWORD_HERE
We hope that you enjoy your installation of Vesta. Please feel free to contact us anytime if you have any questions.
Thank you.
--
Sincerely yours
vestacp.com teamStep 3 – Configure VestaCP
Now that VestaCP is successfully installed, you can follow the instructions in the output after the installation, and visit the URL provided. In my case, I’m visiting https://panel.dracula.host:8083.
The browser will complain about a self-signed certificate. You can safely add it as an exception and proceed to the login page.
Change Admin Password
The first thing you should do is change the admin password, and make it a strong password. You can also check other settings there as well.
You can change the admin password by clicking on admin in the extreme upper right corner of the VestaCP dashboard.
Managing Services
You can see and manage installed services by clicking on Server , on the right, in the VestaCP top navigation menu. From there you can restart, stop, start or configure services.
The VestaCP menu is quite intuitive and straightforward. If you’ve got any questions you can either check the VestaCP Docs or leave us a commend and we’ll do what we an to assist.
Create and Add Nameservers
Basically, a Nameserver is a server on the internet specialized in handling queries regarding the location of a domain name’s various services.
Earlier, when we built our installation command, we chose DNS:named. We did that because we want to create child nameservers for our VestaCP installation. Child nameservers are our own named private nameservers, that we can create through our registrar.
By using nameservers we can easily add domains to our hosting – domain registrars allow us to do this when managing our domain, as you’ll see later on.
NOTE: If you’re confused, don’t worry. You’ll see how nameservers work further in this guide.
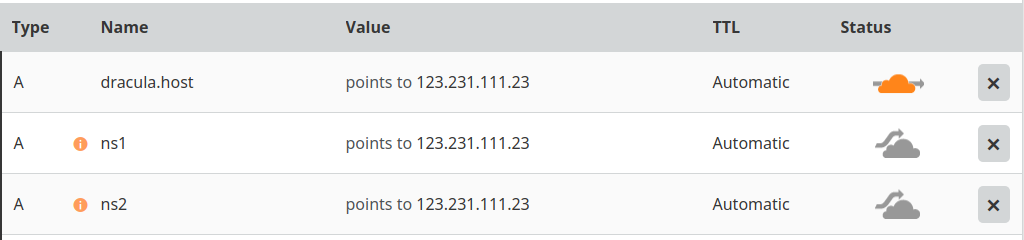
Our nameservers will look like this:
ns1.your_domain.tld
ns2.your_domain.tld
As such, my nameservers are going to be these:
ns1.dracula.host
ns2.dracula.host
To create these nameservers, you’ll just have to go in the dashboard of the Domain Registrar from where you registered your domain, and create 2 A Records that’ll point to your server’s IP address.
Here’s an example of this. I’m using Cloudflare, but whatever your registrar is, you should be able to create A records and point them to your server’s IP address.
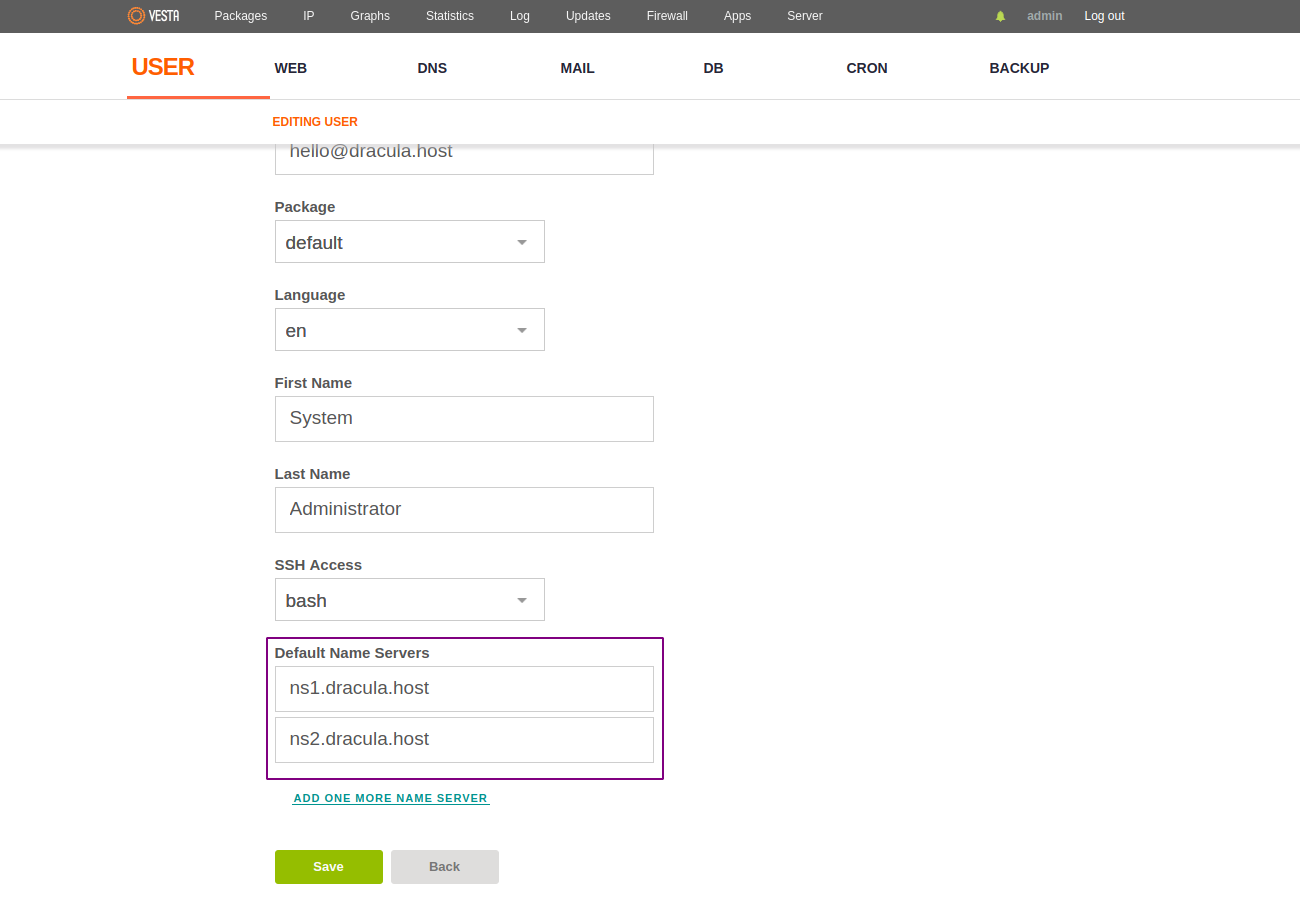
Now head over to your VestaCP Dashboard, in the USER section. Hover your mouse in the area of Admin/System Administrator and the EDIT button should appear.
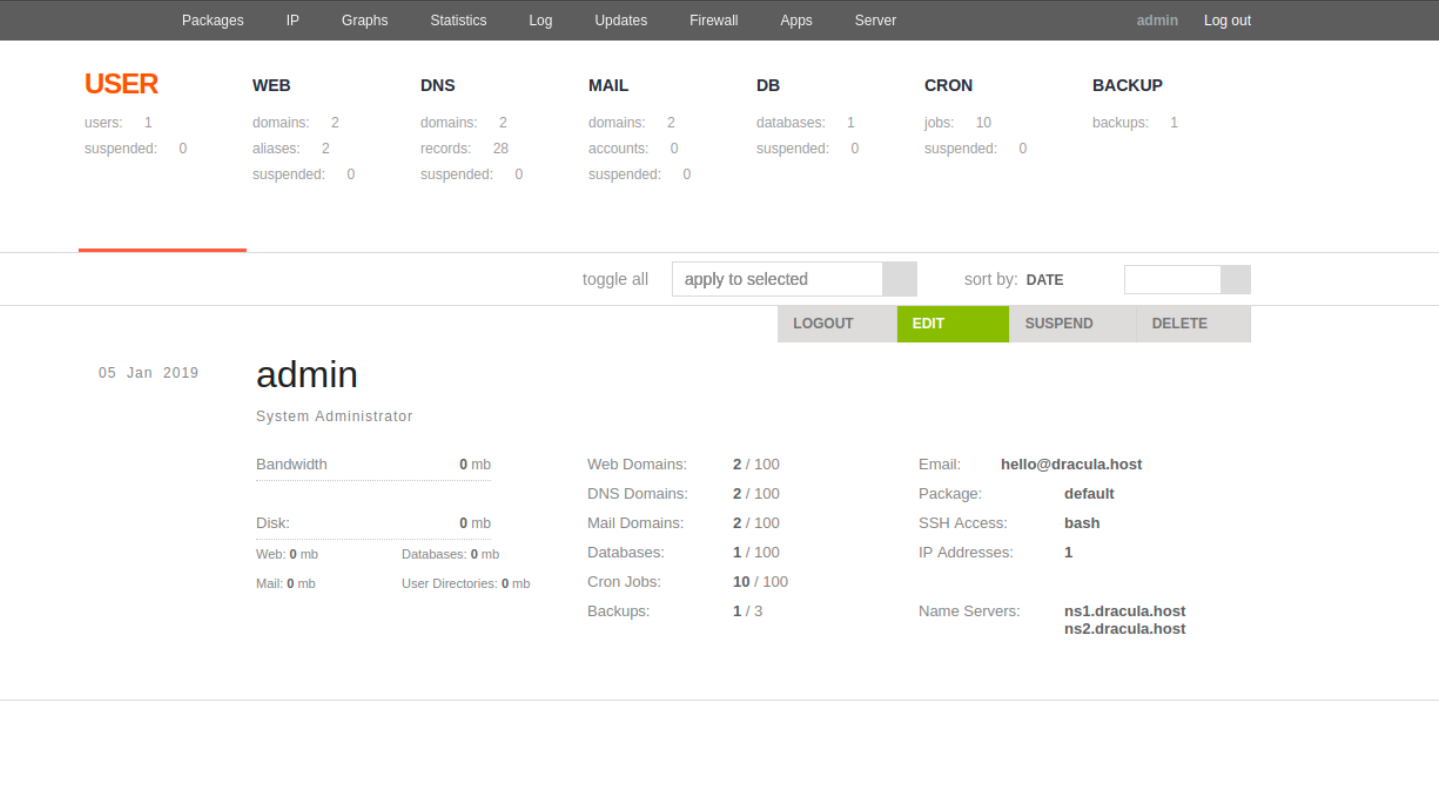
Click the EDIT button, and on the next page, if you scroll down a little, you’ll be able to edit Default Name Servers.
Change them to the nameservers you just created and save. In my case, it’ll look like this:
Add a New Domain
To add a new domain, in my case draculawebsite.ml, first go into the registrar’s dashboard, and change it’s nameservers to the ones you created earlier.
In my case, I registered draculawebsite.ml from Freenom. I navigated on the page where I manage nameservers and added the nameservers I created earlier:
ns1.dracula.host
ns2.dracula.host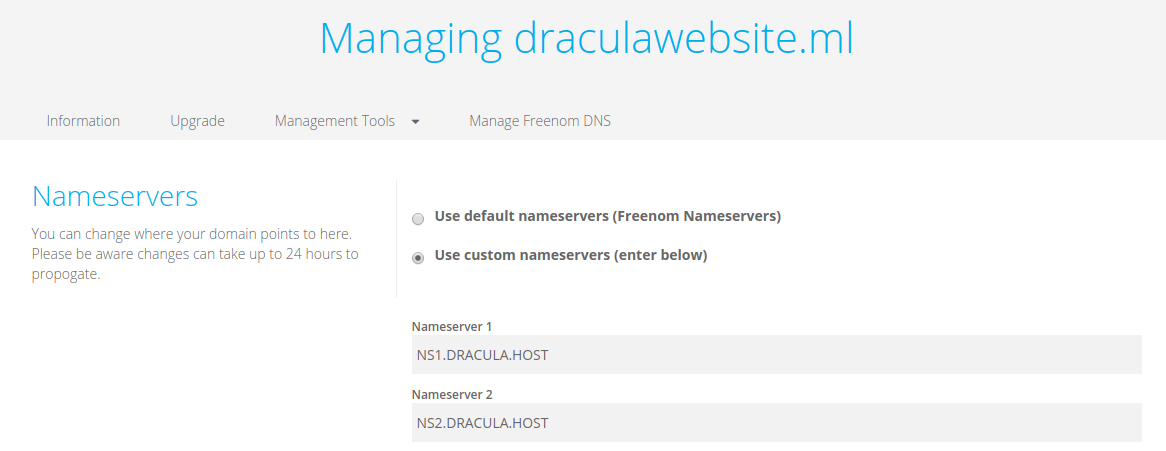
After assigning the nameservers to your new domain, in the registrar dashboard, you can go in the VestaCP dashboard, on WEB, and click on the big green plus sign to add a new domain.
This will take you to the ADDING DOMAIN page.
- In the
Domainfield type in your new domain. In my case it’sdraculawebsite.ml - Under
IP addressselect the IP of your server. - Click
ADVANCED OPTIONS - In the
Aliasessection you can add aliases. It should be automatically filled out with the default aliaswww.your_domain.tld - To enable SSL check the
SSL Supportcheckbox. This’ll causeLets Encrypt Supportto appear, which provides free SSL certificates. If you want to enable it then just check the Let’s Encrypt Support box too – we recommend you do that if you don’t have paid certificates. - Choose whether you want web analytics –
webalizer,awstatsornone. - If you want a separate FTP account for this domain, you can check
Additional FTPand fill in the desired credentials for your new FTP account. - Click
Addwhen you’re done, and after waiting a few seconds, the domain should be successfully added.
There should be a confirmation message that your domain has been added successfully.
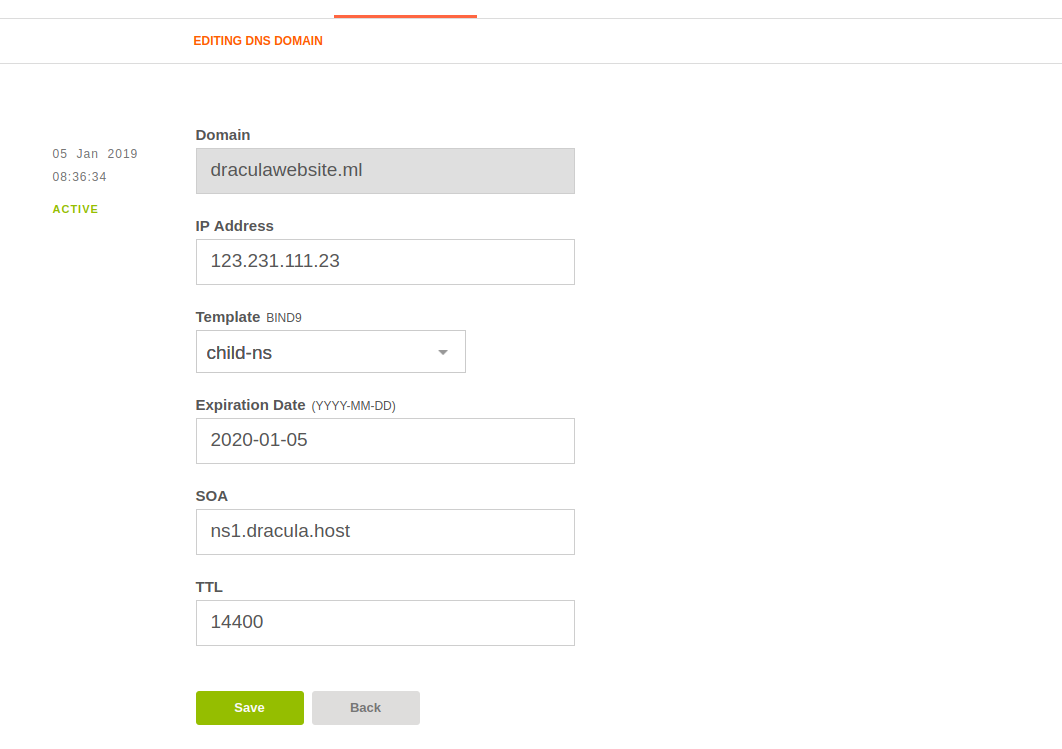
Finally, head over to the DNS page ( next to WEB, under the top navigation ), hover over the domain you just created, and the EDIT button should appear. Click that and you’ll be taken to the EDITING DNS DOMAIN page.
All you have to do here is change the Template for the BIND9 to child-ns and SOA to your nameserver ( in my case ns1.dracula.host ) and save it.
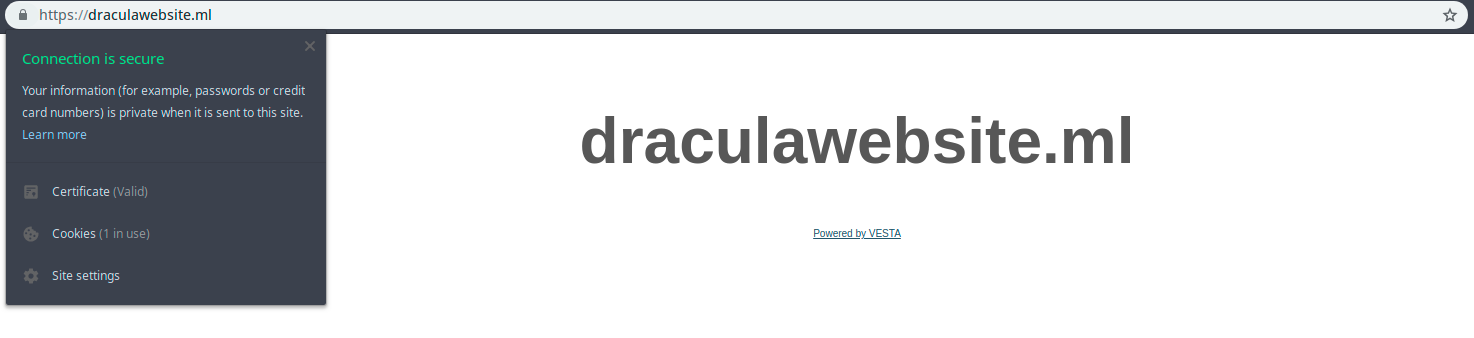
That’s it. Now you can visit your newly added domain, and you should see the default VestaCP page.
If you selected Let’s Encrypt Support, your website should also work over https.
Conclusion
Well done. You’ve now successfully installed VestaCP on Ubuntu 18.04 and added your first domain to it.
FYI. Earlier we had the choice of installing Softaculous. In case you do not know this, the paid version of Softaculous offers you the possibility of autoinstalling over 400 apps on your hosting – such as Magento, WordPress etc. You can check the Softaculous VestaCP Documentation for more information.
Other tutorials may differ from this one, with regards to how they add their new domain. If anything is confusing, you encounter any issue or have any questions, please do contact us and we’ll get right back to you.
Need Help?
Have a server from a different provider and need help? Hit us up!
We offer various services to assist you in achieving your business goal. Working in the industry, we've gained proficiency various areas related to hosting.
[Proficiencies Include] - RADIUS
- WHMCS
- LAMP Stack
- LEMP Stack
- VPN Protocols
- SMTP
- Remote Desktop Solutions
- Linux in general
- WHMCS
- LAMP Stack
- LEMP Stack
- VPN Protocols
- SMTP
- Remote Desktop Solutions
- Linux in general
Hire Us
Hi,
Your article was a very helpful one, thanks for the write-up
However, I ,ight have found some errors, I think you made them during edit, b/c I ued your article sometime ago without observing these errors.
sudo hostnamectl set-hostname panelDid not work for me in Ubuntu 18.04, had to use
hostname panelsystemctl retart NetworkManager.serviceHad to use
systemctl start systemd-networkd.service