![]()
How to Install WordPress on Ubuntu 18.04 using MariaDB, Nginx, PHP 7.2 & Let’s Encrypt

Introduction
If you want to set up a professional website without having to invest a good deal of money or time, then WordPress is one of the best solutions.
Additionally, you can lower your budget by installing it yourself on a server, rather than hosting your website on shared hosting, or using a web panel.
This is what we aim for in this tutorial. By the time you’ve worked through it, you should have a fully functional, secure website that can withstand a good deal of traffic without affecting it’s speed – and on a budget!
Table of Contents
- Introduction
- Overview
- Prerequisites
- Step 1 — Install Nginx
- Step 2 — Install MariaDB
- Step 3 — Install PHP7.2-FPM And Related Modules
- Step 4 — Create a MariaDB Database and User for WordPress
- Step 5 — Download WordPress
- Step 6 — Configure Nginx
- Step 7 — Set up WordPress Configuration File
- Step 8 — Obtain and Configure the Let’s Encrypt SSL Certificates
- Step 9 — Finalize the WordPress Installation
Overview
In this tutorial we’ll cover setting up LEMP Stack, installing and configuring WordPress and Let’s Encrypt.
LEMP Stack is a group of popular open-source software that serve your website’s dynamic web pages.
LEMP stands for:
Linux– in our case it’s Ubuntu 18.04Nginx– pronounced Engine-X, it is a powerful web server that will serve content to your visitors. It’s one of the most popular web servers and is used by some of the biggest websites on the internet.MariaDB– a fork of the popular MySQL and some consider it to be better in some ways than MySQL. We won’t get into that, however you can check comparisons for yourself. We use MariaDB for storing and managing our data.PHP– is one popular & powerful server-scripting language that you’ve most likely heard of. We’ll use PHP 7.2 to dynamically process web pages.
Prerequisites
- A Ubuntu server with a minimum of 512MB RAM, but with a recommended 1GB+ RAM.
Most software that we’ll be using comes from Ubuntu’s default package repositories, which means we’ll use the apt command to make these installations.
Since we assume this is the first time we’re using apt we’ll make sure we have the latest listings by updating our server’s package index:
$ sudo apt updateUpdating package index
Now that our package index is up-to-date, we can get down to business.
Step 1 — Install Nginx
To install Nginx on Ubuntu just run the command:
$ sudo apt-get intall nginxInstalling Nginx
Now stop, start and enable Nginx so it always starts on boot:
sudo systemctl stop nginx.service
sudo systemctl start nginx.service
sudo systemctl enable nginx.service
Stop/Start/Enable Nginx
Step 2 — Install MariaDB
WordPress will use MariaDB to store and manage our data. To install MariaDB run the following command:
$ sudo apt-get install mariadb-server mariadb-clientInstall MariaDB
Like we did with Nginx, use the following commands to stop, start and enable MariaDB so it always starts when the server boots:
sudo systemctl stop mariadb.service
sudo systemctl start mariadb.service
sudo systemctl enable mariadb.service
Stop/Start/Enable MariaDB
To secure your installation, MariaDB comes with a script to help you adjust some insecure defaults. To start securing MariaDB run the following command:
$ sudo mysql_secure_installationYou’ll be prompted to answer some questions. We recommend you answer as follows:
NOTE: Make sure you remember your MariaDB password, as you’ll be using it later on.
Enter current password for root (enter for none): Just press the Enter
Set root password? [Y/n]: Y
New password: Enter password
Re-enter new password: Repeat password
Remove anonymous users? [Y/n]: Y
Disallow root login remotely? [Y/n]: Y
Remove test database and access to it? [Y/n]: Y
Reload privilege tables now? [Y/n]: Y
Secure MariaDB
Restart MariaDB Server:
$ sudo systemctl restart mariadb.serviceRestart MariaDB Server
Let’s make sure MariaDB is set up correctly before moving forward. We’ll just test it by logging in. To do this run the following command and enter your MariaDB password at the prompt. After that you can just type exit.
$ sudo mysql -u root -pTest/Login MariaDB
Step 3 — Install PHP7.2-FPM And Related Modules
Since Nginx does not come with PHP processing, we’ll have to install it ourselves. What we’ll need to do now is install php-fpm, along with a few more extensions that are most frequently used by WordPress and its’ plugins:
sudo apt update
sudo apt install php-curl php-gd php-intl php-mbstring php-soap php-xml php-xmlrpc php-zip
NOTE: The extensions we’ve just installed are used by most plugins, but there are some WordPress plugins that require additional extensions. Make sure to check their documentations and see what other extensions they may require to work. You can install additional ones with the apt command as we’ve just done above.
When you’re done installing PHP7.2-FPM, and the extensions, make sure to restart the PHP-FPM process so it uses the newly added extensions:
$ sudo systemctl restart php7.2-fpmInstall PHP7.2-FPM And Related Modules
With that we’ve installed PHP and extensions most commonly used by WordPress and many of its’ plugins.
Configure the PHP Processor
Now that we’ve got PHP installed, we’ll have to adjust a few settings to make our setup more secure and adjust some settings that’ll make our life easier when working with WordPress.
To do this, open the main php-fpm configuration file:
$ sudo nano /etc/php/7.2/fpm/php.iniAnd adjust the following values:
memory_limit = 256M
upload_max_filesize = 100M
cgi.fix_pathinfo = 0
max_execution_time = 360
date.timezone = America/Chicago
Save and close the file when you’re finished.
Edit PHP.ini
Restart the PHP processor, so that the changes we made are implemented:
$ sudo systemctl restart php7.2-fpm.serviceRestart Nginx and PHP7.2-FPM
Step 4 — Create a MariaDB Database and User for WordPress
First of all, we’ll need to set up a new database and a user for WordPress to use. WordPress uses the database to manage and store data, and it’ll need it’s own user to be able to authenticate when doing that.
Log into the MariaDB root by running:
$ mysql -u root -pYou should be prompted to enter your MariaDB root password. Enter the password you created when installing MariaDB.
Now we’ll create a database for WordPress to use. You can name it anything you want, but for the purposes of this tutorial we’ll call it dracula_db here. Create it by running the following command:
CREATE DATABASE dracula_db;
Next we’ll create a database user and set it a password. You can replace wordpressuser and wordpressuser_password with anything you’d like.
CREATE USER 'countdracula'@'localhost' IDENTIFIED BY 'bloodiwantblood';
With the new database and user created, we’ll have to grant our new user privileges to allow them to access the database. To do that, run the following command:
GRANT ALL ON dracula_db.* TO 'countdracula'@'localhost' IDENTIFIED BY 'bloodiwantblood' WITH GRANT OPTION;
You’ve created a database and user exclusively for WordPress to use. Now we’ll have to flush the privileges so that the current instance of MariaDB knows about the recent changes.
FLUSH PRIVILEGES;
Exit MariaDB when you’re done:
EXIT;
Create MariaDB Database/User/Password
Step 5 — Download WordPress
Download, unpack & move WordPress into your new website’s root directory. In this tutorial, our directory is dracula.host but you can name it however you’d like.
cd /tmp && wget https://wordpress.org/latest.tar.gz #download
tar -zxvf latest.tar.gz #unpack
sudo mv wordpress /var/www/html/dracula.host
Set the correct permissions for WordPress to function:
sudo chown -R www-data:www-data /var/www/html/dracula.host/
sudo chmod -R 755 /var/www/html/dracula.host/
Download WordPress & Set Permissions
Step 6 — Configure Nginx
Now we’ll edit the Nginx configuration file for your our new WordPress website, in /etc/nginx/sites-available/.
In this example we’ll use /etc/nginx/sites-available/dracula.host as the configuration file for our WordPress site. This file basically controls how visitors access your website. You should replace dracula.host with what applies to your requirements.
To begin, open your server block’s file with sudo privileges:
$ sudo nano /etc/nginx/sites-available/dracula.hostIn the main server block we’ll have to add some location blocks.
The first location blocks are will block the exact matches of /favicon.ico and /robots.txt, so we will block logging requests for them.
We’ll also turn off logging for static files, by using regular expressions. In these blocks we also mark these files as highly cacheable since they are typically expensive to serve.
You can also adjust the regex for any other extension you’d like.
server {
    . . .

    location = /favicon.ico { log_not_found off; access_log off; }
    location = /robots.txt { log_not_found off; access_log off; allow all; }
    location ~* \.(css|gif|ico|jpeg|jpg|js|png)$ {
        expires max;
        log_not_found off;
    }

    . . .
}
Inside the existing location / block, we’ll need to adjust the try_files list so it passes control to index.php instead of returning a 404.
server {
    . . .

    location / {
        #try_files $uri $uri/ =404;
        try_files $uri $uri/ /index.php$is_args$args;
    }

    . . .
}
Save and close the file when you’re finished.
To give you the full example, our file will look like this when we’re done with it. Remember to change dracula.host with your own domain.
server {
        listen 80;

        root /var/www/html/dracula.host;
        index  index.php index.html index.htm index.nginx-debian.html;
        server_name dracula.host www.dracula.host;

        client_max_body_size 100M;

        location / {
                try_files $uri $uri/ /index.php$is_args$args;
        }

        location ~ \.php$ {
                include snippets/fastcgi-php.conf;
                fastcgi_pass unix:/var/run/php/php7.2-fpm.sock;
                fastcgi_param SCRIPT_FILENAME $document_root$fastcgi_script_name;
                include fastcgi_params;
        }

        location = /favicon.ico { log_not_found off; access_log off; }
        location = /robots.txt { log_not_found off; access_log off; allow all; }
        location ~* \.(css|gif|ico|jpeg|jpg|js|png)$ {
                expires max;
                log_not_found off;
        }

        location ~ /\.ht {
                deny all;
        }
}
Now let’s check if everything’s ok with the changes we’ve made:
$ sudo nginx -tIf there were no errors then we can restart Nginx so the changes can take effect:
$ sudo systemctl reload nginxConfigure Nginx
The last step here is to enable our server block that we just created. We enable it by linking it from /etc/nginx/sites-available and into /etc/nginx/sites-enabled. We do this with the following command:
sudo ln -s /etc/nginx/sites-available/dracula.host /etc/nginx/sites-enabled/Restart Nginx so our changes are implemented:
$ sudo systemctl restart nginx.serviceEnable the Site
Step 7 — Set up WordPress Configuration File
Configure your WordPress configuration file wp-config.php
$ sudo mv /var/www/html/dracula.host/wp-config-sample.php /var/www/html/dracula.host/wp-config.phpOpen the configuration file to edit it:
$ sudo nano /var/www/html/dracula.host/wp-config.phpSet the MariaDB Database, User & Password that you created earlier, so that WordPress can use the it to store and manage data:
// ** MySQL settings - You can get this info from your web host ** //
/** The name of the database for WordPress */
define('DB_NAME', 'dracula_db');

/** MySQL database username */
define('DB_USER', 'countdracula');

/** MySQL database password */
define('DB_PASSWORD', 'bloodiwantblood');

/** MySQL hostname */
define('DB_HOST', 'localhost');

/** Database Charset to use in creating database tables. */
define('DB_CHARSET', 'utf8');

/** The Database Collate type. Don't change this if in doubt. */
define('DB_COLLATE', '');
Save the file and exit when you’re done.
Configure WordPress
Step 8 — Obtain and Configure the Let’s Encrypt SSL Certificates
Let’s Encrypt provides an Nginx a client to automate obtaining and configuring it. It’s called certbot, and to install it on Ubuntu run the following commands:
sudo add-apt-repository ppa:certbot/certbot
sudo apt-get update
sudo apt-get install python-certbot-nginx
Install Let’s Encrypt Client
To obtain your free Let’s Encrypt SSL/TLS certificate run the following command:
$ sudo certbot --nginx -m your@email.com -d your_domain.com -d www.your_domain.comIn our case we’ll run:
$ sudo certbot --nginx -m hello@draculaservers.com -d dracula.host -d www.dracula.hostAfter running the command, you’ll be prompted if you accept the Licensing Terms and after that, if you would like to share your email to receive news from the Electronic Frontier Foundation which is an organization that works towards digital freedom ( In short, they’re trustworthy, don’t spam, and are fighting the good fight, in our opinion ).
You only need to accept the Licensing Terms to proceed (A).
Please read the Terms of Service at
https://letsencrypt.org/documents/LE-SA-v1.2-November-15-2017.pdf. You must
agree in order to register with the ACME server at
https://acme-v02.api.letsencrypt.org/directory
- - - - - - - - - - - - - - - - - - - - - - - - - - - - - - - - - - - - - - - -
(A)gree/(C)ancel: A
You are not required to share your email, but can do so if you’d like to receive emails regarding their work encrypting the web, EFF news, campaigns, and ways to support digital freedom.
Would you be willing to share your email address with the Electronic Frontier
Foundation, a founding partner of the Let's Encrypt project and the non-profit
organization that develops Certbot? We'd like to send you email about our work
encrypting the web, EFF news, campaigns, and ways to support digital freedom.
- - - - - - - - - - - - - - - - - - - - - - - - - - - - - - - - - - - - - - - -
(Y)es/(N)o: Y
Next, you’ll be prompted to answer whether you want to redirect all HTTP traffic to HTTPS. This is an important step!
Choose option 2, so everyone visiting, for example, http://dracula.host will be actually be redirected to https://dracula.host
Please choose whether or not to redirect HTTP traffic to HTTPS, removing HTTP access.
- - - - - - - - - - - - - - - - - - - - - - - - - - - - - - - - - - - - - - - -
1: No redirect - Make no further changes to the webserver configuration.
2: Redirect - Make all requests redirect to secure HTTPS access. Choose this for
new sites, or if you're confident your site works on HTTPS. You can undo this
change by editing your web server's configuration.
- - - - - - - - - - - - - - - - - - - - - - - - - - - - - - - - - - - - - - - -
Select the appropriate number [1-2] then [enter] (press 'c' to cancel): 2
After that, the Let’s Encrypt Client should install your certificate and configure your website to redirect all traffic to HTTPS.
Congratulations! You have successfully enabled https://dracula.host and
https://www.dracula.host

You should test your configuration at:
https://www.ssllabs.com/ssltest/analyze.html?d=dracula.host
https://www.ssllabs.com/ssltest/analyze.html?d=www.dracula.host
- - - - - - - - - - - - - - - - - - - - - - - - - - - - - - - - - - - - - - - -

IMPORTANT NOTES:
 - Congratulations! Your certificate and chain have been saved at:
   /etc/letsencrypt/live/dracula.host/fullchain.pem
   Your key file has been saved at:
   /etc/letsencrypt/live/dracula.host/privkey.pem
   Your cert will expire on 2019-01-21. To obtain a new or tweaked
   version of this certificate in the future, simply run certbot again
   with the "certonly" option. To non-interactively renew *all* of
   your certificates, run "certbot renew"
 - Your account credentials have been saved in your Certbot
   configuration directory at /etc/letsencrypt. You should make a
   secure backup of this folder now. This configuration directory will
   also contain certificates and private keys obtained by Certbot so
   making regular backups of this folder is ideal.
 - If you like Certbot, please consider supporting our work by:

   Donating to ISRG / Let's Encrypt:   https://letsencrypt.org/donate
   Donating to EFF:                    https://eff.org/donate-le
If you check your site’s Nginx configuration file, in our case /etc/nginx/sites-available/dracula.host, you’ll notice that some modifications have been made by the Let’s Encrypt client.
. . .

    listen 443 ssl; # managed by Certbot
    ssl_certificate /etc/letsencrypt/live/dracula.host/fullchain.pem; # managed by Certbot
    ssl_certificate_key /etc/letsencrypt/live/dracula.host/privkey.pem; # managed by Certbot
    include /etc/letsencrypt/options-ssl-nginx.conf; # managed by Certbot
    ssl_dhparam /etc/letsencrypt/ssl-dhparams.pem; # managed by Certbot

}

server {
    if ($host = www.dracula.host) {
        return 301 https://$host$request_uri;
    } # managed by Certbot


    if ($host = dracula.host) {
        return 301 https://$host$request_uri;
    } # managed by Certbot


    listen 80;
    server_name dracula.host www.dracula.host;
    return 404; # managed by Certbot

}
Your WordPress site is now ready to be used over HTTPS.
Obtain Free SSL/TLS Certificates
There’s one more step that we need to do here.
The Let’s Encrypt SSL/TLS Certificates expire in 3 months and you will have to renew for another 3 months, and so on. To automate this, we can set up a cron job to renew it every time so we don’t have to worry.
To do this run:
sudo crontab -eAnd add the following line at the end of the file. It will try to renew the certificate every day, and it will succeed in renewing it when it gets close to expiring.
0 1 * * * /usr/bin/certbot renew & > /dev/nullSave and exit when you’re done.
NOTE: You can see a nice explanation of the cron expression we used here: https://crontab.guru/#0_1_*_*_*
Finalize/Schedule SSL Renewal
Step 9 — Finalize the WordPress Installation
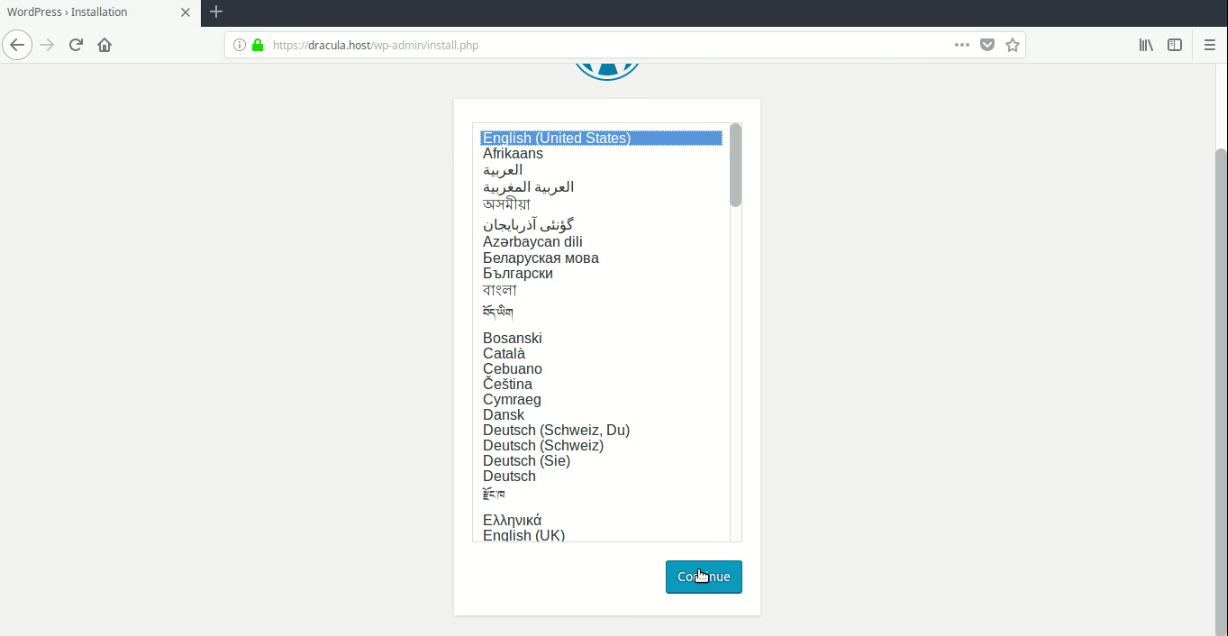
The final step is to complete the WordPress installation through the web interface. To do this, just navigate in your browser to your domain ( in our case https://dracula.host ), and you’ll be guided through the easy process of installing WordPress.
Select your preferred language.
And fill in your basic website and admin user information.
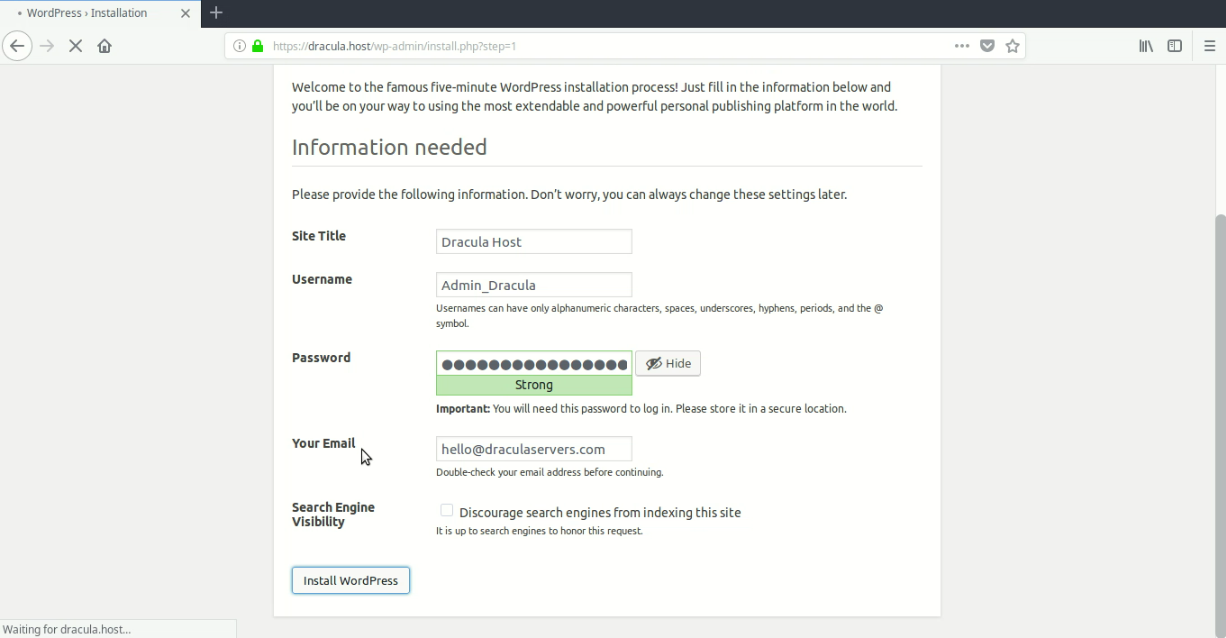
You can see that your website’s URL shows that you are using HTTPS.
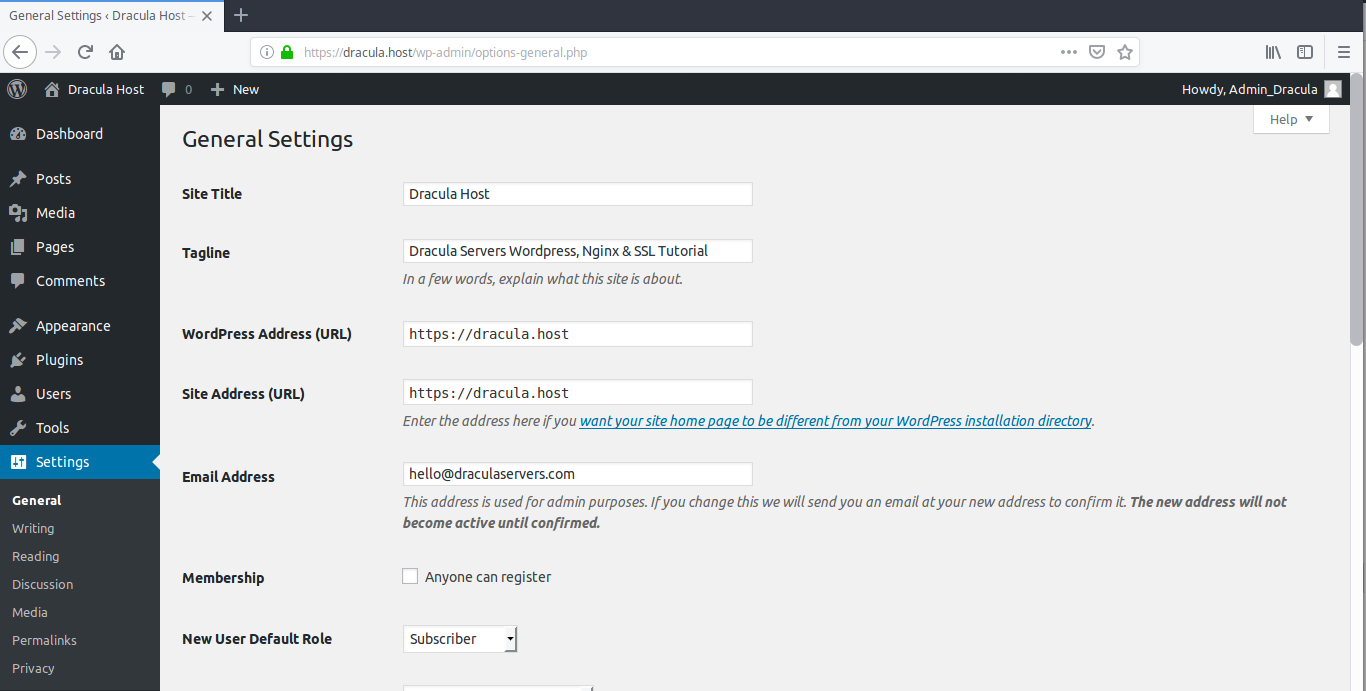
Congratulations! You’ve successfully set up WordPress using Nginx, MariaDB, PHP and Let’s Encrypt on an Ubuntu server!
If you’d like an budget Linux VPS then check out our Linux KVM SSD Plans. We offer affordable VPS, with our smallest plan featuring 2GB RAM, 10GB SSD and for only $5.99!
And f you’ve got any questions or you’ve got an issue that you can’t figure out, then don’t hesitate to leave a comment or contact us.
Cheers!
Subscribe
Login
0 Comments