![]()
WHMCS FreeRadius Module Install

In this article, we’re going to learn how to integrate the Radius Server from the previous tutorial with WHMCS, in order to automatically provision orders and manage users on our network.
Before we start, let’s go through the services we’re going to use. We have already covered Freeradius and DaloRadius. I recommend going through both tutorials before proceeding.
What is WHMCS?
WHMCS is a popular client management system ( CMS ), mostly used by hosting companies. It has been around since the early days and it is still going strong to this day. One of the features that made it so popular is the ability to bill customers and automatically set up their order. If you’re on this page, it’s a safe bet to assume that you’re already familiar with WHMCS, so I won’t go into any more details.
Pre-Installed FreeRADIUS Servers
Automatic FreeRADIUS 3 + daloRADIUS Set Up
Instantly deploy machines with FreeRADIUS + MySQL + daloRADIUS GUI Panel already set up, receive the credentials and take over from there! You also get our custom WHMCS Module to help you manage it from our dashboard.
Pick one of our FreeRADIUS KVM plans
P.S. We're available for hire, if you need help. Click here to contact us.
Table of Contents
- What is WHMCS?
- FreeRadius Provisioning Module
- Prerequisites
- Step 0 – Log into the Freeradius server with Putty
- Step 1 – Freeradius MYSQL remote connections
- Step 2 – Create Radius Profiles
- Step 3 – WHMCS Freeradius Module
- Step 4 – Add a Product Server
- Step 5 – Create a WHMCS Product
- Testing
- Further Customization
FreeRadius Provisioning Module
The WHMCS module from this guide is able to Create, Suspend, Unsuspend, Change Password, and Terminate radius accounts from WHMCS, be it automatically or manually from the admin panel.

The Client Area will display basic product information and the option for Cancellation and Password Change.
Prerequisites
Before we start, make sure that you already have a server with Freeradius + daloRadius installed. If you don’t, you can order a VPS with both installed and have it delivered in minutes.
This tutorial has been tailored and tested using DraculaServers Radius VPS.
Click here to learn more about our Radius VPS.
Step 0 – Log into the Freeradius server with Putty
The first time you open an ssh session the Freeradius server ordered from draculaservers.com, the MySQL and radius password will be displayed. Please note them down as you’ll need them later in this guide.
==============================================

Phpmyadmin:
http://server_IP_or_domain/phpmyadmin

Your Mysql root password: MTUzYzllMTljMjk5OWU5ZDYyMmViZTw

============================================

Radius Panel:
http://server_IP_or_domain/radpanel
User: administrator
Pass: MTUzYzllMTljMjk5OWU5ZDYyMmViZTw
Step 1 – Freeradius MYSQL remote connections
By default, Mysql only allows localhost connections. That is not good for our goal as we want to allow WHMCS access to the radius database. We need to change the default settings so that MySQL will allow remote connections.
vim /etc/mysql/mysql.conf.d/mysqld.cnf
Set bind = 0.0.0.0 save and restart the MySQL service
service mysql restart
mysql -uroot -pYOURPASSWORD

GRANT ALL PRIVILEGES ON *.* TO 'root'@'%' IDENTIFIED BY 'YOURPASSWORD' WITH GRANT OPTION;
FLUSH PRIVILEGES;
Although not recommended, we’re going to use the MySQL root for this tutorial. We need to grant it permission to connect remotely to the radius database. For extra security, we recommend creating a new user that is only allowed to connect from the ip address of the WHMCS server.
Step 2 – Create Radius Profiles
For each WHMCS product, you plan on selling, create a corresponding profile group in Daloradius. You can assign any radius attribute to the groups and set different bandwidth limits and simultaneous connections for each profile group.
We’re going to use profiles to differentiate between WHMCS billing plans and products.
See this tutorial on how to create Radius Profiles from the GUI Panel.
Step 3 – WHMCS Freeradius Module
From your DraculaServers client area download the WHMCS Radius module. You can also start the download from here.
Upload the zip file to your WHMCS server, in the modules/servers/ folder.
Step 4 – Add a Product Server
From the WHMCS admin panel, go to Setup > Products/Services > Servers.
Click on the Add Server and input your radius server data.
 From the Type dropdown select FreeRadius DraculaServers
Add the Freeradius’ MySQL database credentials in the user/password field.
Add the database name in the Access Hash field and click Test Connection. If the WHMCS server manages to establish a database connection to the radius server, a SUCCESSFUL message will be displayed.
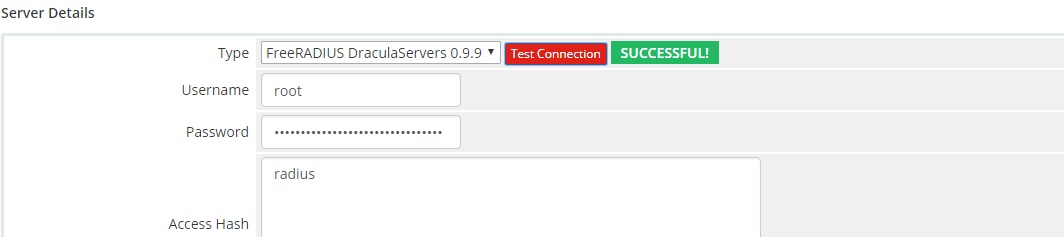
Click OK to add the server and create a new Server Group containing the newly added server.
Step 5 – Create a WHMCS Product
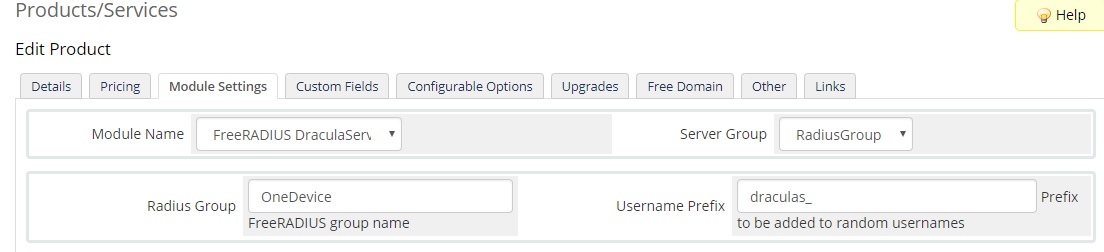
Navigate to Setup > Products/Services > Products/Services and create a new product. After setting the price and the product details, go to the Module Settings tab.
Select FreeRadius DraculaServers from the dropdown and the Server Group containing the server we have created at the previous step.
In the Radius Group box add the Radius Profile we have created on Step 2. In our case, the profile is named OneDevice and contain radius attributes that limit the user to 1 connection and 12 GB of bandwidth per month.
You can customize the profile group from the Freeradius DaloRadius panel as you see fit for your service you are running.
The Radius account names will be randomly generated. Select a preferred prefix to be included in the names.
Click OK to save the product.
Testing
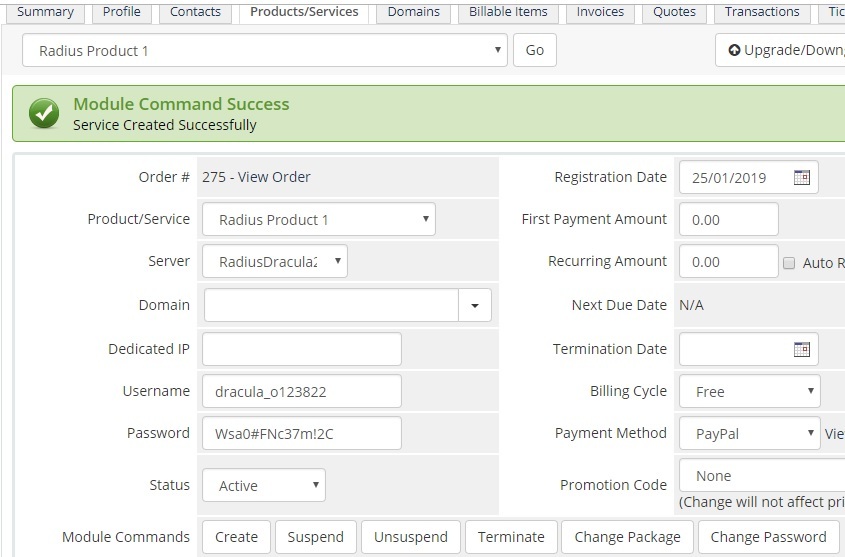
In WHMCS, place an order for your newly added product and click Create from the User’s Products/Services panel.
A green message should appear if the user has been successfully created on the Freeradius server.
Login into the DaloRadius Panel and go to Management > List Users to see the newly created user.
To test the Radius user you can download NTRadPing and initiate a radius connection. We’ve already done this in a past tutorial. See it here.
Further Customization
Don’t hesitate to reach out to our support department if you need more functionality from the WHMCS module. We can be hired to create a tailored version that fits your exact requirements.
Pre-Installed FreeRADIUS Servers
Automatic FreeRADIUS 3 + daloRADIUS Set Up
Instantly deploy machines with FreeRADIUS + MySQL + daloRADIUS GUI Panel already set up, receive the credentials and take over from there! You also get our custom WHMCS Module to help you manage it from our dashboard.
Pick one of our FreeRADIUS KVM plans
P.S. We're available for hire, if you need help. Click here to contact us.
Subscribe
Login
0 Comments