How to Change Hostname in Linux | Temporary And Permanent

The hostname is an identifier every Linux Operating System has on the network. By default, the hostname is set during the installation process of the Linux Operating System. However, the user can manually set it after the installation at any time according to the requirements.
Various scenarios can require you to change the hostname of your Linux Operating System, such as deploying a Local Server/domain. Also, having a more meaningful hostname allows your PC to be easily accessed instead of using its IP Address.
Whatever the case is. This guide will teach you all the different ways that you can use to change the hostname of your Linux Operating System.
But first…
How to Check the Hostname in Linux?
Before learning how to change the hostname, you should be aware of the method of checking the current hostname. You can easily check the hostname of your machine by running the following command in the terminal:
hostname
This will show the following output:
As you can see from the image, the current hostname is set to “linux.”
Note: Alternatively, you can use the command “hostnamectl” to get more information.
Method 1: Change Hostname With Network Manager
The Network Manager Text User Interface is a setup wizard that lets users manage their network settings. This means that it allows the users to change their hostname as well. This is a great tool for beginners in the Linux Operating System. If the nmtui utility is not installed on your Linux operating system, then you will first install it using the following commands:
For CentOS/RHEL:
sudo yum install NetworkManager-tui
For Ubuntu/Debian:
sudo apt install NetworkManager-tui
After that nmtui has been installed, open a terminal and type the following command:
sudo nmtui
Type in the password for the root user, and the terminal will display the following textual menu:
Use the keyboard arrow keys to head to the third option, “Set system hostname,” and press enter. Doing this will open a new pop-up window asking you about the new hostname:
Type the hostname that you want and press the Enter key:
After that, exit the Network Manager UI and type the following command in the terminal:
hostnamectl
This will show you the hostname of your machine after the change has been made:
You have successfully changed your hostname. However, this change is temporary and will reset after your machine has been rebooted.
Method 2: Edit the Hosts Configuration Files
If you want to change the hostname permanently, you’ll need to change your system configuration files. The configuration files are “hosts” and “hostname.” Start by opening the hostname file using the following command:
sudo nano /etc/hostname
Running this will show the hostname file’s content:
Replace the current hostname with the new hostname:
After that, simply save and close the file using the “CTRL+O” followed up by “CTRL+X.” You’ll also need to update the /etc/hosts file to reflect the new hostname. Open the file with the following command:
sudo nano /etc/hosts
Look for the line that starts with 127.0.0.1 and has the old hostname next to it:
Replace the old hostname with the new one and save the file.
Finally, restart your machine to apply your permanent changes. After the restart, verify the hostname using the hostnamectl command:
You have successfully changed your Hostname permanently.
Method 3: Using the hostname Command
You can temporarily change your machine’s hostname by simply using the hostname command. The syntax of using this command is defined as:
sudo hostname <new_Hostname_here>
Let’s change the hostname to “DSHome” by using the following hostname command in the terminal:
sudo hostname DSHome
After running this command, use the hostname command to verify the temporary change:
You have successfully changed your hostname temporarily.
Method 4: Using the hostnamectl Command
Just like the hostname command, you can use the hostnamectl command to change your hostname. To do this, simply follow the given syntax:
sudo hostnamectl set-hostname <new_Hostname_Here>
Let’s change the hostname to “DSServer” by using the following hostnamectl command:
sudo hostnamectl set-hostname DSServer
After that, verify the change using the hostname command:
You have successfully changed the hostname using the hostnamectl command.
Method 5: Using the GUI
Lastly, you can always use GNOME to change your hostname. For this, simply open up “applications” and search for “settings”:
In Settings, scroll the left-side navigation bar to the very bottom and click on the “About” tab:
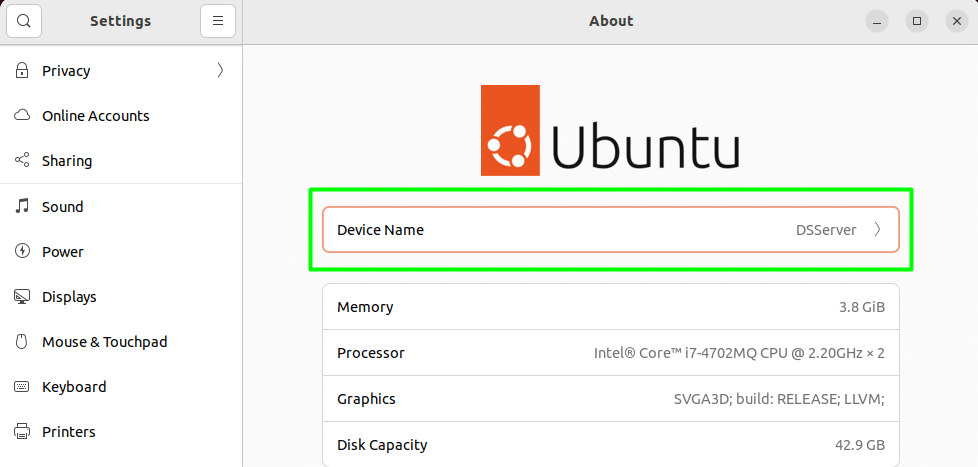
After that, click on the “Device name” bar:
After that, a pop window will open up. Type in the new hostname in this pop-up window and click on the “Rename” button:
You can verify it using the hostname command:

Congratulations! You have successfully changed your hostname using the GUI. That’s it for this guide.
Dracula VPS Hosting Service
Dracula Servers offers high-performance server hosting at entry-level prices. The plans include Linux VPS, Sneaker Servers, Dedicated Servers & turnkey solutions. If you’re looking for quality self-managed servers with high amounts of RAM and storage, look no further.
Check the plans for yourself by clicking Here!
Wrap up
The hostname is a crucial part of a Linux machine connected to a network. The user can change the hostname of the Linux machine using any of the methods mentioned in this guide. Check out other Linux Tutorials here!
Subscribe
Login
0 Comments
Oldest


