![]()
Secure phpMyAdmin against PLEASE_READ.WARNING Attack
phpMyAdmin is a free and open-source MariaDB and MySQL management tool. It’s among the most popular web-based tools that enable you to manage databases, execute SQL queries, manage accounts, export, and import data and much more.
Unfortunately, it’s a target for hacking attempts, and if those attempts succeed they can cause irreparable damage as hackers can steal or delete sensitive information.
For that reason, you should keep phpMyAdmin updated, as it will have the latest patches against recent exploits, and secure it against automated attacks by adding extra layers of security.
Having software that is not up to date on servers is a risky move. In 2019, phpMyAdmin has been the target of random attacks from botnets.
Table of Contents
PLEASE_READ.WARNING Attack
This attack deletes all the databases it finds and replaces them with a table name WARNING containing “To recover your lost data SEND BTC”. There are serveral variations that may ask for different BTC sums or have a different database name.
It appears that the attacker only deletes the data and there isn’t a way to recover them from the attacker, but this may be different from case to case. One of the people that have first detected the attack has written a detailed description.
A database exploited by this attack will look like the picture below.

In this tutorial we’ll learn how to manually update phpMyAdmin to the latest version, change phpMyAdmin default access URL and add an authentication gateway that requires an extra set of credentials before logging in. This tutorial is aimed at phpMyAdmin running with Apache Web Server on Ubuntu 18.04
Need Help?
Have a server from a different provider and need help? Hit us up!
We offer various services to assist you in achieving your business goal. Working in the industry, we've gained proficiency various areas related to hosting.
[Proficiencies Include] - RADIUS
- WHMCS
- LAMP Stack
- LEMP Stack
- VPN Protocols
- SMTP
- Remote Desktop Solutions
- Linux in general
- WHMCS
- LAMP Stack
- LEMP Stack
- VPN Protocols
- SMTP
- Remote Desktop Solutions
- Linux in general
Hire Us
How to Update phpMyAdmin to the latest Version
First, install phpMyAdmin from the official Ubuntu repositories:
$ sudo apt-get install phpmyadminNow, change directory into /usr/share:
$ sudo cd /usr/shareRemove the phpMyAdmin directory:
$ sudo rm -rf phpmyadminUse wget to download the latest phpMyAdmin version. You can find the packages with the latest version here phpMyAdmin – Downloads.
The current latest version at the time of writing is 4.8.5, so we’ll download that one:
$ wget -P /usr/share/ https://files.phpmyadmin.net/phpMyAdmin/4.8.5/phpMyAdmin-4.8.5-english.zipNext, unzip it:
$ unzip phpMyAdmin-4.8.5-english.zipFinally we rename the unzipped folder phpMyAdmin-4.8.5-english to phpmyadmin:
$ mv phpMyAdmin-4.8.5-english phpmyadminIMPORTANT
If you log into phpMyAdmin now, you’ll see two errors:
the configuration file now needs a secret passphrase (blowfish_secret). phpmyadmin
The $cfg['TempDir'] (./tmp/) is not accessible. phpMyAdmin is not able to cache templates and will be slow because of this.
To fix the first error, just run the following:
$ cd /usr/share/phpmyadmin
$ cp config.sample.inc.php config.inc.php
Now you’ll have to add a Blowfish Secret in config.inc.php. To do this, visit the following link to generate a Blowfish Secret https://www.motorsportdiesel.com/tools/blowfish-salt/pma/. Copy the secret so we can paste it into config.inc.php.
When you’ve copied it, open the file config.inc.php:
$ sudo nano config.inc.phpAnd paste in the Blowfish Secret – you’ll notice the section right away. In my case right now, it’s t&GeQ>FhO@sG]/b*&Y9lVG1mh\UQ3CYP
Credit goes to user CRIMSON 501 from askubuntu.com for the Blowfish Secret generator made especially for phpMyAdmin.
Here’s how the section should look after you’ve pasted it in:
/**
 * This is needed for cookie based authentication to encrypt password in
 * cookie. Needs to be 32 chars long.
 */
$cfg['blowfish_secret'] = 't&GeQ>FhO@sG]/b*&Y9lVG1mh\UQ3CYP'; /* YOU MUST FILL IN THIS FOR COOKIE AUTH! */
Save and close the file.
Lastly, we need to create a tmp directory for phpMyAdmin and give Apache ownership over it:
$ sudo mkdir tmp
$ sudo chown -R www-data:www-data /usr/share/phpmyadmin/tmp
Well done. You’ve not upgraded your phpMyAdmin to the latest version.
Changing Default phpMyAdmin Location
As attackers will probe for common locations on any software they’re trying to hack, we’ll change the default path
http://domain_or_IP/phpmyadmin
to
https://domain_or_IP/somethingunexpected
To change the phpMyAdmin default access URL on Ubuntu 18.04, open /etc/apache2/conf-enabled/phpmyadmin.conf using your favorite text editor:
$ sudo nano /etc/apache2/conf-enabled/phpmyadmin.confAmong first lines ( line 3 ) you’ll see:
Alias /phpmyadmin /usr/share/phpmyadminChange it to something unexpected like:
Alias /castleentrance /usr/share/phpmyadminRestart Apache:
$ sudo service apache2 restartNow you should be able to access phpMyAdmin by visiting:
https://domain_or_IP/castleentranceAdd Auth Gateway to phpMyAdmin
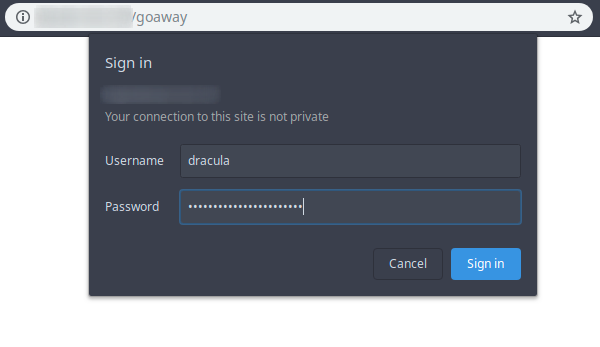
As an additional layer of security, we can add a popup that requires an extra login, before our usual phpMyAdmin login.
To do this on Ubuntu 18.04, open the Apache configuration file and add these lines to it:
    AuthType Basic
    AuthName "Restricted Content"
    AuthUserFile /etc/apache2/.htpasswd
    Require valid-user
To give you a complete example, here’s how mine looks after adding the lines:
        # The ServerName directive sets the request scheme, hostname and port that
        # ...
        #ServerName www.example.com

        ServerAdmin webmaster@localhost
        DocumentRoot /var/www/html

        # Available loglevels: trace8, ..., trace1, debug, info, notice, warn,
        # ...
        #LogLevel info ssl:warn

        ErrorLog ${APACHE_LOG_DIR}/error.log
        CustomLog ${APACHE_LOG_DIR}/access.log combined

        # For most configuration files from conf-available/, which are
        # ...
        #Include conf-available/serve-cgi-bin.conf


            AuthType Basic
            AuthName "Restricted Content"
            AuthUserFile /etc/apache2/.htpasswd
            Require valid-user


# vim: syntax=apache ts=4 sw=4 sts=4 sr noet
Save and close the file when you’re done.
Now use htpasswd to generate a password file for an account that will be allowed to access the phpMyAdmin login page on Ubuntu 18.04. I’ll use the username dracula, but you can use anything you want:
$ sudo htpasswd -c /etc/apache2/.htpasswd draculaYou’ll be prompted to create a password and enter it again to confirm it.
Finally we’ll change the permissions for the file, to prevent anyone not in the www-data or apache group from being able to access it:
$ sudo chmod 640 /etc/apache2/.htpasswd
$ chgrp www-data /etc/apache2/.htpasswd
And you’re done.
Now you can go to your phpMyAdmin access URL and you should be prompted for the extra credentials.
After changing the phpMyAdmin access URL and added the extra authentication gateway, here’s how it looks like:
Conclusion
Well done. You’ve learned how to manually upgrade phpMyAdmin and add 2 extra layers of security to your phpMyAdmin installation.
Need Help?
Have a server from a different provider and need help? Hit us up!
We offer various services to assist you in achieving your business goal. Working in the industry, we've gained proficiency various areas related to hosting.
[Proficiencies Include] - RADIUS
- WHMCS
- LAMP Stack
- LEMP Stack
- VPN Protocols
- SMTP
- Remote Desktop Solutions
- Linux in general
- WHMCS
- LAMP Stack
- LEMP Stack
- VPN Protocols
- SMTP
- Remote Desktop Solutions
- Linux in general
Hire Us
Thanks a lot, very well explained. A question, this attack could be executed also in windows based systems?