![]()
Install and Configure FreeRADIUS on Ubuntu 18.04 with MySQL
What is FreeRADIUS?
FreeRADIUS is an authentification, authorization and accounting protocol. It was built in the dial-up era to manage users and keep track of the bandwidth usage by each connection for billing purposes. In this article, we will teach you how to install FreeRADIUS
It is still a very strong tool to use even today. It is fast to set up and many networking programs like OpenVPN, SotfEther, Squid proxy and wifi managing tools can be integrated with FreeRADIUS.
Table of Contents
- What is FreeRADIUS?
- How to set up a RADIUS server?
- Method 1— The Easy Way – 5 minutes
- Method 2— The Hard Way
- Step 1 — Install FreeRADIUS 3 and FreeRADIUS modules
- Step 2 — Install php
- Step 3 — MySQL Server
- Step 4 — MySQL Root Password config
- Step 5 — Create the FreeRADIUS database schema
- Step 6 — Set FreeRADIUS to use SQL
- Step 7 — Edit the radius SQL module’s config
- Step 8 — Run FreeRADIUS
- Step 9 — GUI WebPanel
- Step 10 — Create a NAS Client & User
- Step 10 — Testing with NTRadPing
- Step 11 — Final Notes
How to set up a RADIUS server?
There are two ways of setting up the FreeRADIUS server:
1. The hard way: installing it via a putty terminal and manually configuring it and troubleshooting. This method usually takes about 30 minutes if you know what you’re doing, and several hours if you’re a newbie.
2. The easy way: creating a new server instance and selecting the FreeRADIUS Ubuntu template from our DraculaServers. This takes about 1 minute and everything works straight out of the box. You can deploy a radius server as described in this tutorial in 1 minute. To order a KVM Radius Server, click here.
Method 1— The Easy Way – 5 minutes
In 2019, there is no need to dive deep into the terminal for setting up a radius server. There is the option of getting a VPS that has the option of deploying radius. Find more about it.
Pre-Installed FreeRADIUS Servers
Automatic FreeRADIUS 3 + daloRADIUS Set Up
Instantly deploy machines with FreeRADIUS + MySQL + daloRADIUS GUI Panel already set up, receive the credentials and take over from there! You also get our custom WHMCS Module to help you manage it from our dashboard.
Pick one of our FreeRADIUS KVM plans
P.S. We're available for hire, if you need help. Click here to contact us.
Method 2— The Hard Way
Good on you for not being afraid of getting your hands dirty! Let’s proceed with the manual FreeRADIUS install. If you don’t have 1 hour to waste, you can order a VPS that comes with FreeRADIUS already installed here.
Installing FreeRADIUS on Ubuntu 20.04: For an updated version of this tutorial for Ubuntu 20.04, we recommend checking out this article Install FreeRADIUS & daloRADIUS on Ubuntu 20.04 + MySQL/MariaDB
Step 1 — Install FreeRADIUS 3 and FreeRADIUS modules
apt-get update
apt-get install freeradius freeradius-mysql freeradius-utils -y
Step 2 — Install php
apt-get install php-common php-gd php-curl php-mysql -y
Step 3 — MySQL Server
apt-get install mysql-server mysql-client -y
Depending on the MySQL version, you may be asked to set the MySQL root password. We will handle both scenarios in this tutorial.
Step 4 — MySQL Root Password config
If you were asked for a root password at the previous step, you can skip this.
Run the MySQL Secure to setup a root password and other settings.
$ mysql_secure_installation
VALIDATE PASSWORD PLUGIN can be used to test passwords
and improve security. It checks the strength of password
and allows the users to set only those passwords which are
secure enough. Would you like to setup VALIDATE PASSWORD plugin?

Press y|Y for Yes, any other key for No:
If you know how to chose a strong password, select No.
Change the password for root ? ((Press y|Y for Yes, any other key for No) : y
Select Y and set your root password.
Step 5 — Create the FreeRADIUS database schema
mysql -uroot -pPasswordForRootSql
CREATE DATABASE radius;
exit
Now that we have a database, let’s populate it with the radius schema.
cd /etc/freeradius/3.0/mods-config/sql/main/mysql/

mysql -uroot -pYourMysqlPass radius < schema.sql
mysql -uroot -pYourMysqlpass radius < setup.sql
Step 6 — Set FreeRADIUS to use SQL
FreeRADIUS comes by default set to use files for users.
cd /etc/freeradius/3.0/mods-enabled
ln -s ../mods-available/sql sql
Open the “default” config file with your favorite text editor.
cd /etc/freeradius/3.0/sites-available/
vim default
For all categories, remove the “file” directive and add the “sql” one. This will instruct FreeRADIUS to relly on the database for user management.
authorize {
.....
sql
....
}
accounting {
......
sql
....
}
post-auth {
......
sql
....
}
session{
......
sql
.....}
Step 7 — Edit the radius SQL module’s config
Open the configuration file:
cd /etc/freeradius/3.0/mods-available
vim sql
Modify the following values:
driver = "rlm_sql_mysql"

dialect = "mysql"

 server = "localhost"
 port = 3306
 login = "root"
 password = "YOURMYSQLPASSWORD FROM STEP 4"
 radius_db = "radius"
read_clients = yes
Step 8 — Run FreeRADIUS
Being the first time firing up radius, better use the debug mode by adding “-X”
freeradius -X
If everything is OK you should see something like this.
Listening on auth address 127.0.0.1 port 18120 bound to server inner-tunnel
Listening on auth address * port 1812 bound to server default
Listening on acct address * port 1813 bound to server default
Listening on auth address :: port 1812 bound to server default
Listening on acct address :: port 1813 bound to server default
Listening on proxy address * port 59791
Listening on proxy address :: port 36140
Ready to process requests
Step 9 — GUI WebPanel
You can add a web panel to radius for easy user creation and management.
Please follow this tutorial on how to install the DaloRadius GUI web panel on a radius server, then return to this page to continue.

There are several options out there. Our FreeRADIUS VPS come with DaloRadius installed.
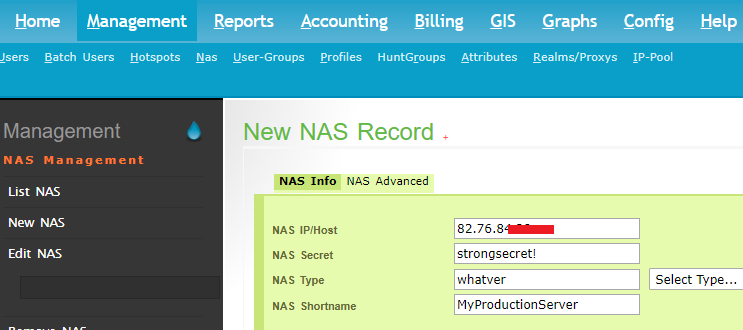
Step 10 — Create a NAS Client & User
For another computer to use our new radius server, it needs to be added in the nas client table in the radius database.
To add a Nas using Daloradius, go to Managemnt > Nas > New Nas
To add an User in DaloRadius, go to Management > Users > New Users
There are plenty of attributes that can be set to users and users groups, but we will not get into that during this tutorial.
Now that we have created a Nas Client and an User, we should test them. Everytime we add a new NAS , we need to reload FreeRADIUS so that it fetches the refreshed table. Close and run radius again:
freeradius -X
Step 10 — Testing with NTRadPing
A very cool tool for testing radius servers is NTRadPing. You can download it here: ntradping.
Add your radius server’s ip, change the port to 1812, insert your NAS secret and User credentials from the previous step.

Clicking “Send” should reply a message.
NTRadPing should display something like this when it succesfully validates an user against the radius server:
Sending authenticatio request to server Xx.xx.xx.xx.:1812
transmiting Packet, code =1 id=11 length=50
recieved response from the server in 187 milliseconds
replay packet code=2 id=11 length=20
response: Access-Accept
-------------------attribute dump------------------
The Freeradius debug output should look something like this when the user is authenticated:
(0) sql: SQL-User-Name set to 'test_user'
(0) sql: EXPAND INSERT INTO radpostauth (username, pass, reply, authdate) VALUES ( '%{SQL-User-Name}', '%{%{User-Password}:-%{Chap-Password}}', '%{reply:Packet-Type}', '%S')
(0) sql:    --> INSERT INTO radpostauth (username, pass, reply, authdate) VALUES ( 'test_user', '0x146391b1d4d16f92e1cfa1c8246cfa5a1d', 'Access-Accept', '2018-12-17 13:58:29')
(0) sql: Executing query: INSERT INTO radpostauth (username, pass, reply, authdate) VALUES ( 'test_user', '0x146391b1d4d16f92e1cfa1c8246cfa5a1d', 'Access-Accept', '2018-12-17 13:58:29')
(0) sql: SQL query returned: success
(0) sql: 1 record(s) updated
rlm_sql (sql): Released connection (2)
(0)     [sql] = ok
(0)     [exec] = noop
(0)     policy remove_reply_message_if_eap {
(0)       if (&reply:EAP-Message && &reply:Reply-Message) {
(0)       if (&reply:EAP-Message && &reply:Reply-Message)  -> FALSE
(0)       else {
(0)         [noop] = noop
(0)       } # else = noop
(0)     } # policy remove_reply_message_if_eap = noop
(0)   } # post-auth = ok
(0) Sent Access-Accept Id 11 from 64.4X.X1.XX:1812 to 82.76.84.XX:61656 length 0
(0) Finished request
Waking up in 4.9 seconds.
(0) Cleaning up request packet ID 11 with timestamp +27
Ready to process requests
Step 11 — Final Notes
It was a bit of work, but you now have a working FreeRADIUS server!
If you’re having issues please keep in mind that DraculaServers offers instant KVM FreeRADIUS Servers.
They come with FreeRADIUS 3 + Daloradius Panel + PhpMyAdmin already installed, so you can focus on your business instead of wasting time troubleshooting various error codes. Please see our FreeRADIUS VPS offer for more details.
You can learn more about radius by reading our Creating a profile with bandwidth limit tutorial.
Pre-Installed FreeRADIUS Servers
Automatic FreeRADIUS 3 + daloRADIUS Set Up
Instantly deploy machines with FreeRADIUS + MySQL + daloRADIUS GUI Panel already set up, receive the credentials and take over from there! You also get our custom WHMCS Module to help you manage it from our dashboard.
Pick one of our FreeRADIUS KVM plans
P.S. We're available for hire, if you need help. Click here to contact us.
Hello, when running FREERADIUS -X
/etc/freeradius/3.0/mods-enabled/sql[89]: Expecting section start brace ‘{‘ after “Connection info:”
Errors reading or parsing /etc/freeradius/3.0/radiusd.conf
How do I get an error message?
hello. if i use this: cd /etc/freeradius/3.0/mods-config/sql/main/mysql/
mysql -uroot -pYourMysqlPass radius < schema.sql
mysql -uroot -pYourMysqlpass radius < setup.sql it show permission deny while am root user
any help
error sorted out
how did you fix the error?
can someone explain Step 6 — Set FreeRADIUS to use SQL (sql vs file thingy)